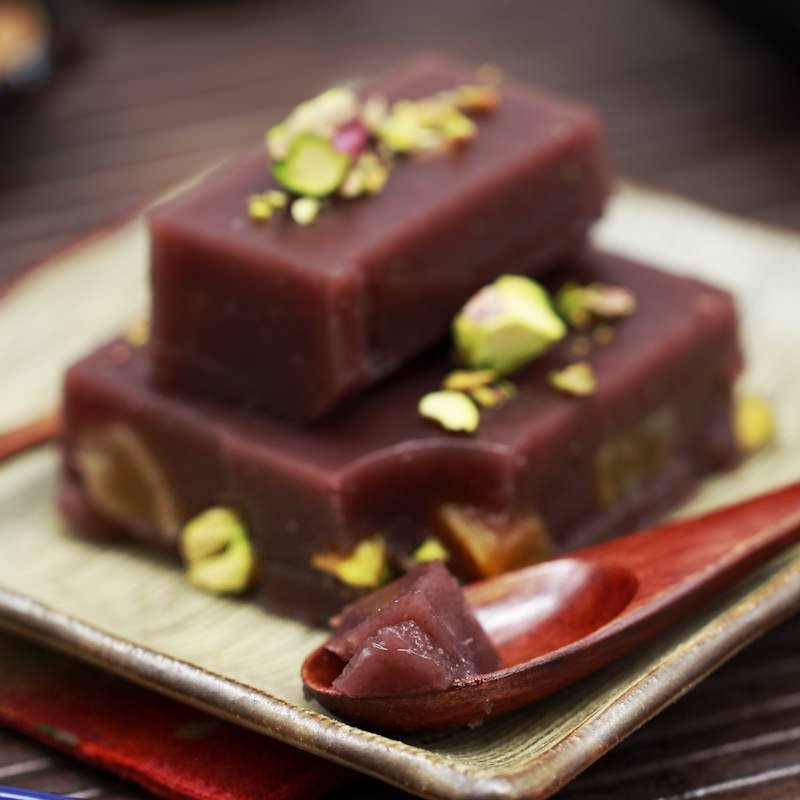
Yokan is a classic Japanese jelly made from red bean paste and agar-agar, which captivates with its gentle sweetness and refined texture. Our recipe shows you passage by passage how you can easily make Yokan at home. The combination of candied apricots and pistachios in particular gives the jelly a modern, fruity-nutty flavour. Whether served with green tea or as a sophisticated dessert – Yokan is always a treat!

What is Yokan?
Yokan is one of the classic wagashi, the traditional Japanese sweets often served with green tea. Originally from China, Yokan has a long history and plays a significant role in Japanese culture.
The name ‘Yokan’ literally means ‘thick sheep’s bone soup’ and refers to the original method of production using sheep’s bone broth. However, with the advent of Buddhism and the ban on meat in Japan, the recipe was adapted: agar-agar (Japanese “kanten”) replaced the animal gelatine, and anko, the sweet paste made from red adzuki beans, was introduced as a base.
Yokan is a jelly made by combining just a few ingredients, such as koshi-an (smooth bean paste), sugar and agar-agar. This minimalist list of ingredients demands the highest quality of each component to achieve the distinctive flavour and creamy, firm consistency.
The dessert is poured into rectangular blocks, sliced and traditionally served with green tea or Matcha. Yokan became a popular delicacy particularly during the Edo period, as sugar became increasingly available. Today, it is not just a sweet, but a piece of cultural heritage, prized for its diversity and versatility.
What types of Yokan are there?
Yokan is available in various forms, differing both in their preparation and flavour. There are three main types that form the basis for numerous flavour variations:
- Neri Yokan
This standard variety has a firm consistency and is made from koshi-an, sugar and agar-agar. The high agar-agar content ensures a dense, compact texture that is easy to cut. - Mizu Yokan
The summer version of Yokan contains more water than Neri Yokan, giving it a lighter, creamier consistency. This variety is often served chilled and is notable for its refreshing taste. - Mushi Yokan
This steamed version is made with wheat flour or kudzu starch instead of agar-agar and has a slightly firmer yet still soft texture.
In addition, there are numerous flavour variations that combine the traditional approach with modern influences:
- Sakura-Yokan: Made with cherry blossom leaves and white bean paste, perfect for cherry blossom season.
- Matcha-Yokan: Made with high-quality green tea powder for a tart, aromatic note.
- Kuri-Yokan: With candied chestnut pieces, particularly popular in autumn.
- Imo-Yokan: A sweet potato variety offering a velvety texture.
Chocolate Yokan: A modern take featuring melted chocolate. Shio Yokan: With a hint of salt to balance the sweetness. Creative ingredients such as candied fruit, nuts or honey also feature in modern interpretations. This variety makes Yokan an exciting sweet treat that satisfies both traditional tastes and modern palates. Making Yokan yourself: Here’s how Homemade Yokan is not only a wonderful way to bring Japanese culture into your own kitchen, but also an impressive dessert for guests. Although the preparation requires precision, it is easy to manage with the right ingredients and utensils. The key ingredients for Japanese red bean jelly: Koshi-an: Smooth red bean paste forms the base. Agar-agar: This plant-based gelling agent ensures the typical consistency. Sugar: For the perfect balance of sweetness and texture. Water: Binds all the ingredients together and determines the density of the jelly. The preparation of the Yokan begins with preparing the mould: line a small baking dish (approx. 20 x 10 cm) with cling film so that the jelly is easier to remove later. For the agar -agar mixture, stir agar-agar and sugar into water, bring everything to the boil and let the mixture simmer for two minutes until the agar-agar has completely dissolved. https://1mal1japan.de/wp-content/uploads/2025/02/Yokan-selber-machen.jpg Making your own Yokan Stir the hot agar mixture into the koshi-an until a smooth, homogeneous mass is formed. Pour a third of the mixture into the prepared mould and leave it to set at room temperature for about 10 minutes. Then spread the candied apricots and pistachios over the layer and carefully cover them with the remaining mixture. Smooth the surface and tap the mould gently to remove any air bubbles. Leave the Japanese red bean jelly to cool at room temperature first, then place it in the fridge for at least two hours. To serve, turn it out onto a chopping board, cut it into 1–2 cm thick slices and enjoy it traditionally with a cup of green tea. Tips for preparation Finding the right consistency: The amount of agar-agar is crucial for the perfect texture. Use a little less if you want a softer, creamier result, and a little more if you want the jelly to be firmer. Experiment with small amounts to find your ideal consistency. Layering without mixing: If you are making Yokan in several layers, allow each layer to set slightly before pouring the next one on top. Ensure that both layers are at a similar temperature so that they do not mix. Perfect presentation: Cut the finished Yokan into even slices using a damp, sharp knife. This keeps the surface smooth and makes the pieces look particularly appetising. Optionally, garnish with chopped pistachios or a pinch of Kinako (roasted soya bean flour) for that special touch. - Schokoladen-Yokan: Moderne Interpretation mit geschmolzener Schokolade.
- Shio-Yokan: Mit einem Hauch Salz, um die Süße auszubalancieren.
Auch kreative Zutaten wie kandierte Früchte, Nüsse oder Honig finden in modernen Interpretationen Platz. Diese Vielfalt macht Yokan zu einer spannenden Süßspeise, die sowohl traditionellen Ansprüchen als auch modernen Geschmäckern gerecht wird.
Yokan selber machen: So geht’s
Selbstgemachtes Yokan ist nicht nur eine wunderbare Möglichkeit, die japanische Kultur in die eigene Küche zu bringen, sondern auch ein beeindruckendes Dessert für Gäste. Die Zubereitung erfordert zwar Präzision, ist jedoch mit den richtigen Zutaten und Utensilien leicht zu bewältigen.
Die wichtigsten Zutaten für japanisches Rote-Bohnen-Gelee:
- Koshi-an: Glatte rote Bohnenpaste bildet die Basis.
- Agar-Agar: Das pflanzliche Geliermittel sorgt für die typische Konsistenz.
- Zucker: Für die perfekte Balance aus Süße und Textur.
- Wasser: Bindet alle Zutaten und bestimmt die Dichte des Gelees.
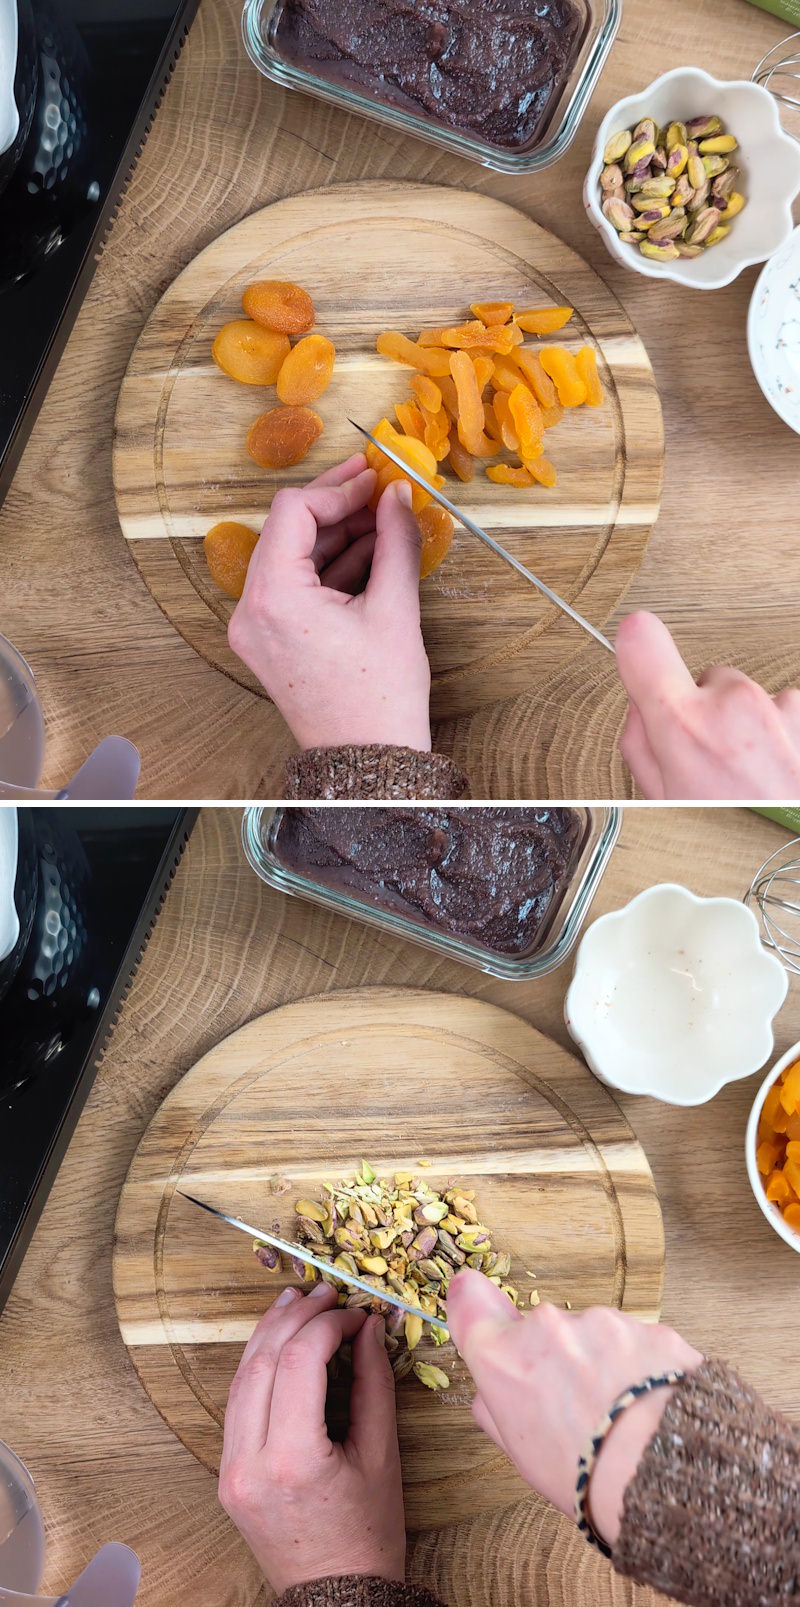
Die Zubereitung des Yokan beginnt mit der Vorbereitung der Form: Lege eine kleine Auflaufform (ca. 20 x 10 cm) mit Frischhaltefolie aus, damit sich das Gelee später leichter herausnehmen lässt. Für die Agar-Agar-Mischung rührst du Agar-Agar und Zucker in Wasser ein, bringst alles zum Kochen und lässt die Mischung zwei Minuten köcheln, bis sich das Agar-Agar vollständig aufgelöst hat.
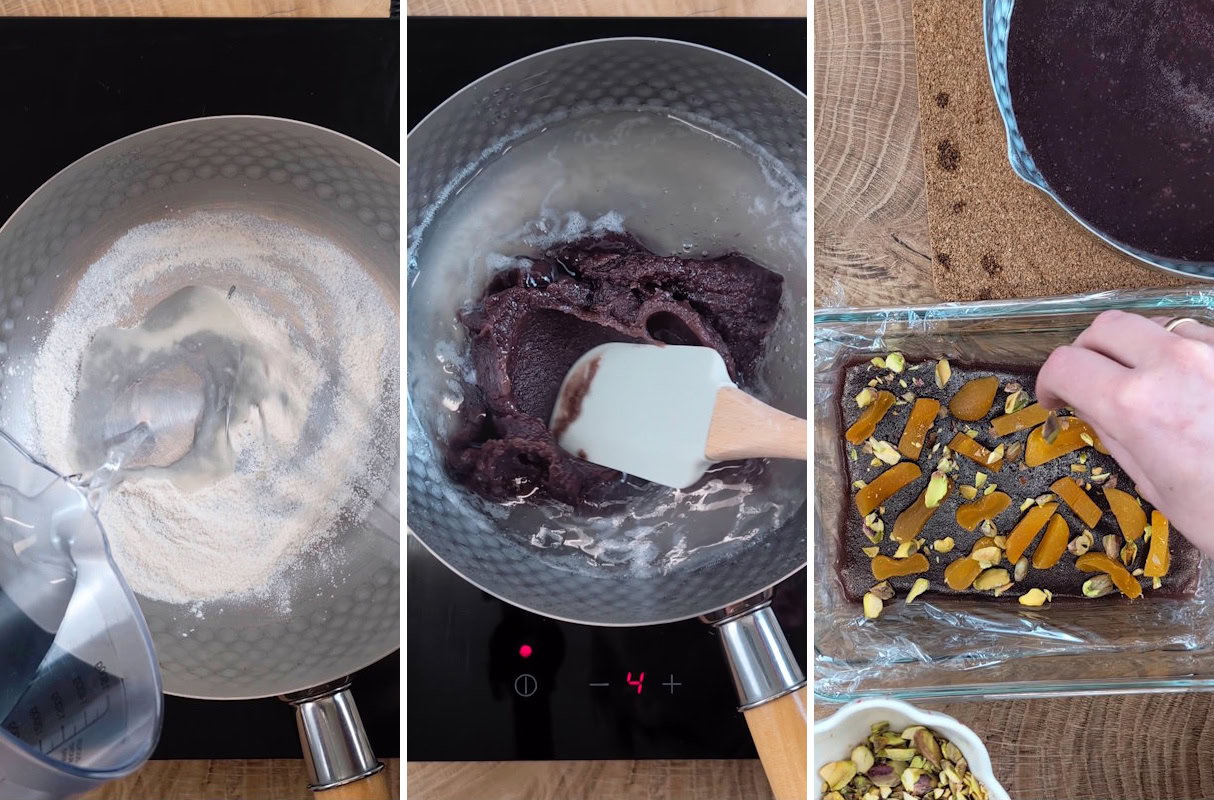
Rühre die heiße Agar-Mischung in die Koshi-an, bis eine glatte, homogene Masse entsteht. Gieße ein Drittel der Masse in die vorbereitete Form und lasse sie etwa 10 Minuten bei Raumtemperatur fest werden. Verteile anschließend die kandierten Aprikosen und Pistazien auf der Schicht und bedecke sie vorsichtig mit der restlichen Masse. Glätte die Oberfläche und klopfe die Form leicht, um Luftblasen zu entfernen.
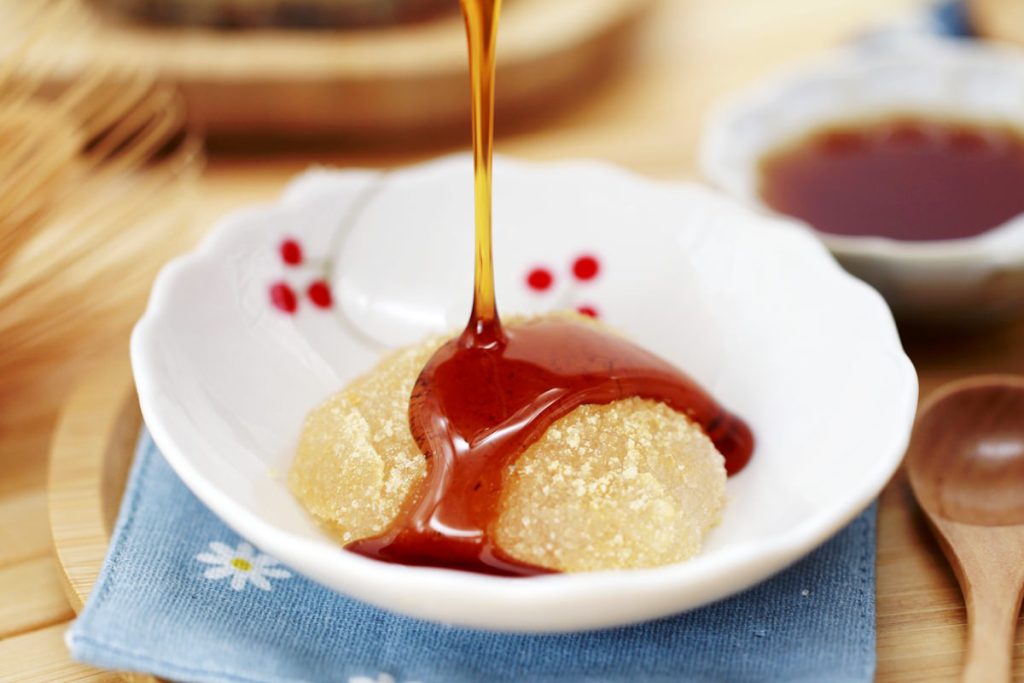
Lasse das japanische Rote-Bohnen-Gelee zuerst bei Raumtemperatur abkühlen und stelle es anschließend für mindestens zwei Stunden in den Kühlschrank. Zum Servieren stürze es auf ein Schneidebrett, schneide es in 1–2 cm dicke Scheiben und genieße es traditionell mit einer Tasse grünem Tee.
Tipps für die Zubereitung
- Die richtige Konsistenz finden: Die Menge des Agar-Agar ist entscheidend für die perfekte Textur. Verwende lieber etwas weniger, wenn du ein weicheres, cremigeres Ergebnis möchtest, und etwas mehr, wenn das Gelee fester sein soll. Experimentiere mit kleinen Mengen, um deine ideale Konsistenz zu finden.
- Schichten ohne Vermischen: Wenn du Yokan in mehreren Schichten zubereitest, lasse jede Schicht erst leicht fest werden, bevor du die nächste darauf gießt. Achte darauf, dass beide Schichten eine ähnliche Temperatur haben, damit sie sich nicht vermischen.
- Perfekte Präsentation: Schneide das fertige Yokan mit einem angefeuchteten, scharfen Messer in gleichmäßige Scheiben. So bleibt die Oberfläche glatt, und die Stücke sehen besonders appetitlich aus. Garniere sie optional mit gehackten Pistazien oder einer Prise Kinako (geröstetes Sojabohnenmehl) für das gewisse Etwas.
How is Yokan served correctly?
The way Yokan is served is just as important as how it is prepared. Traditionally, it is cut into rectangular pieces and served in an elegant presentation alongside tea.
- Serving size: Small, rectangular slices or cubes to create the perfect balance with the bitter tea.
- Accompaniment: Green tea or Matcha bring out the sweetness of the Yokan.
- Presentation: Served on a small porcelain plate with a bamboo skewer to emphasise the elegance of Japanese culture.
- Temperature: Whilst Neri Yokan is served at room temperature, Mizu Yokan is often enjoyed chilled – particularly on hot summer days.
Yokan is also frequently packaged as a fine gift, particularly in Japan, where presentation plays a major role. Due to its high sugar content, this sweet has a long shelf life and is ideal as a gift for special occasions.
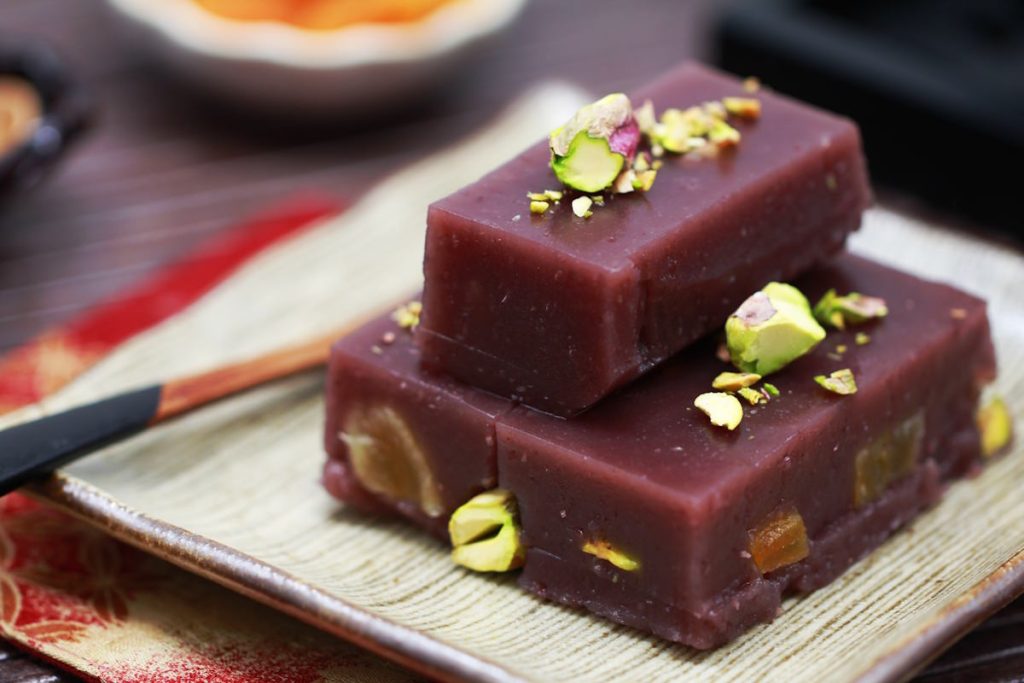
Japanese red bean jelly is more than just a dessert – it is a piece of Japanese history that combines elegance and simplicity in a single dish. Whether you prefer it in the classic style with anko or in a modern twist with chocolate, fruit or nuts – the variety and versatility of this wagashi are impressive. Try it for yourself and discover the harmony between flavour, texture and tradition!
Do you have any questions about the Yokan recipe, or would you like to share your results with the community? Feel free to leave a comment below this post and let me know how your Yokan recipe turned out. Have fun trying it out and enjoy!
Yokan
serves 8 | 20 minutes | 172 kcal
🖨️ Print PDF 📌 Save pinYokan is one of Japan’s oldest desserts and combines tradition with pure elegance. This jelly made from red bean paste, sugar and agar-agar is versatile, easy to prepare and a highlight when served with green tea. With our simple recipe, you’re guaranteed to succeed in making Yokan with candied apricots and pistachios.
Ingredients (8 servings)
300 g Koshi-an (very fine red bean paste, to the recipe)
3 g agar-agar (depending on desired firmness)
10 g sugar
225 ml water
50 g dried apricots
20 g pistachios
Useful tools:
Santoku knife (im Shop ansehen)
Yukihiara pot
Preparation (20 minutes + 2 hours chilling time)
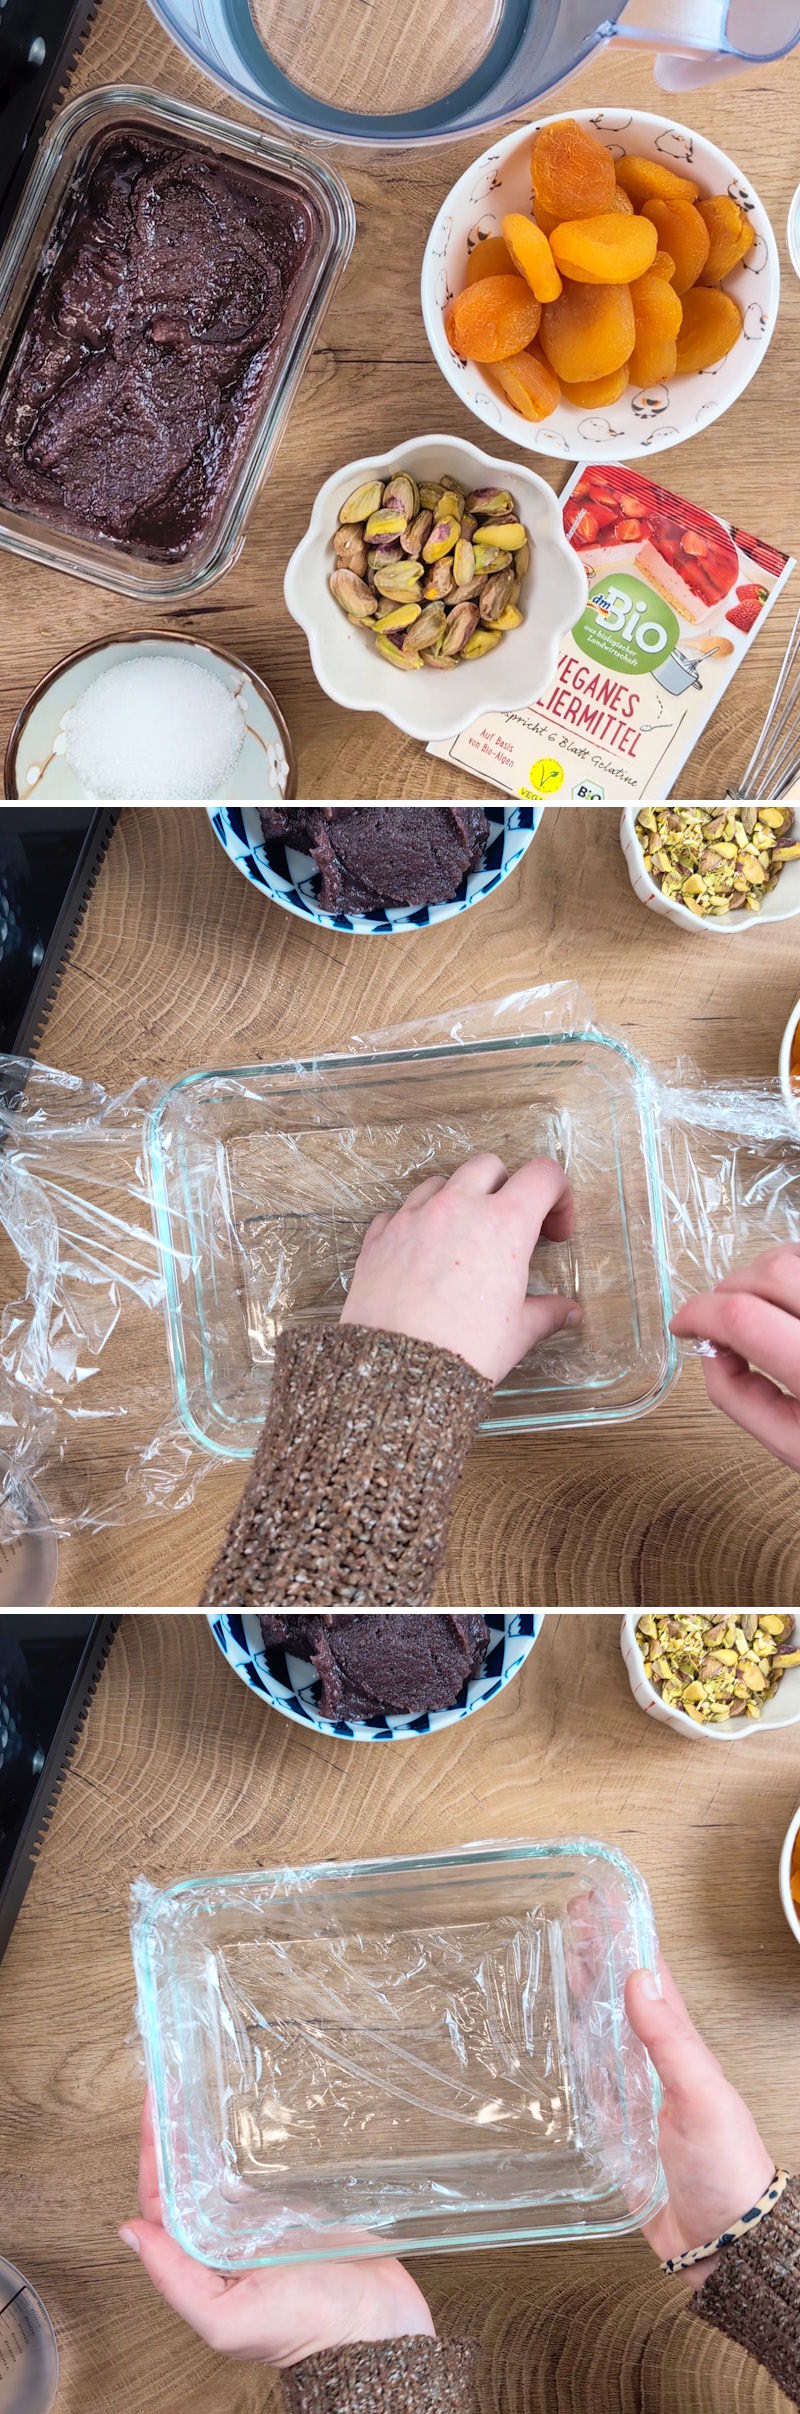
Step 1
Gather the ingredients for the homemade Yokan. Very important: Prepare 300 g of fine Anko (recipe for sweet bean paste) either homemade or store-bought.
Also line a small baking dish (about 20 x 10 cm) with cling film so the Yokan will be easier to remove later. recipes/anko/”>recipe for sweet bean paste) , either homemade or shop-bought.
Also, line a small baking dish (approx. 20 x 10 cm) with cling film so that the Yokan is easier to remove later.
Step 2
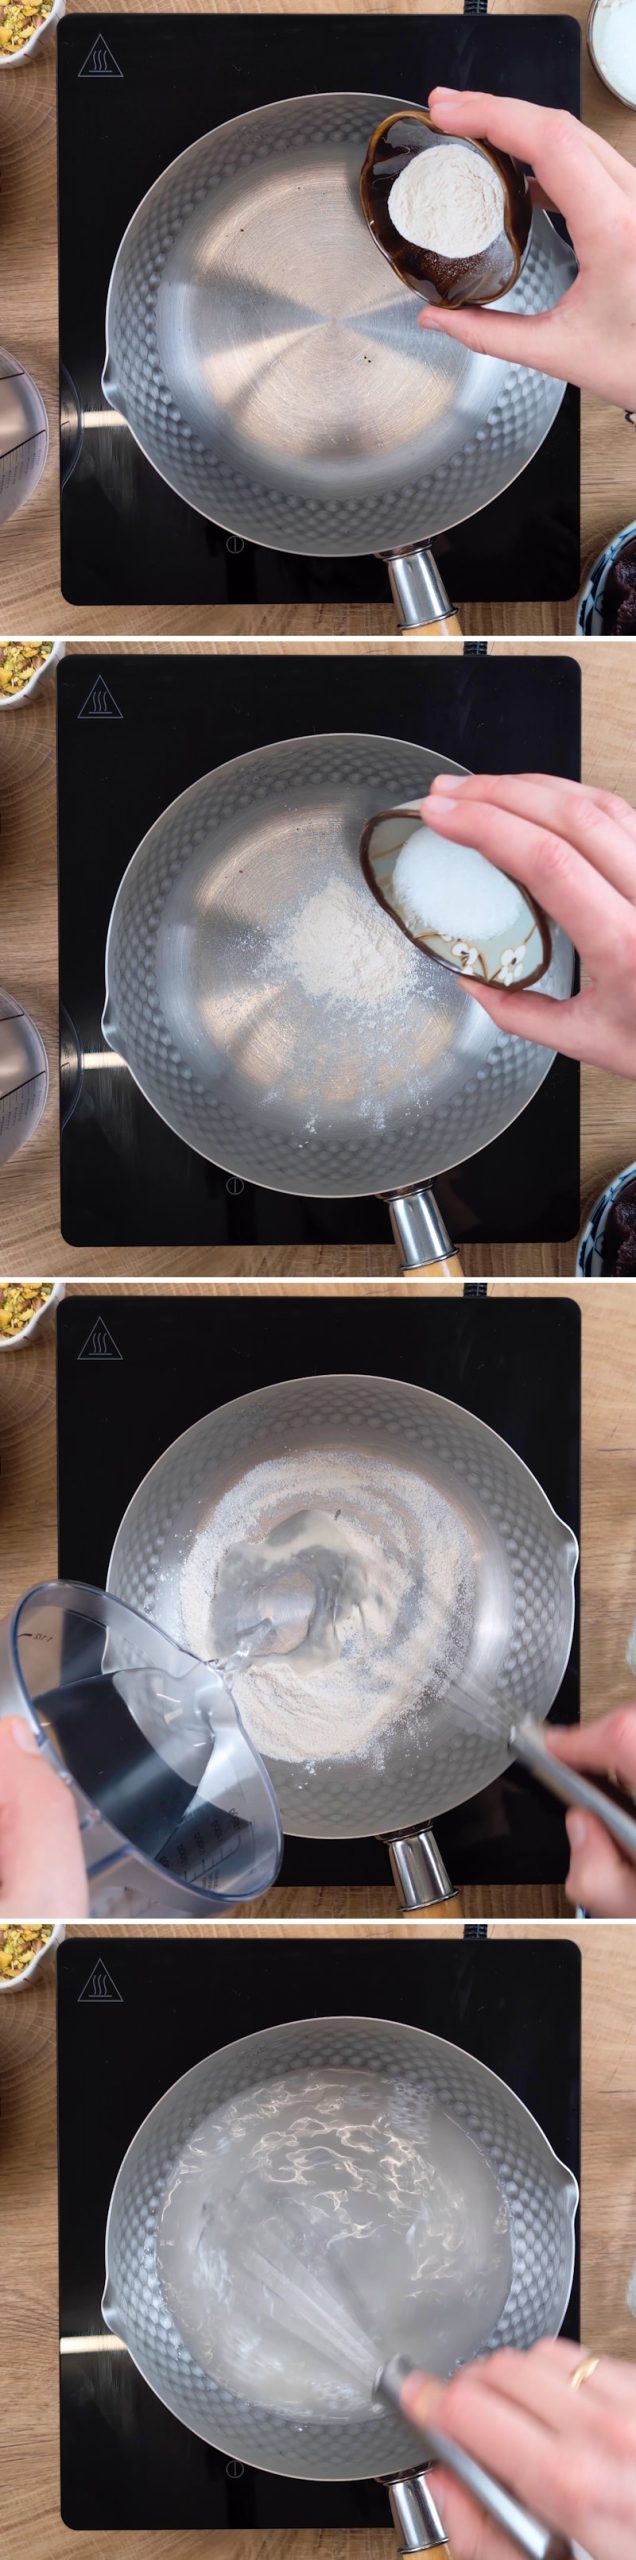
First, let’s prepare the filling: to do so, cut the apricots into smaller pieces and coarsely chop the pistachios .
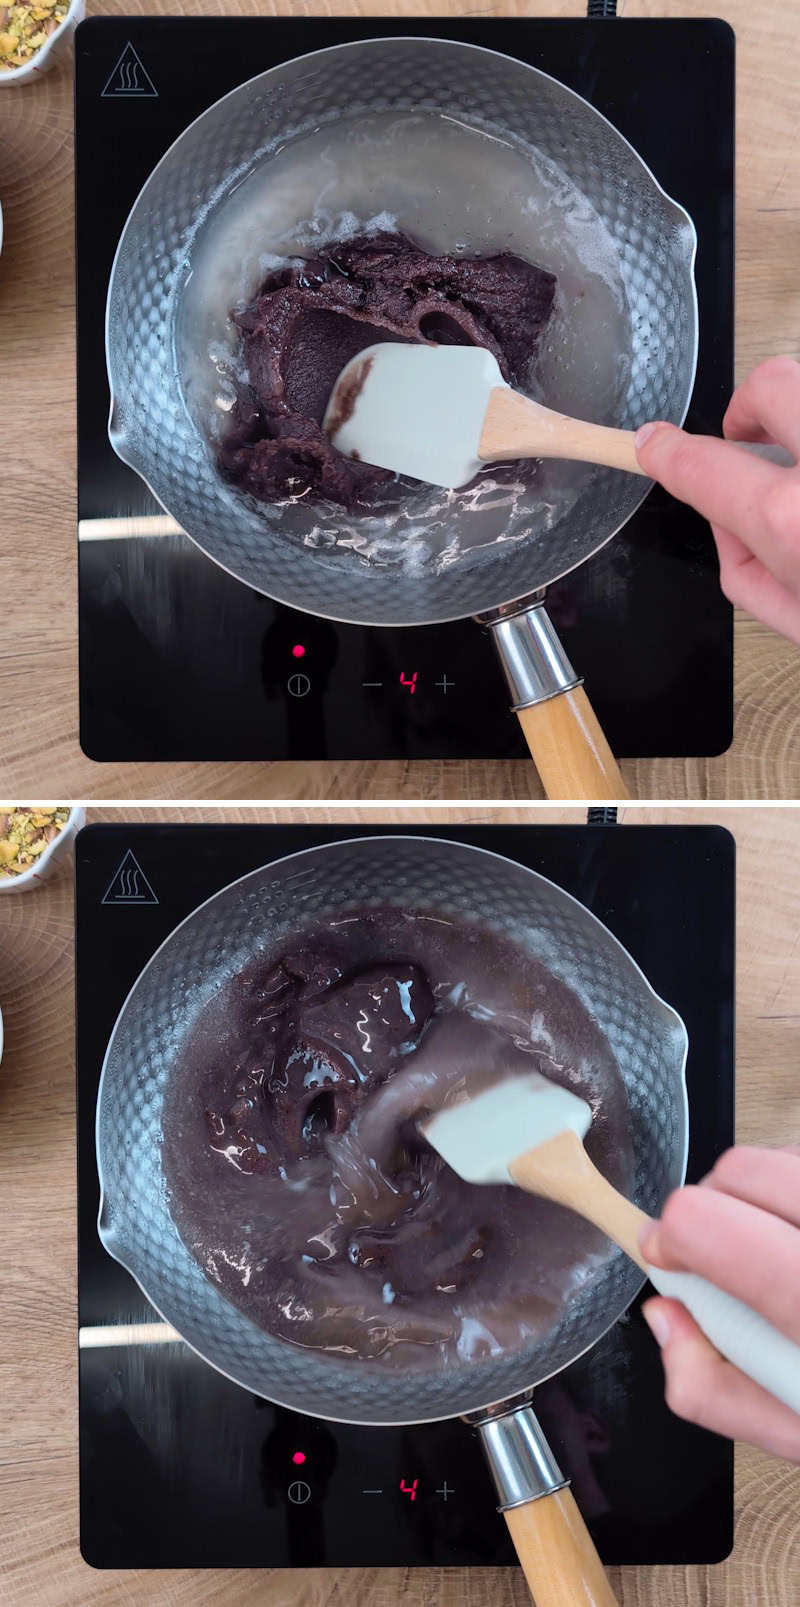
Step 3
Agar-agar powder and sugar into a small saucepan. Add water . Stir well and bring to the boil. Once boiling, reduce the heat and simmer for about 2 minutes, stirring constantly, until the agar-agar has completely dissolved.
Step 4
Stir the bean paste into the hot agar-agar mixture. Mix carefully with a silicone spatula until a smooth, homogeneous mixture is formed. Optional: Add a pinch of salt to balance the sweetness.

Step 5
Pour a third of the red bean mixture into the prepared tin, so that the base is covered to a depth of about 1 cm. Leave to set slightly for 2 minutes at room temperature.
Spread the candied apricot pieces and pistachios evenly over the set layer.
Carefully pour the remaining red bean mixture over the apricots and pistachios so that they are completely covered. Tap the mould gently to remove any air bubbles.
Step 6
Leave the mould to cool at room temperature for 15 minutes, then cover with cling film or a lid. Leave to set in the fridge for at least 2 hours.

Step 7
Remove the Yokan from the mould and place it on a chopping board. Cut into 1–2 cm thick slices and serve. For an elegant presentation, you can sprinkle the pieces with chopped pistachios.