Sprache:
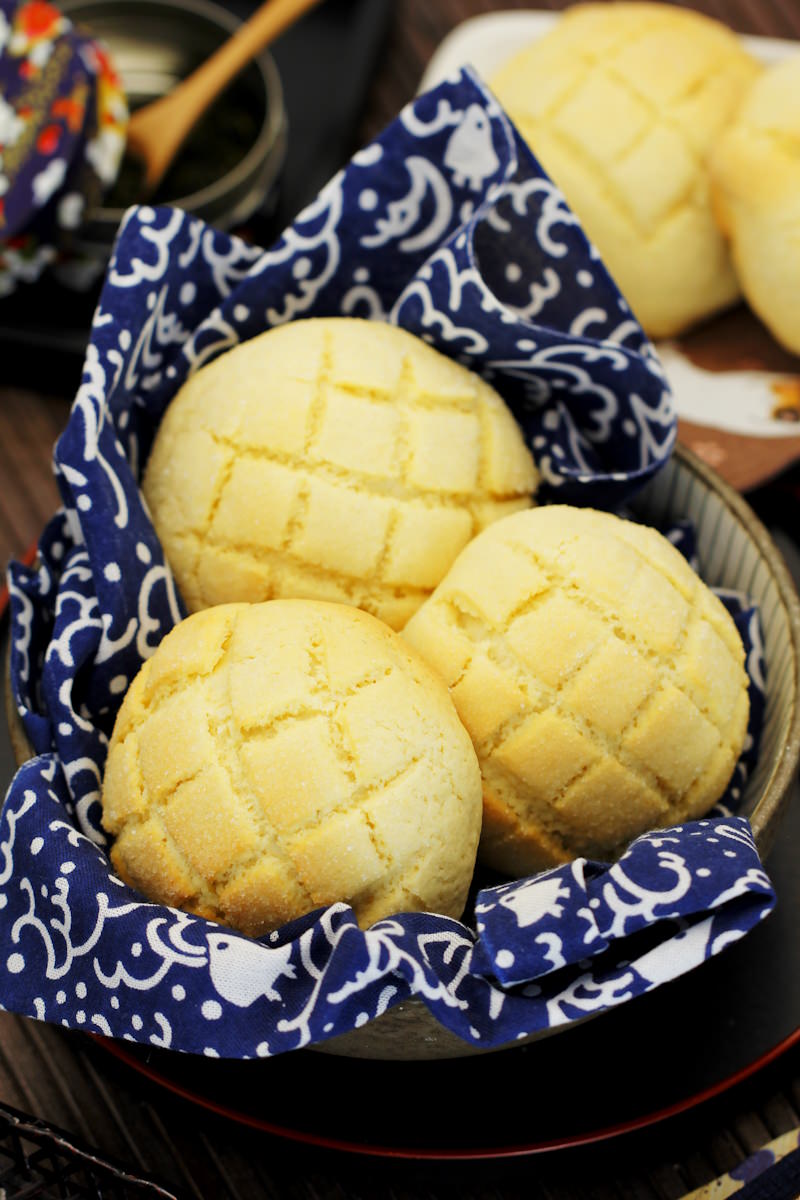
Imagine a fluffy yeast bun, encased in a crispy sponge crust and topped with an enchanting lattice pattern reminiscent of the surface of a sugar melon – Welcome to the tempting world of Melonpan!
Despite its name, which literally means ‘melon bread’, it is not the taste but the design that makes this Japanese classic so special. The best part? You only need simple yet magical ingredients from the supermarket to create this sweet marvel yourself.
Curious? Then let’s delve into the secrets of melonpan together!
What is melonpan?
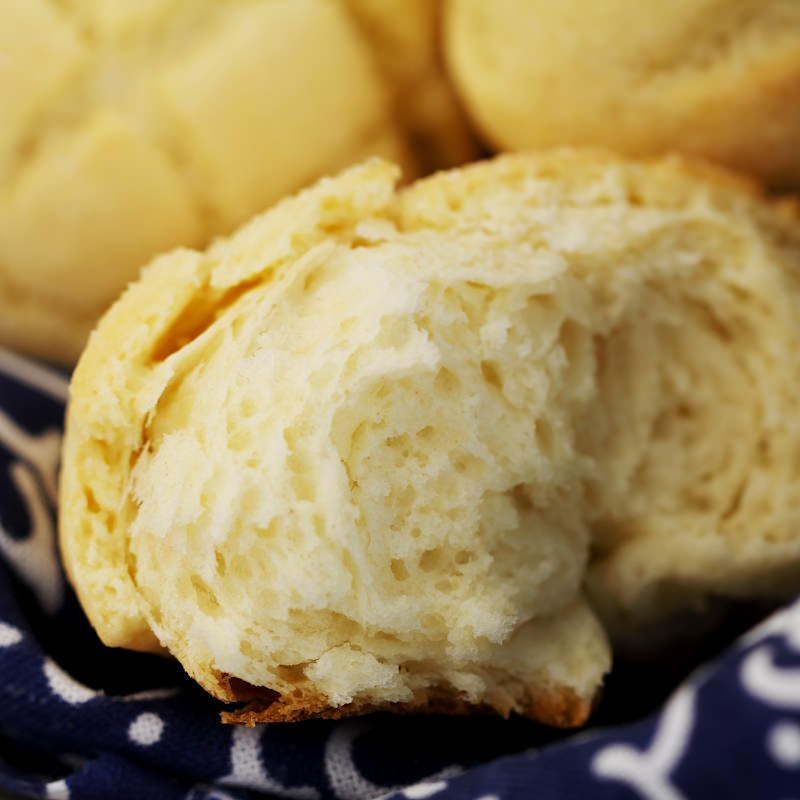
Melonpan, a sweet delicacy with a rich and varied history, is far more than just a piece of pastry. It represents the cultural heritage and creative influences that have shaped Japanese baking over the years. With the first bite, you can feel the crispy biscuit or sponge crust that envelops the soft, fluffy yeast pastry beneath.
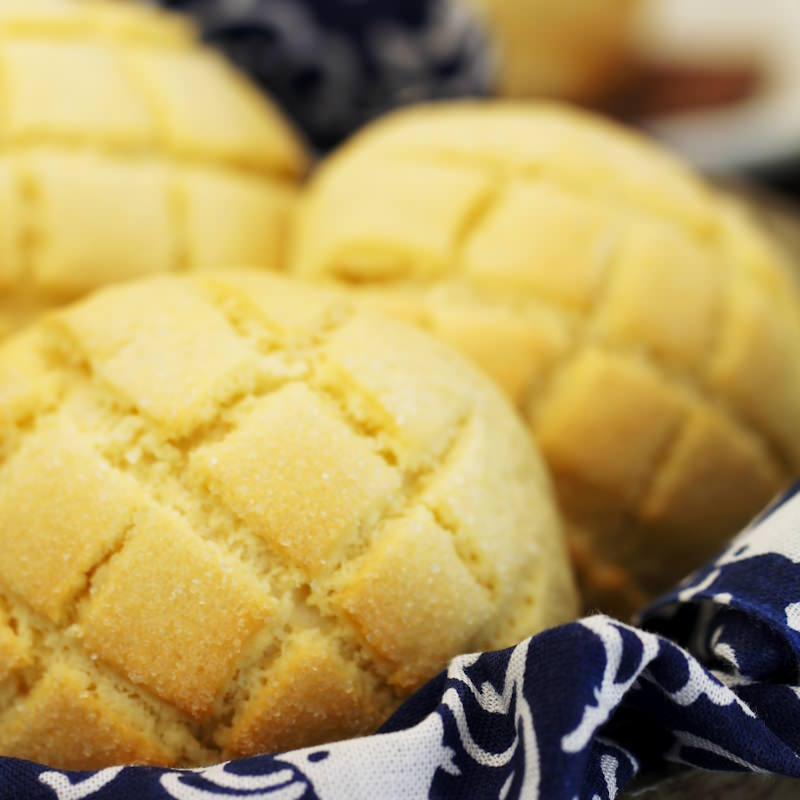
The characteristic lattice pattern visible on the top might, at first glance, be reminiscent of a melon, but surprisingly, the traditional recipe has nothing to do with the taste or the flesh of a melon. The word ‘pan’ for bread has its origins in Portuguese and demonstrates once again how different cultures have influenced the development of melonpan.
The history of melon pan takes us back to the Taisho era. During this period, a round bread with a biscuit or sponge crust was introduced in the western and south-western regions of Japan, particularly in Osaka and Hiroshima. This bread became known as “Sunrise (サンライズ)”. The name “Melon Pan” for this pastry became popular because its appearance is reminiscent of a muskmelon, a fruit that was highly prized then and remains so today.
This history makes melon pan a fascinating part of Japanese cuisine, a treat for both the palate and the mind.
Why do we love melon pan?
On my last trip to Japan, I discovered a quaint little bakery in a narrow alleyway. The aroma? Simply heavenly! One pastry in particular caught my eye: melon pan. A crispy crust, a fluffy interior – a dream!
Back home, I got to work in the kitchen to recreate that exact flavour. After a few fun baking experiments, I’ve done it! This recipe brings the taste of Japan straight to you.
And don’t worry: you can easily knead the dough by hand or use a mixer. So, let’s get to work and take a little trip to Japan – at least in culinary terms!
What do we need for melon pan?
Fortunately, the ingredients for this special pastry are quite standard and easy to find. The exact recipe and quantities follow below:
- Flour
- Sugar
- Salt
- Potato starch
- Yeast
- Baking powder
- Eggs
- Milk
- Butter
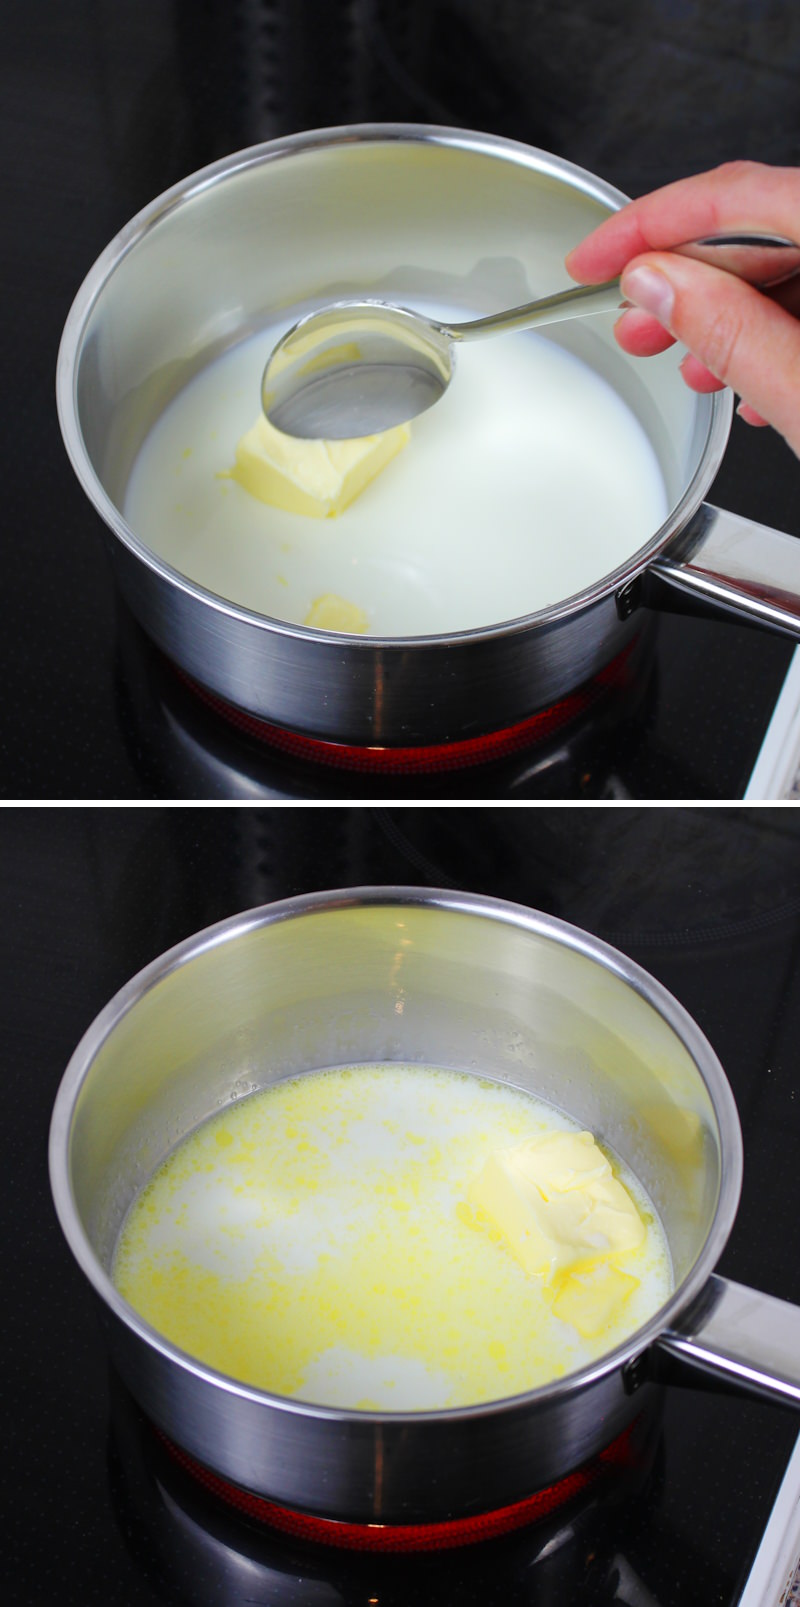
Start with the yeast dough by heating the milk and butter together and then leaving them to cool. Mix the cooled mixture with the flour, starch, sugar, salt, dried yeast and egg, and leave the dough to rise for about an hour until it has doubled in size.
Whilst the dough is rising, prepare the shortcrust pastry: mix softened butter, sugar, egg, flour, cornflour and baking powder into a smooth dough. Then divide both the shortcrust and yeast dough balls into 10 portions each. Roll out each shortcrust dough ball and place it over a yeast dough ball.
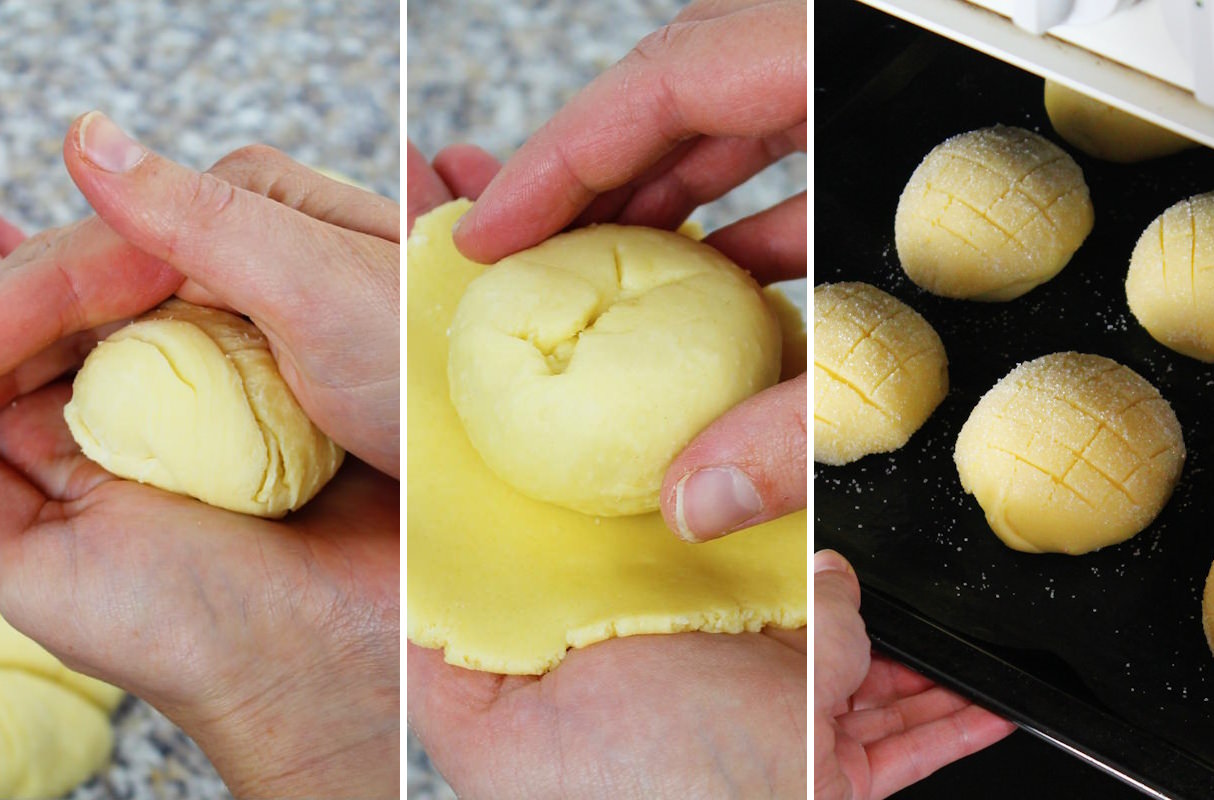
Dip the combined balls in sugar and place them on a prepared baking tray. Then lightly score the surface of each melonpan with a lattice pattern. Leave the melonpan to rise for another 30 minutes and, in the meantime, preheat the oven to 180°C.
Bake the melonpan for 13–15 minutes until lightly browned. They should be left to cool after baking, but taste best when served warm. Leftover melonpan can be stored in an airtight container or frozen.

The world of melon pan is diverse! There are versions with chocolate chips, cocoa powder or even Matcha. Some bakeries add a creamy vanilla filling, which offers an extra flavour experience. Despite all these delicious variations, today’s recipe is the classic version.
Now that you know more about this fascinating and delicious pastry, why not roll up your sleeves and get baking?
If you have any questions or suggestions, please feel free to use the comments section below the recipe 😊 . Have fun and good luck making traditional Japanese melonpan!
Melonpan
Makes 10 | 180 minutes | 307 kcal
🖨️ Print PDF 📌 Save this pinImagine a fluffy yeast bun, encased in a crispy sponge crust and crowned with an enchanting lattice pattern reminiscent of the surface of a sugar melon – welcome to the tempting world of melon pan! All you need are simple, but magical ingredients from the supermarket to create this sweet marvel yourself. Curious? Then let’s delve into the secrets of melonpan together!
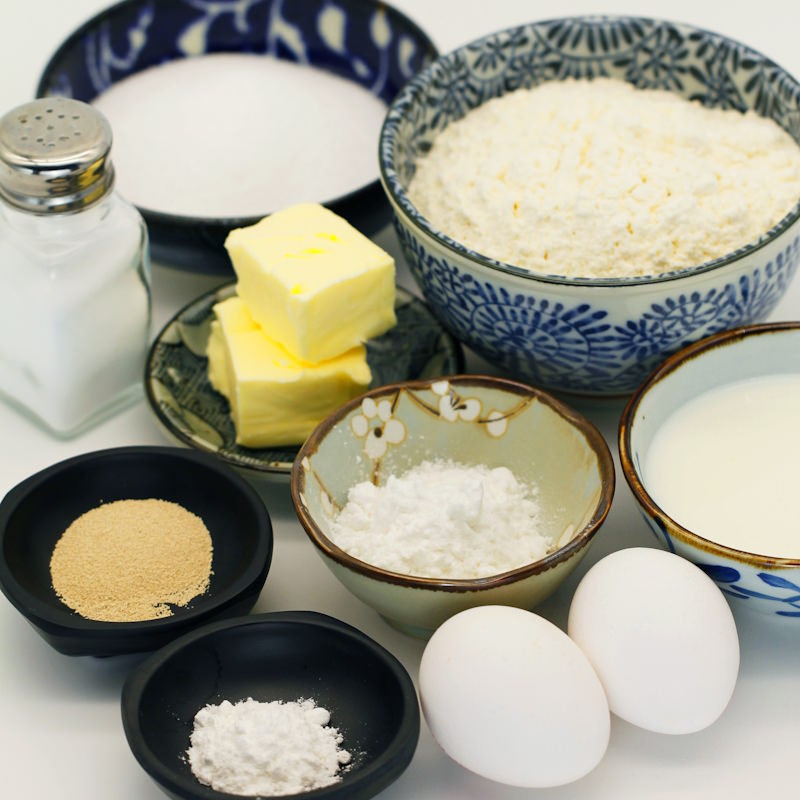
Ingredients (for 10 pieces)
For the yeast dough:
250 g flour (e.g. type 550 wheat flour)
5 g potato starch (im Shop ansehen)
½ tsp salt
4 tbsp sugar
4 g yeast (here: dried yeast)
100 ml milk
35 g butter
1 egg
For the biscuit dough:
60 g butter (at room temperature)
100 g sugar
1 egg
200 g flour (e.g. type 550 wheat flour)
5 g potato starch
½ tsp baking powder
For the topping:
4 tbsp sugar
Preparation (3 hours)
Step 1
Prepare the ingredients for homemade melonpan.
Step 2
First, let’s prepare the yeast dough: To do this, pour the milk into a small saucepan and add the butter . Heat both slowly and remove from the heat as soon as the butter has melted. Leave to cool briefly.
Step 3
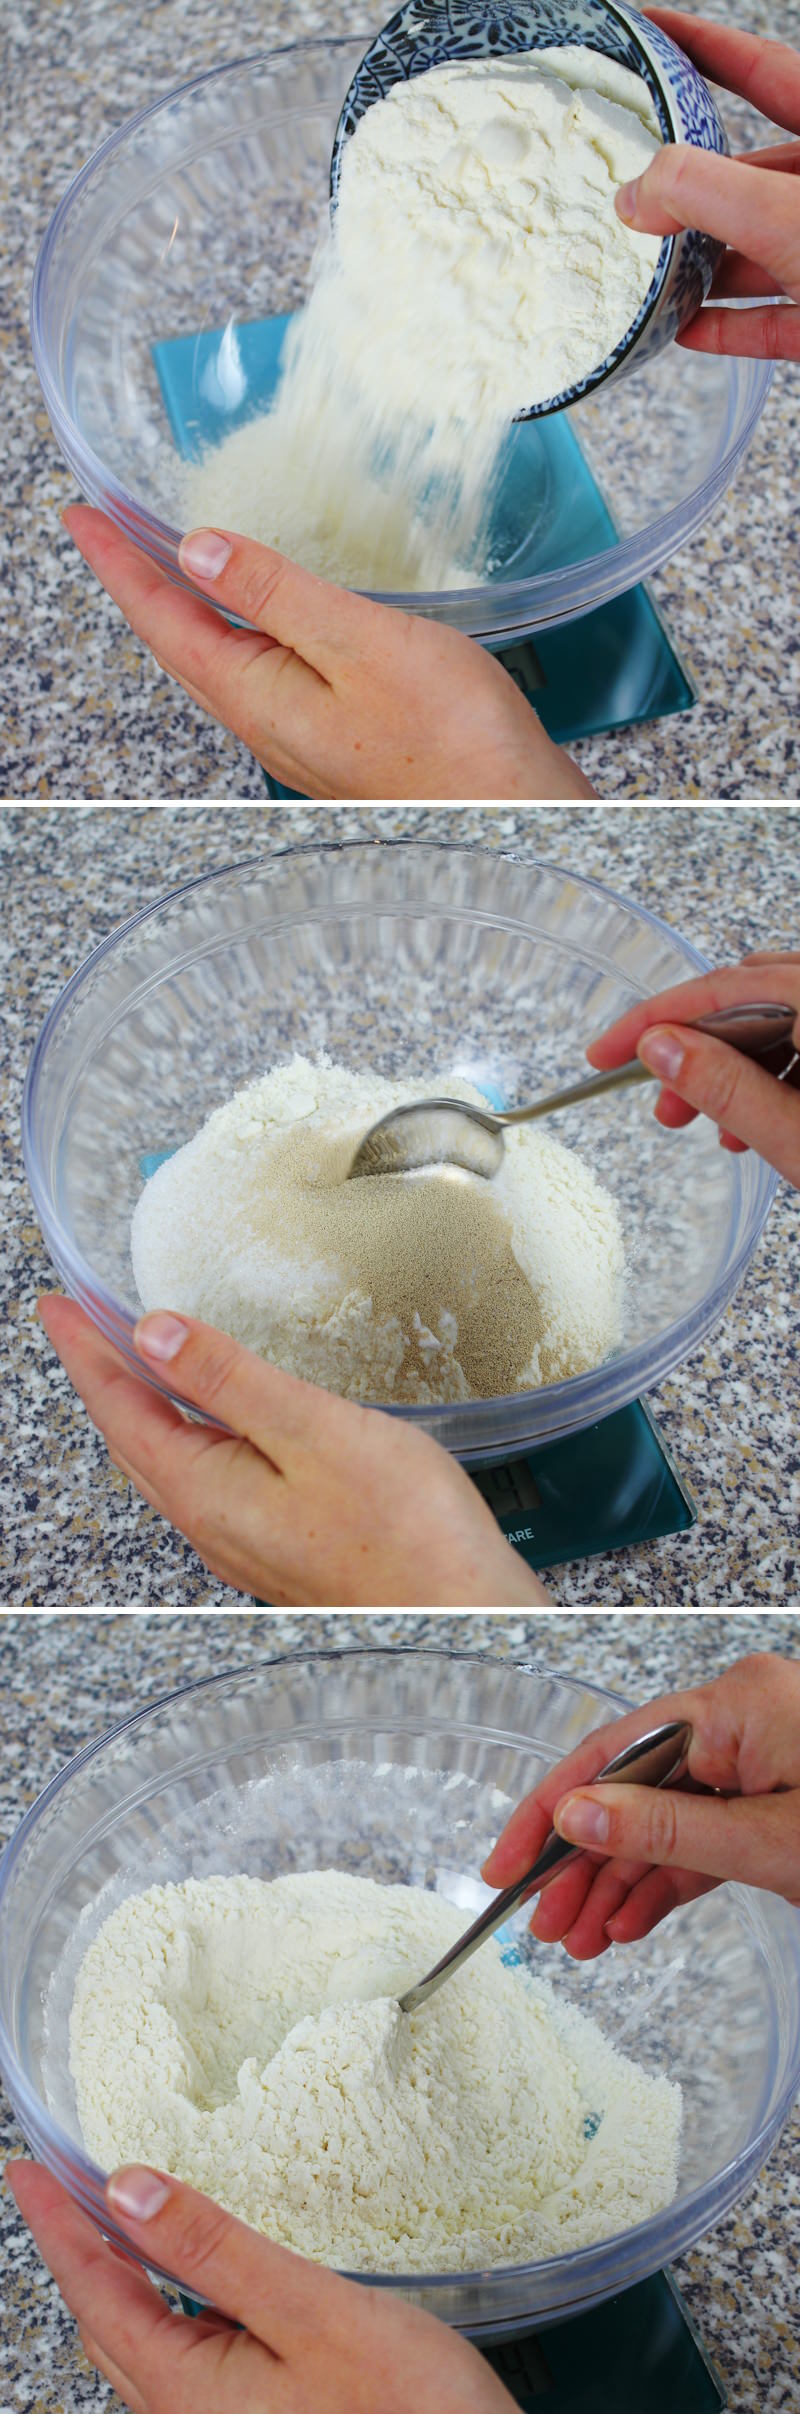
Meanwhile, in a large bowl, add the flour, starch, sugar, salt and dried yeast for the yeast dough and mix together with a spoon.
Step 4
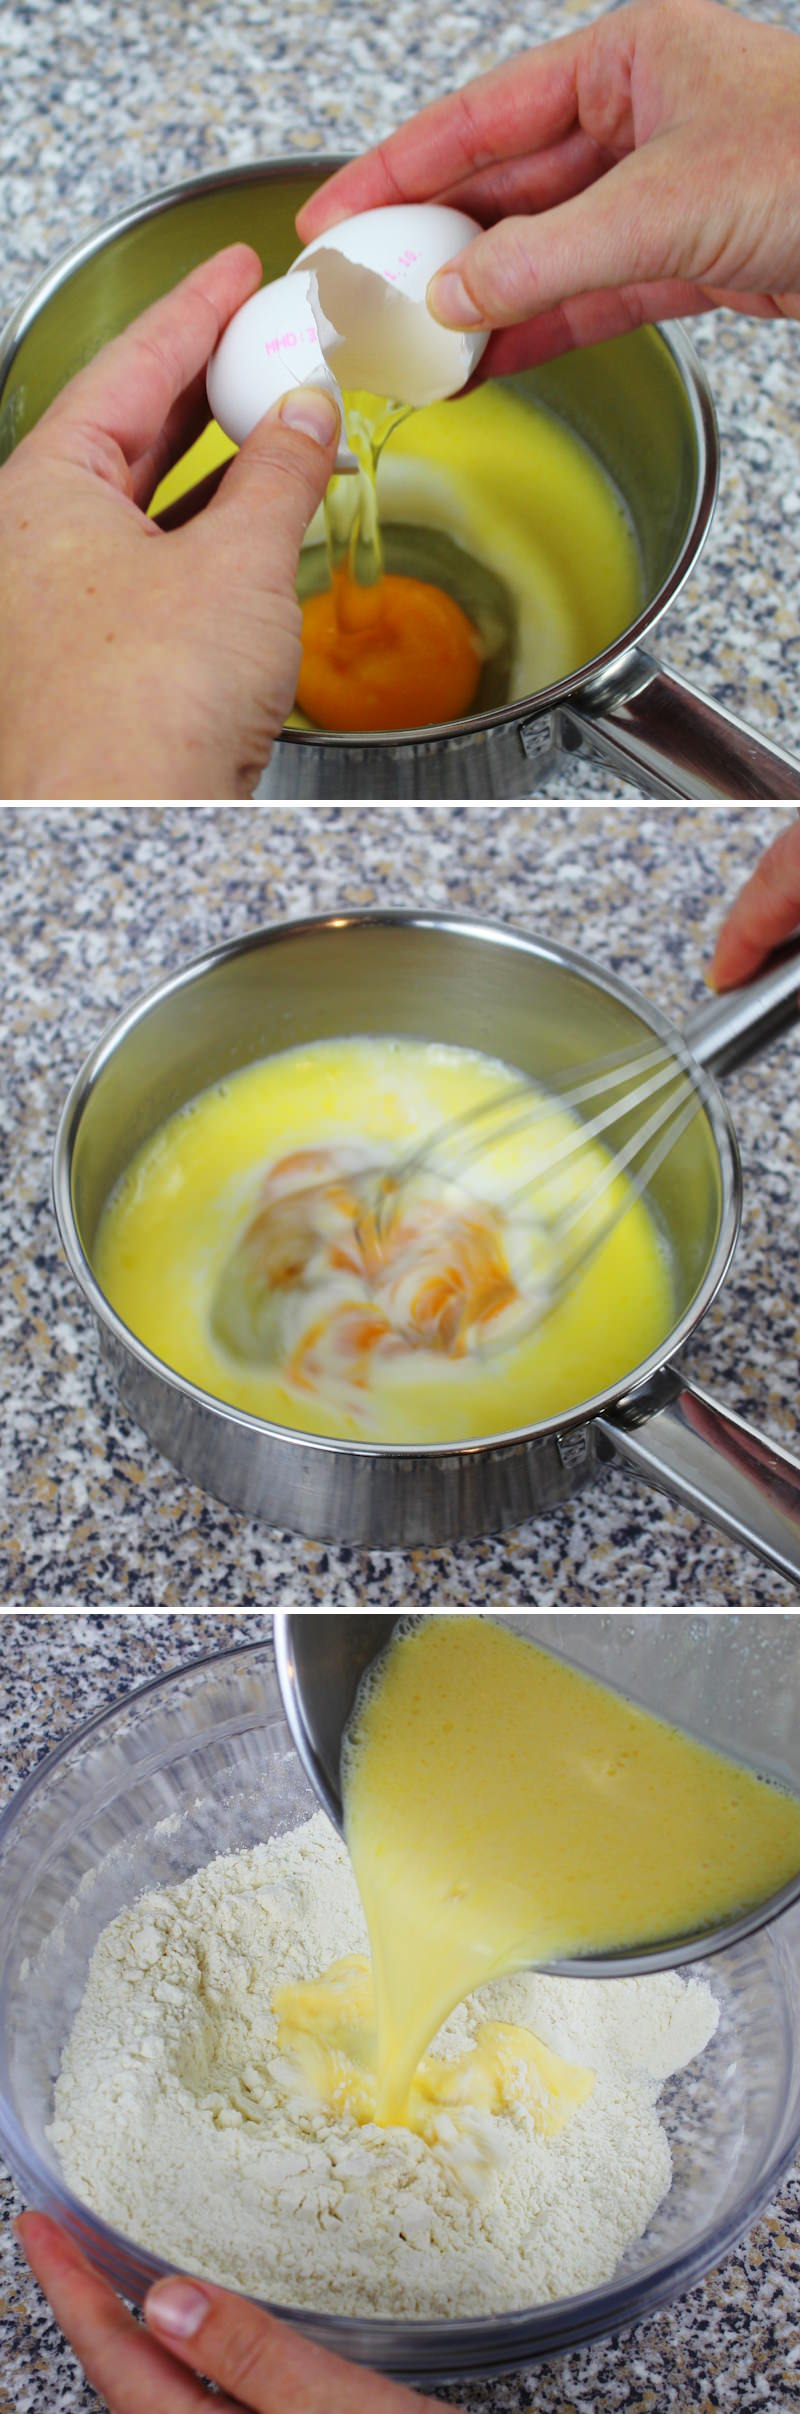
Then crack the egg into the milk and butter mixture, whisk together and add to the bowl with the dry ingredients.
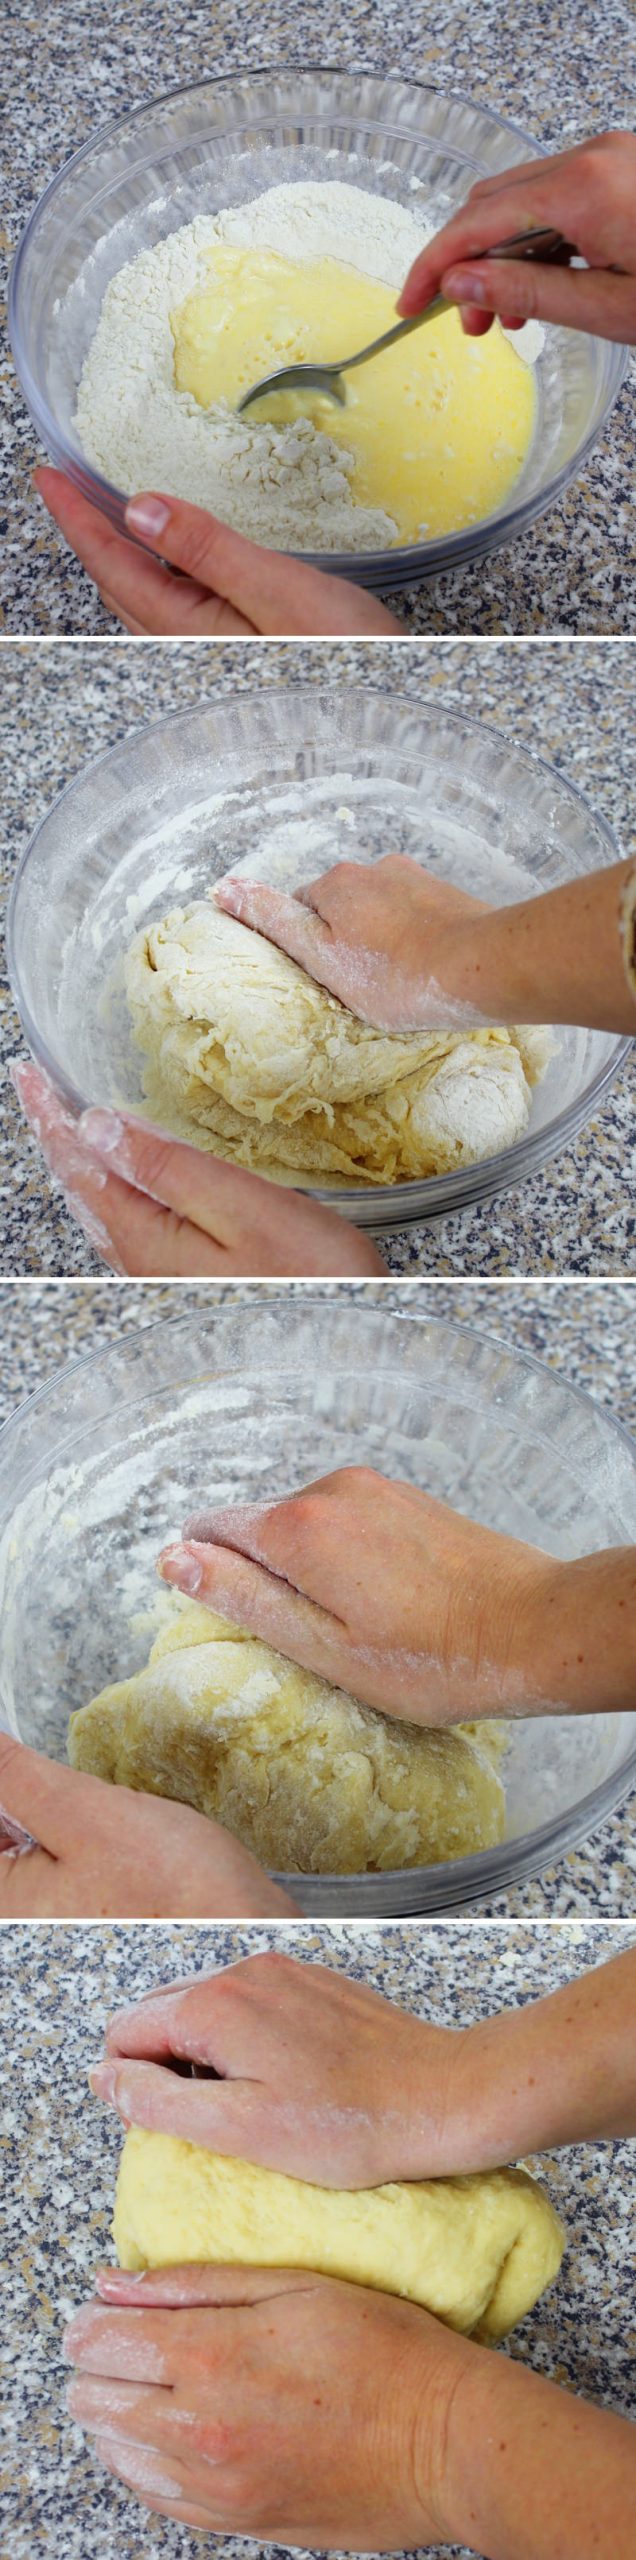
Step 5
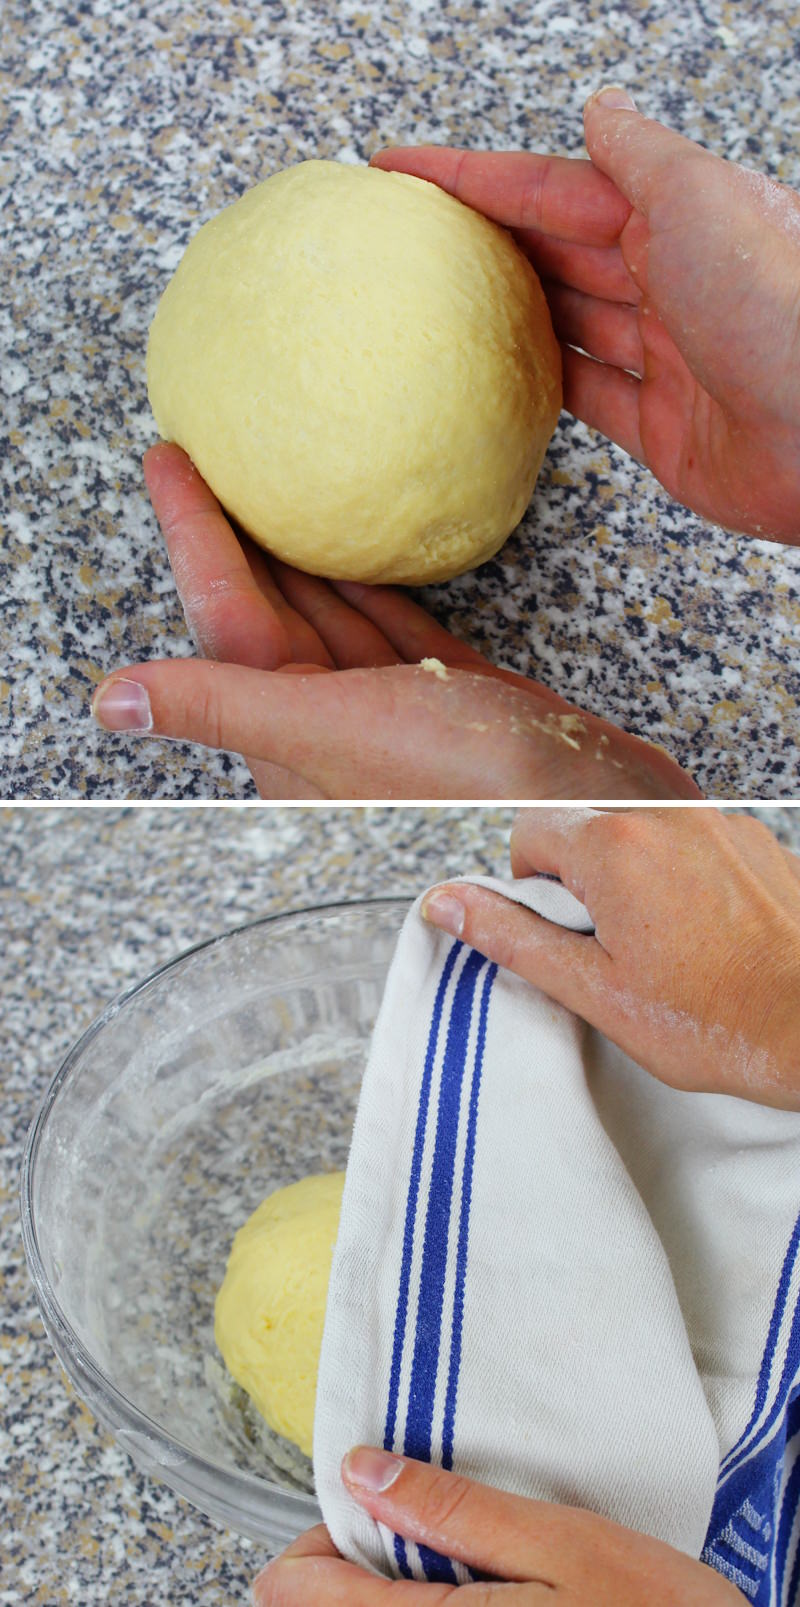
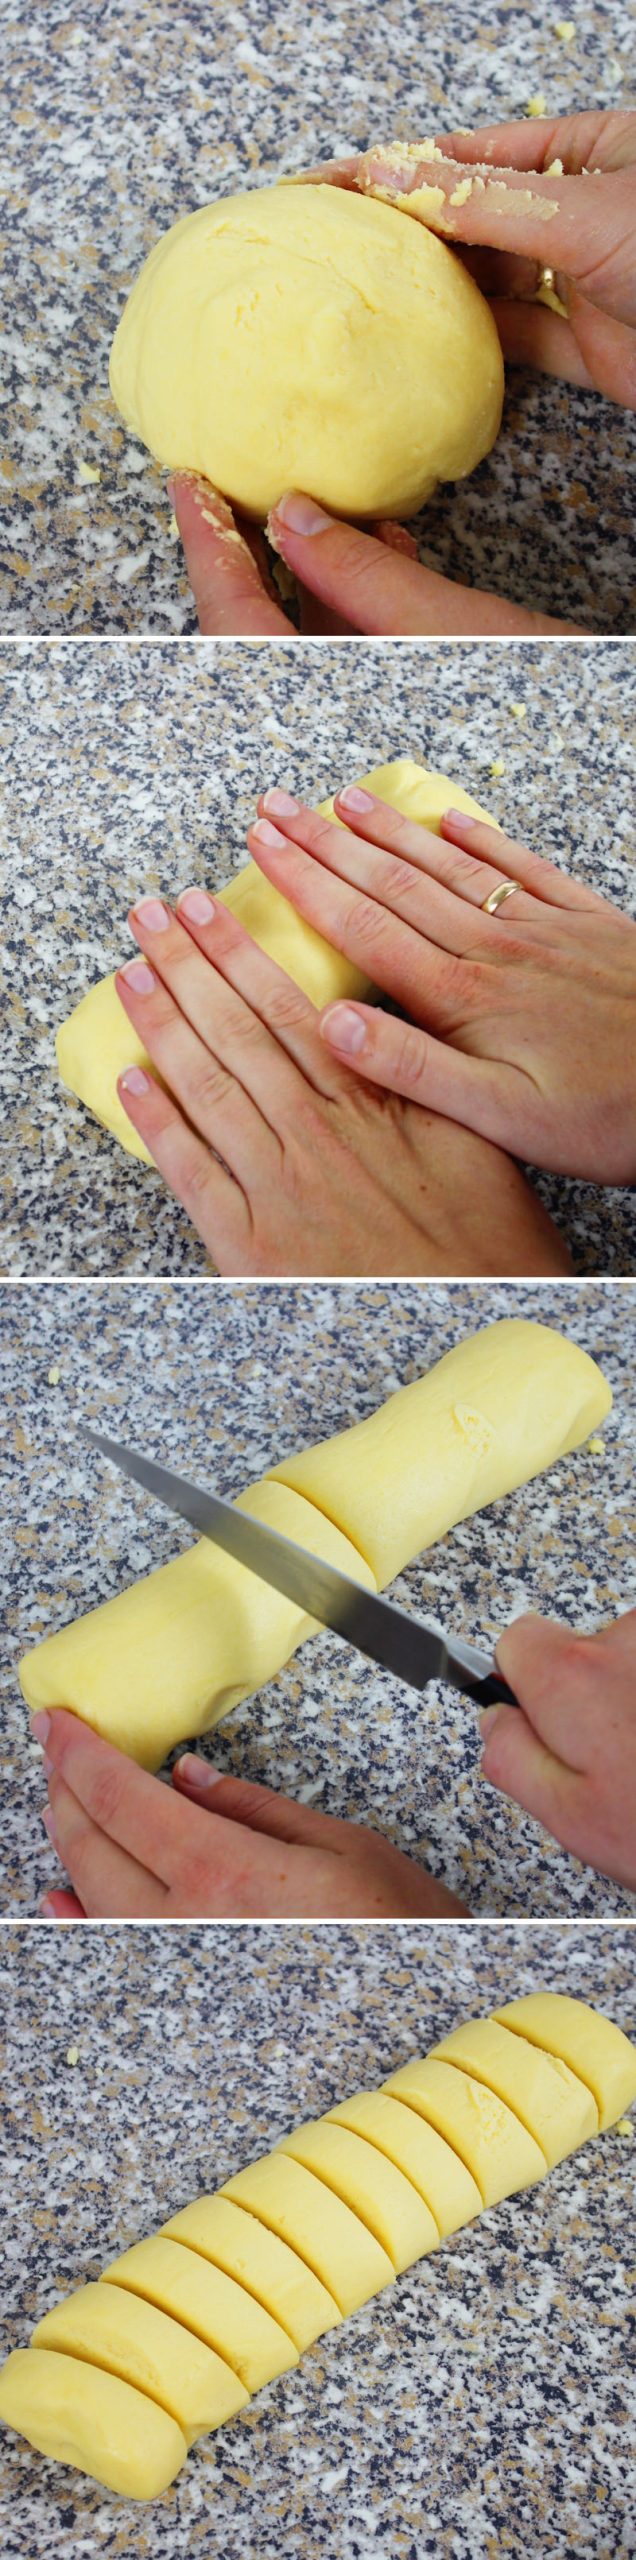
First mix everything together with the spoon , then knead carefully and vigorously with your hands in the bowl and subsequently on a clean work surface until a smooth yeast dough forms (knead vigorously with the palms of your hands for about 5 minutes). If the dough sticks to your palms, gradually knead in some flour.
Passaggio 6
Shape the dough into a ball and leave it to rise in the bowl for about 1 hour, or until it has doubled in size, covered with a slightly damp towel in a warm place.
Step 7
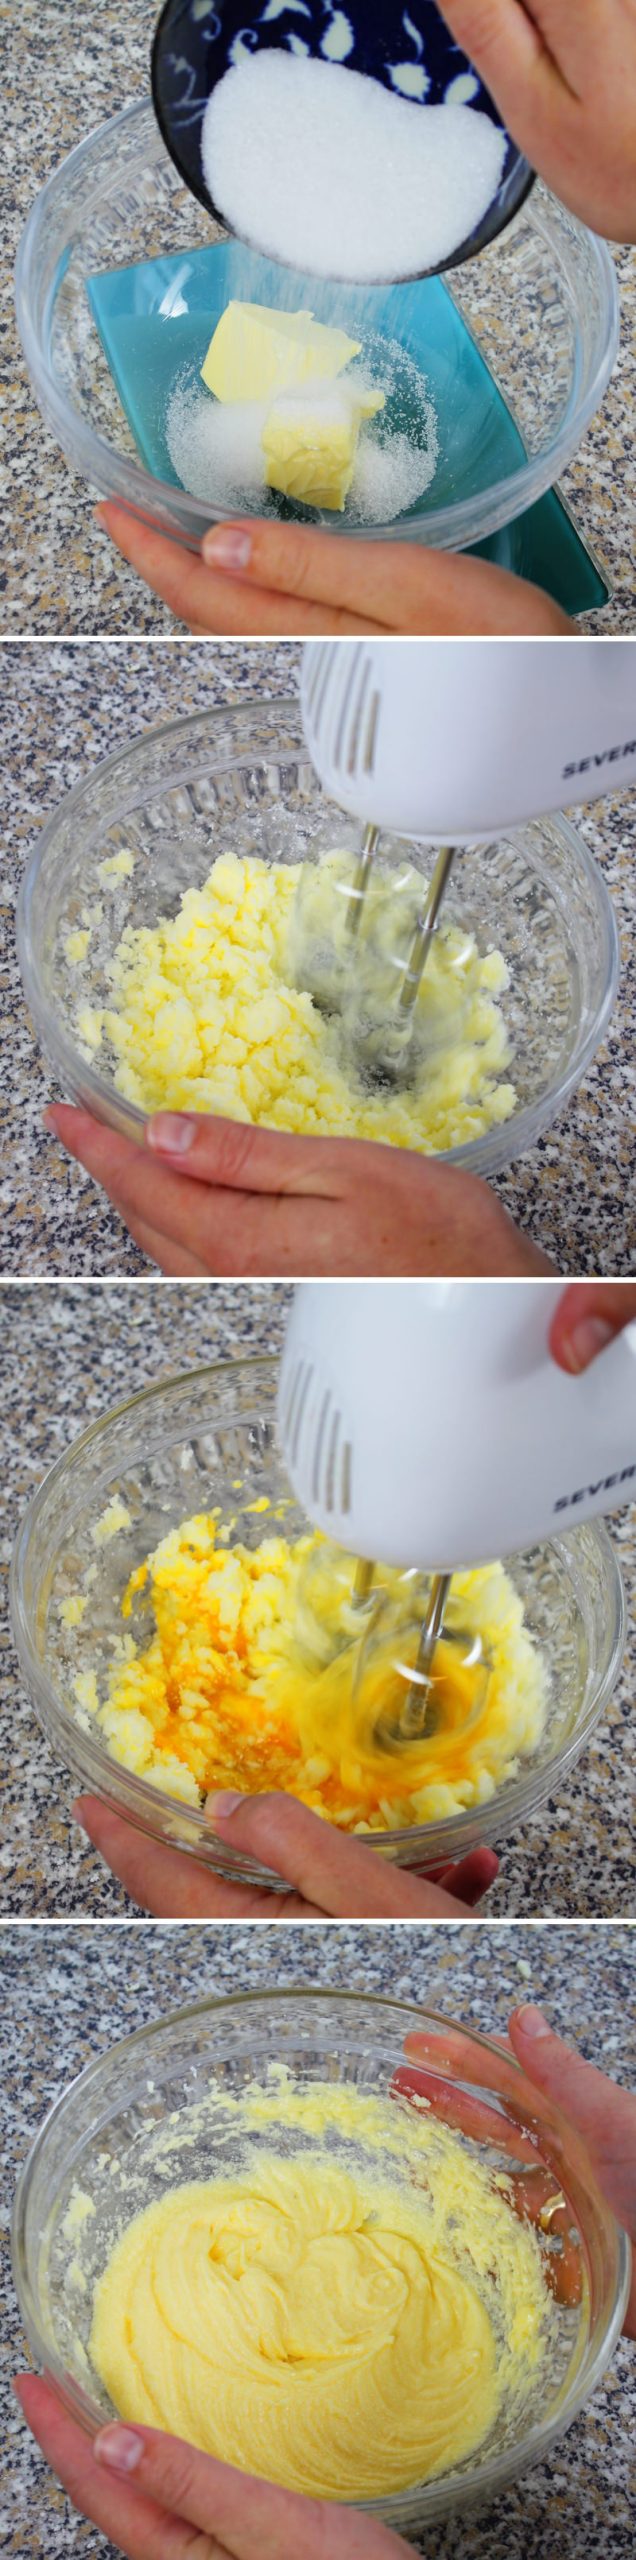
In the meantime, prepare the biscuit base : To do this, mix the soft butter with the sugar in a bowl using a mixer. Then crack the egg into the mixture and mix until the mixture becomes creamy.
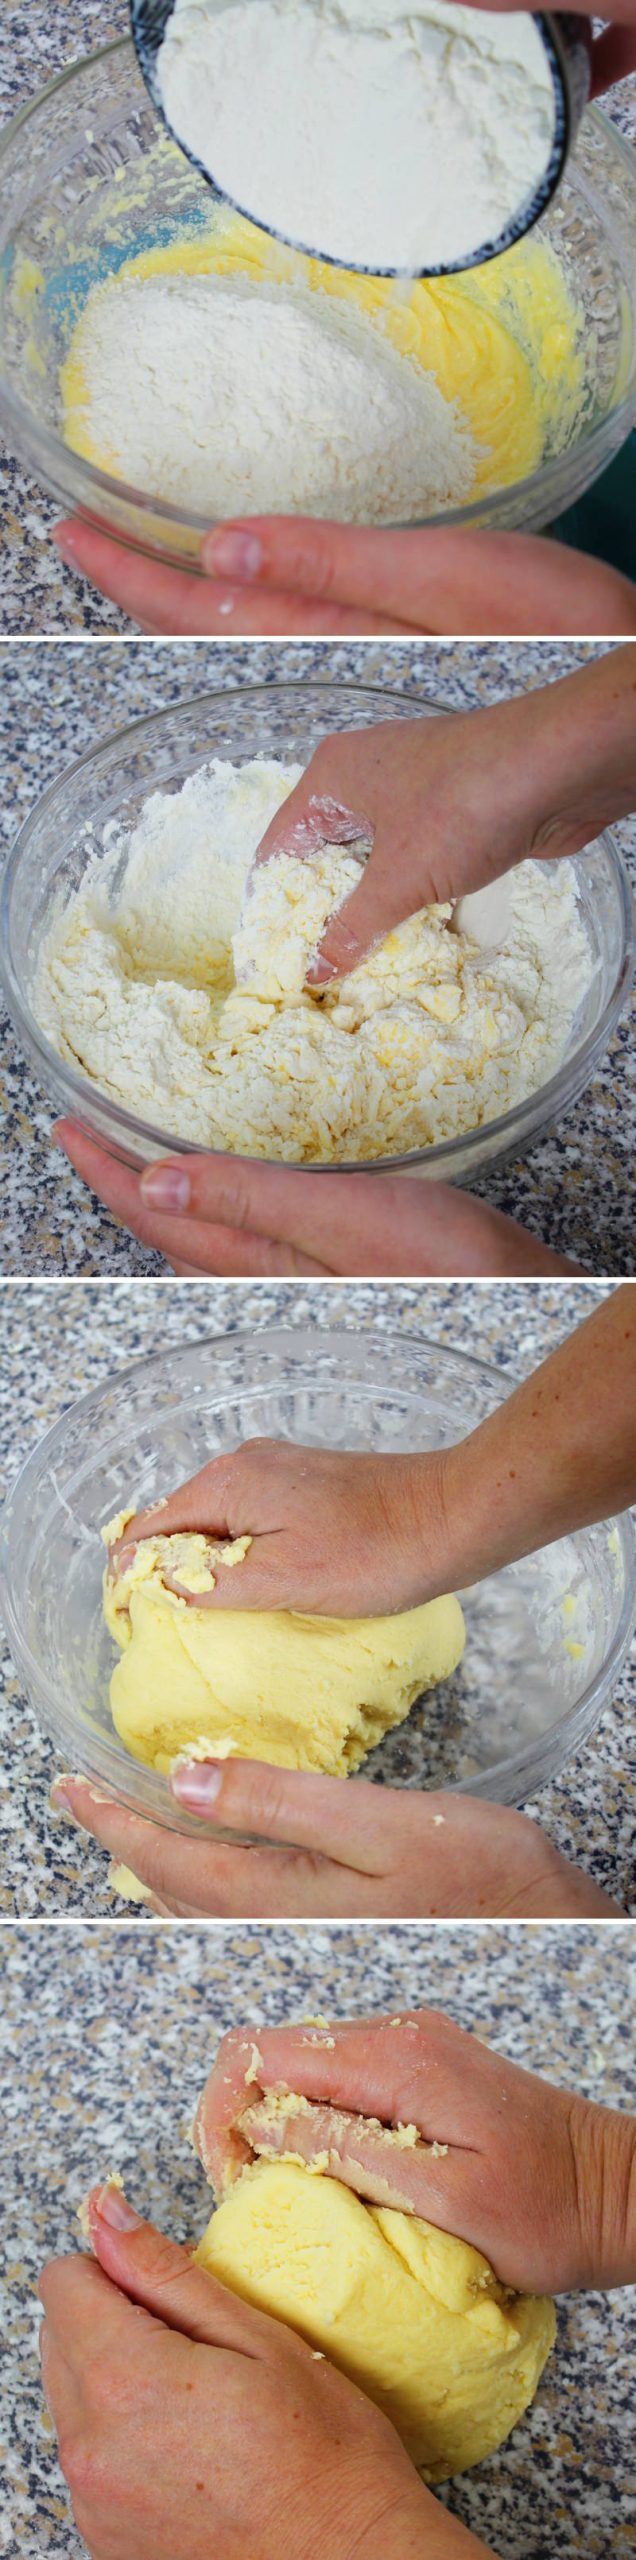
Step 8
Now add the flour, starch and baking powder (sifted if necessary) . Knead the dough again with your hands until it forms a smooth ball (knead for about 3 minutes using the palms of your hands).
Step 9
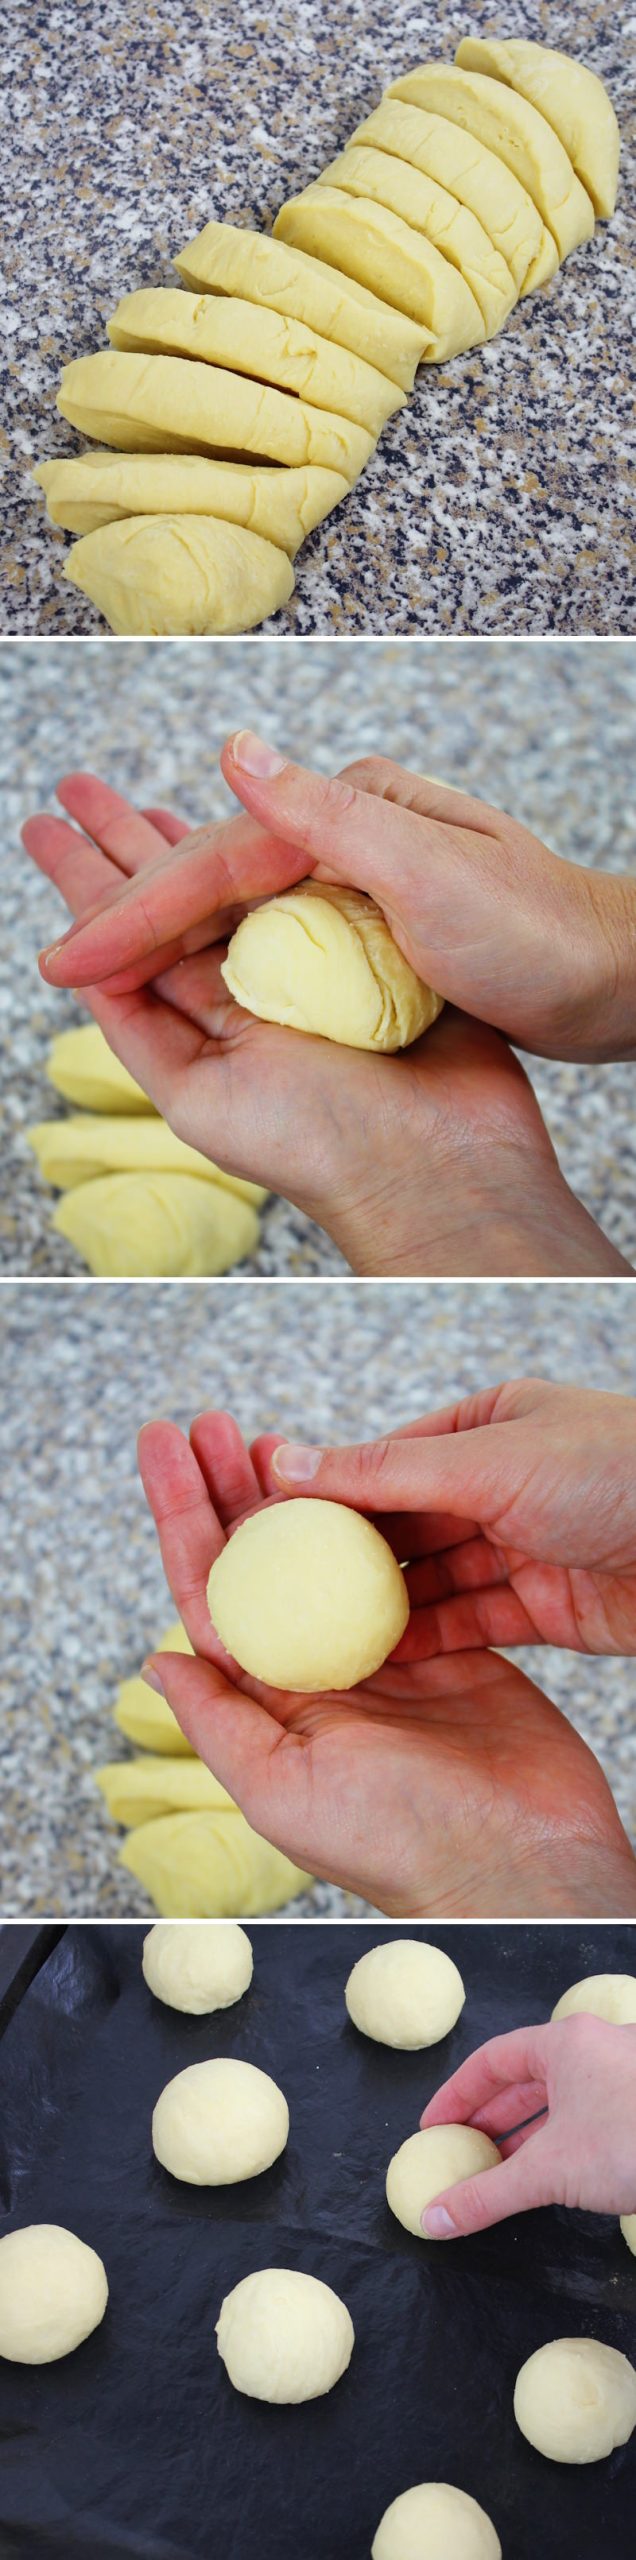
Use your hands to roll the biscuit dough into a long cylinder on the work surface and divide it into 10 equal pieces.
Step 10
Shape each piece of dough into a ball between your palms, place on a plate and put in the fridge.

Step 11
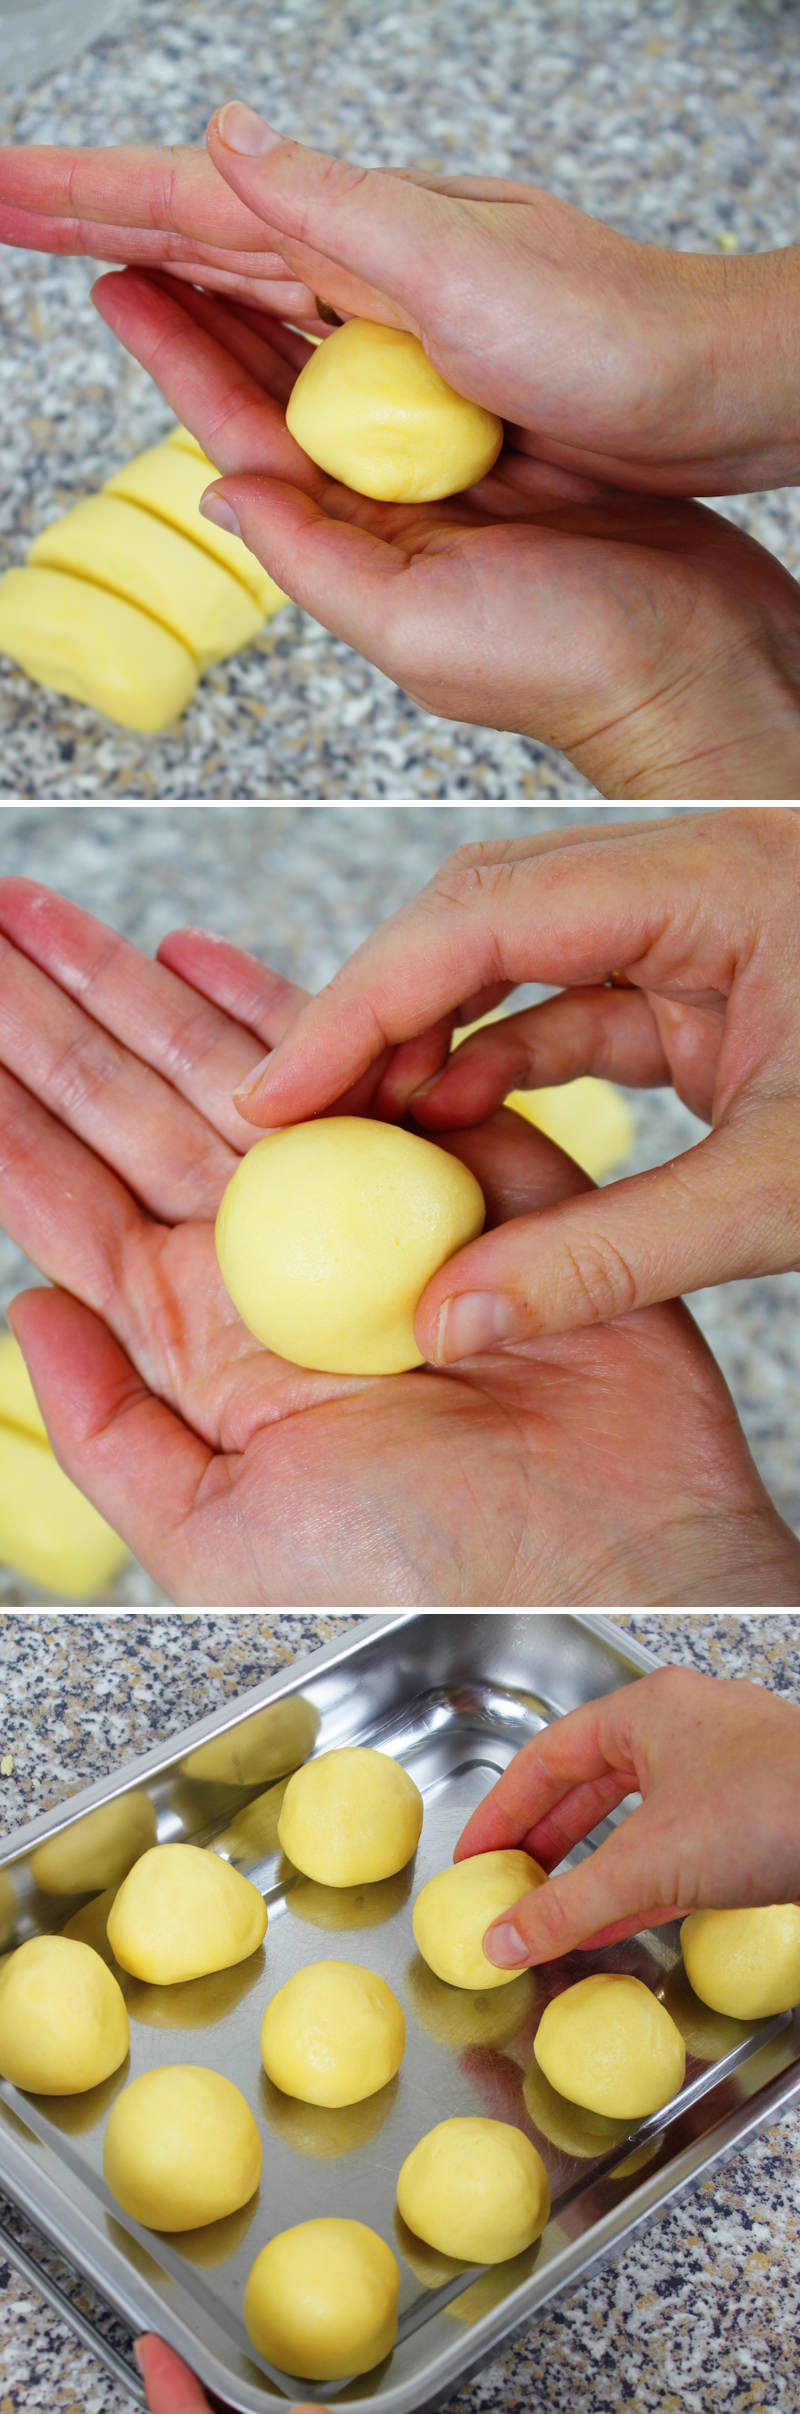
Back to the yeast dough: Once the yeast dough has doubled in size, lift it out of the bowl and knead it briefly.
Step 12
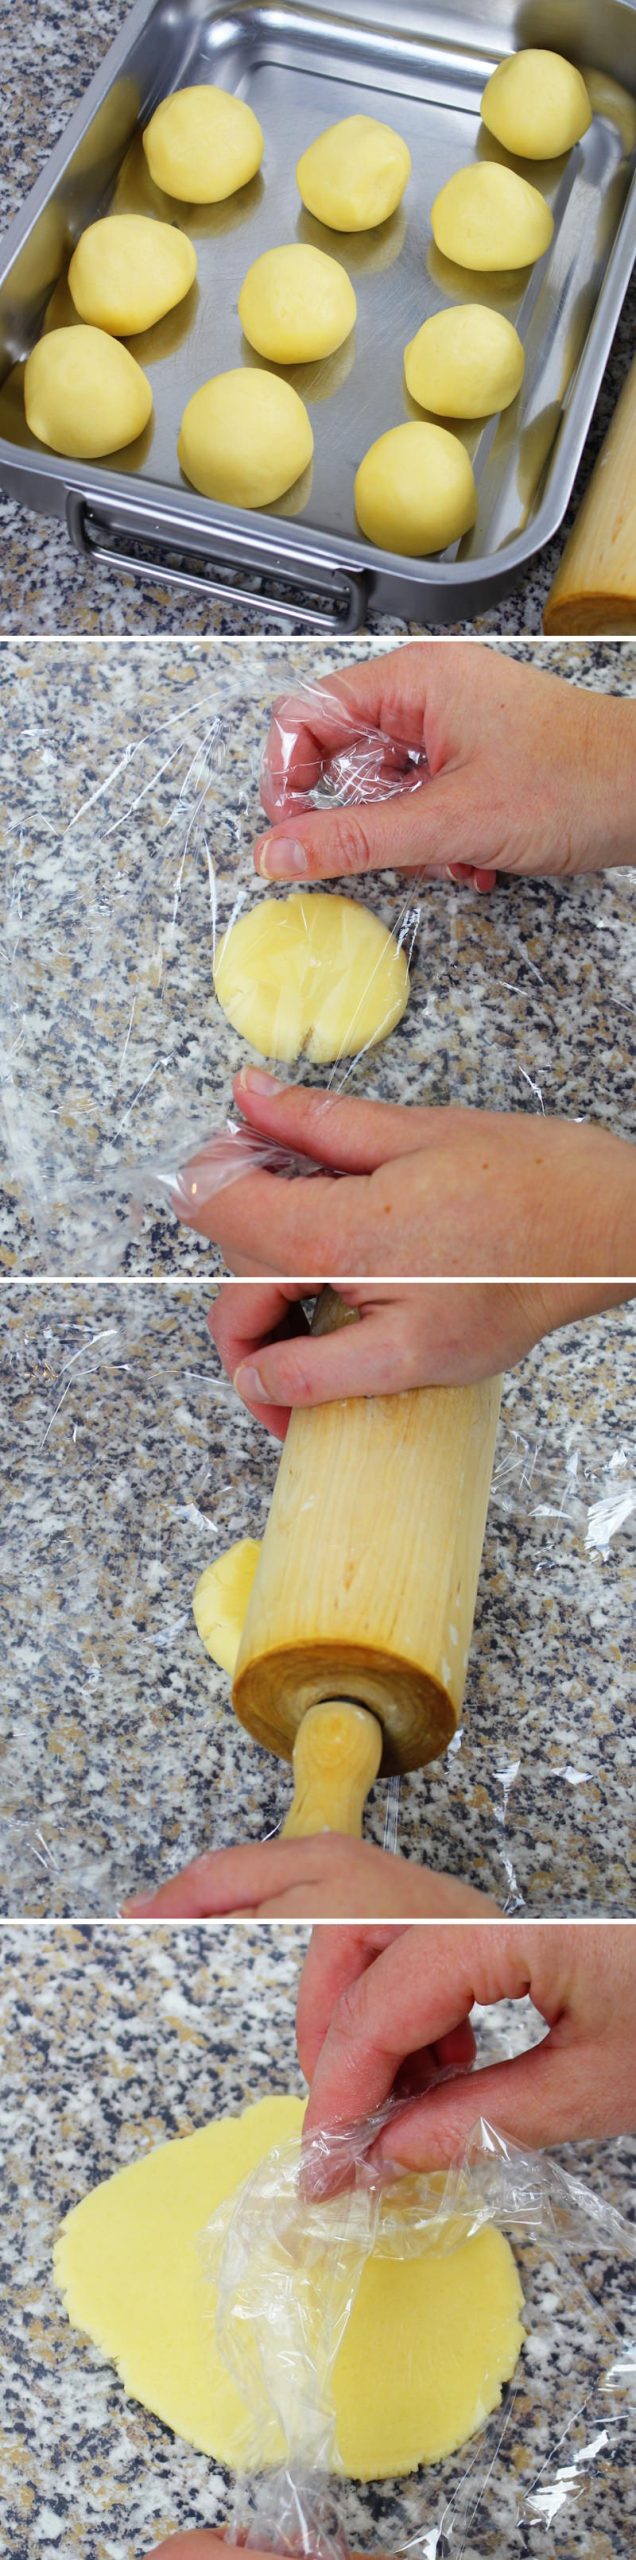
Now cut this dough into 10 equal-sized pieces and shape them into even balls. The best way to do this is to shape them into balls between your palms and then smooth them out on the work surface. Place them on a baking tray lined with baking paper, leaving sufficient space between them.
passaggio 13
Now prepare a bowl with the sugar for the topping.
Take the biscuit dough out of the fridge. Place a ball of dough on a clean work surface, cover with cling film, then flatten it slightly with the palm of your hand and roll it out with a rolling pin into a circle (diameter approx. 10 centimetres) . Remove the cling film and set aside.
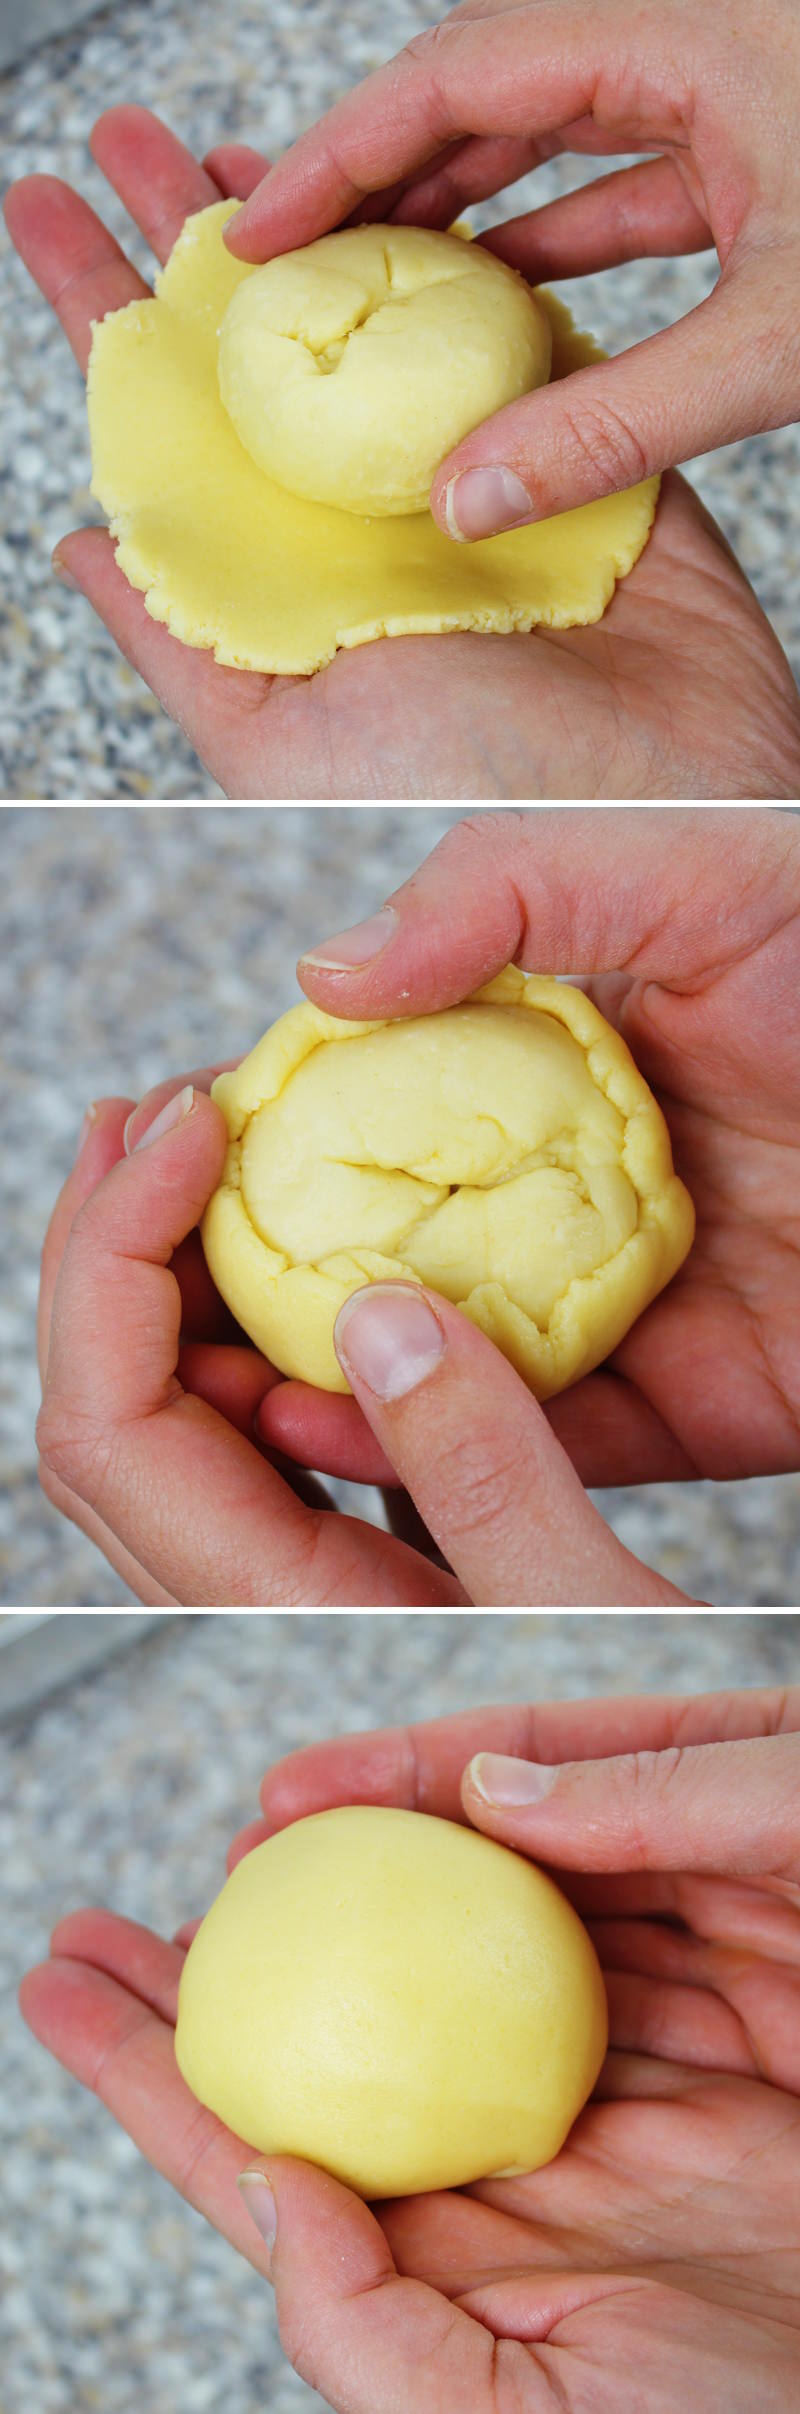
Step 14
Next, wrap the rolled-out biscuit dough around a ball of yeast dough: To do this, place the biscuit dough in the palm of your hand and place the yeast dough in the centre. Now carefully wrap the biscuit dough around the yeast dough – the biscuit dough does NOT need to be wrapped all the way round.

Step 15
Dip the shaped balls, with the biscuit dough side first, into the prepared sugar and place them back on the baking tray (sugar side facing upwards).
Assemble all 10 melon pan in this way.
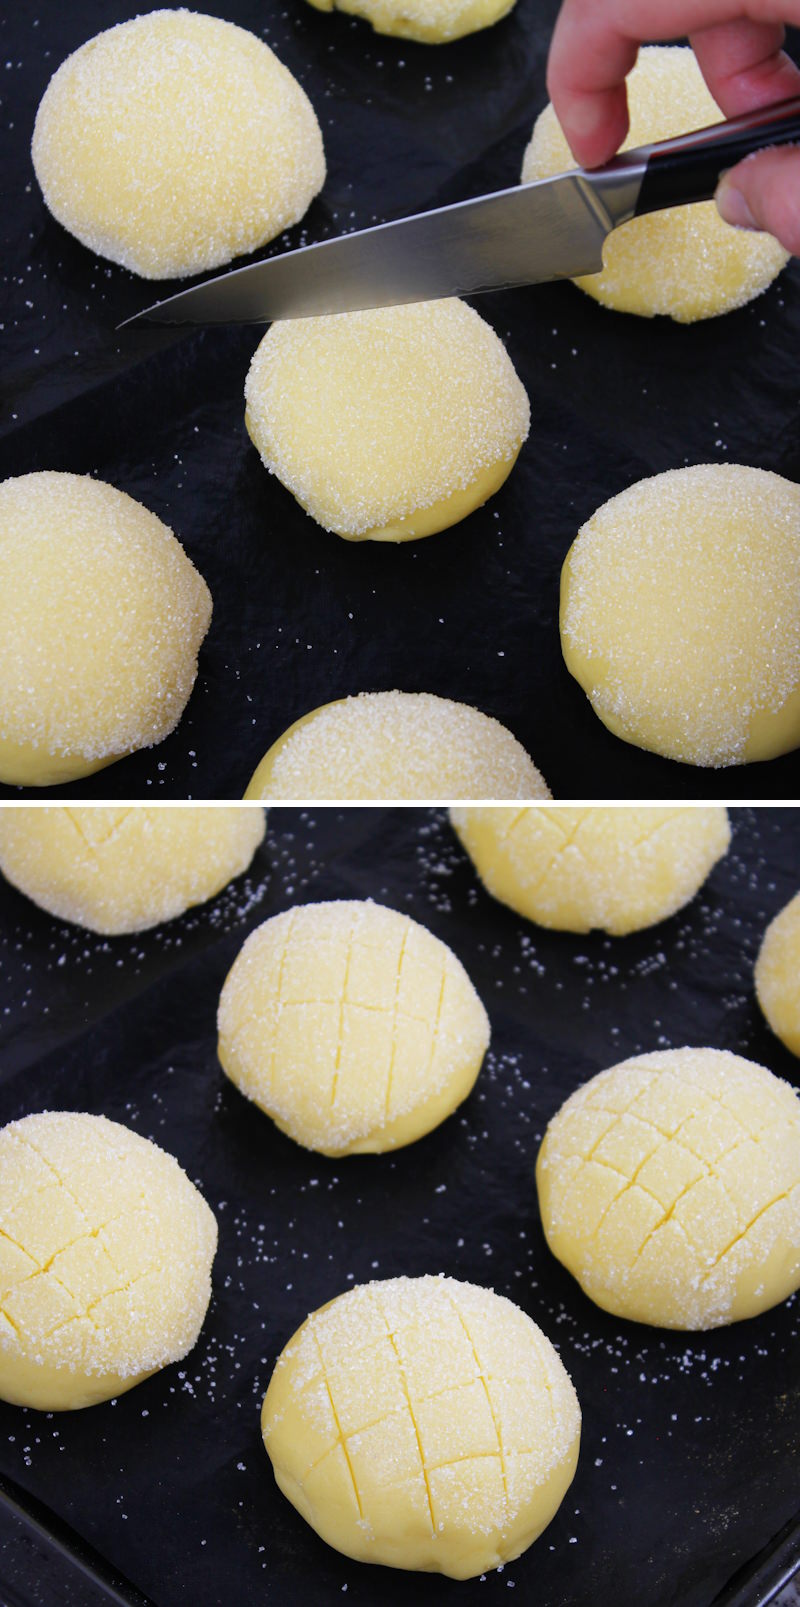
Step 16
Carefully score the surface of each melonpan with a knife to create a lattice pattern . Do not cut through the biscuit dough, but only score it lightly.
Leave the melon pan to prove, covered, in a warm place for a further 30 minutes. Meanwhile, preheat the oven to 180°C (fan-assisted) .
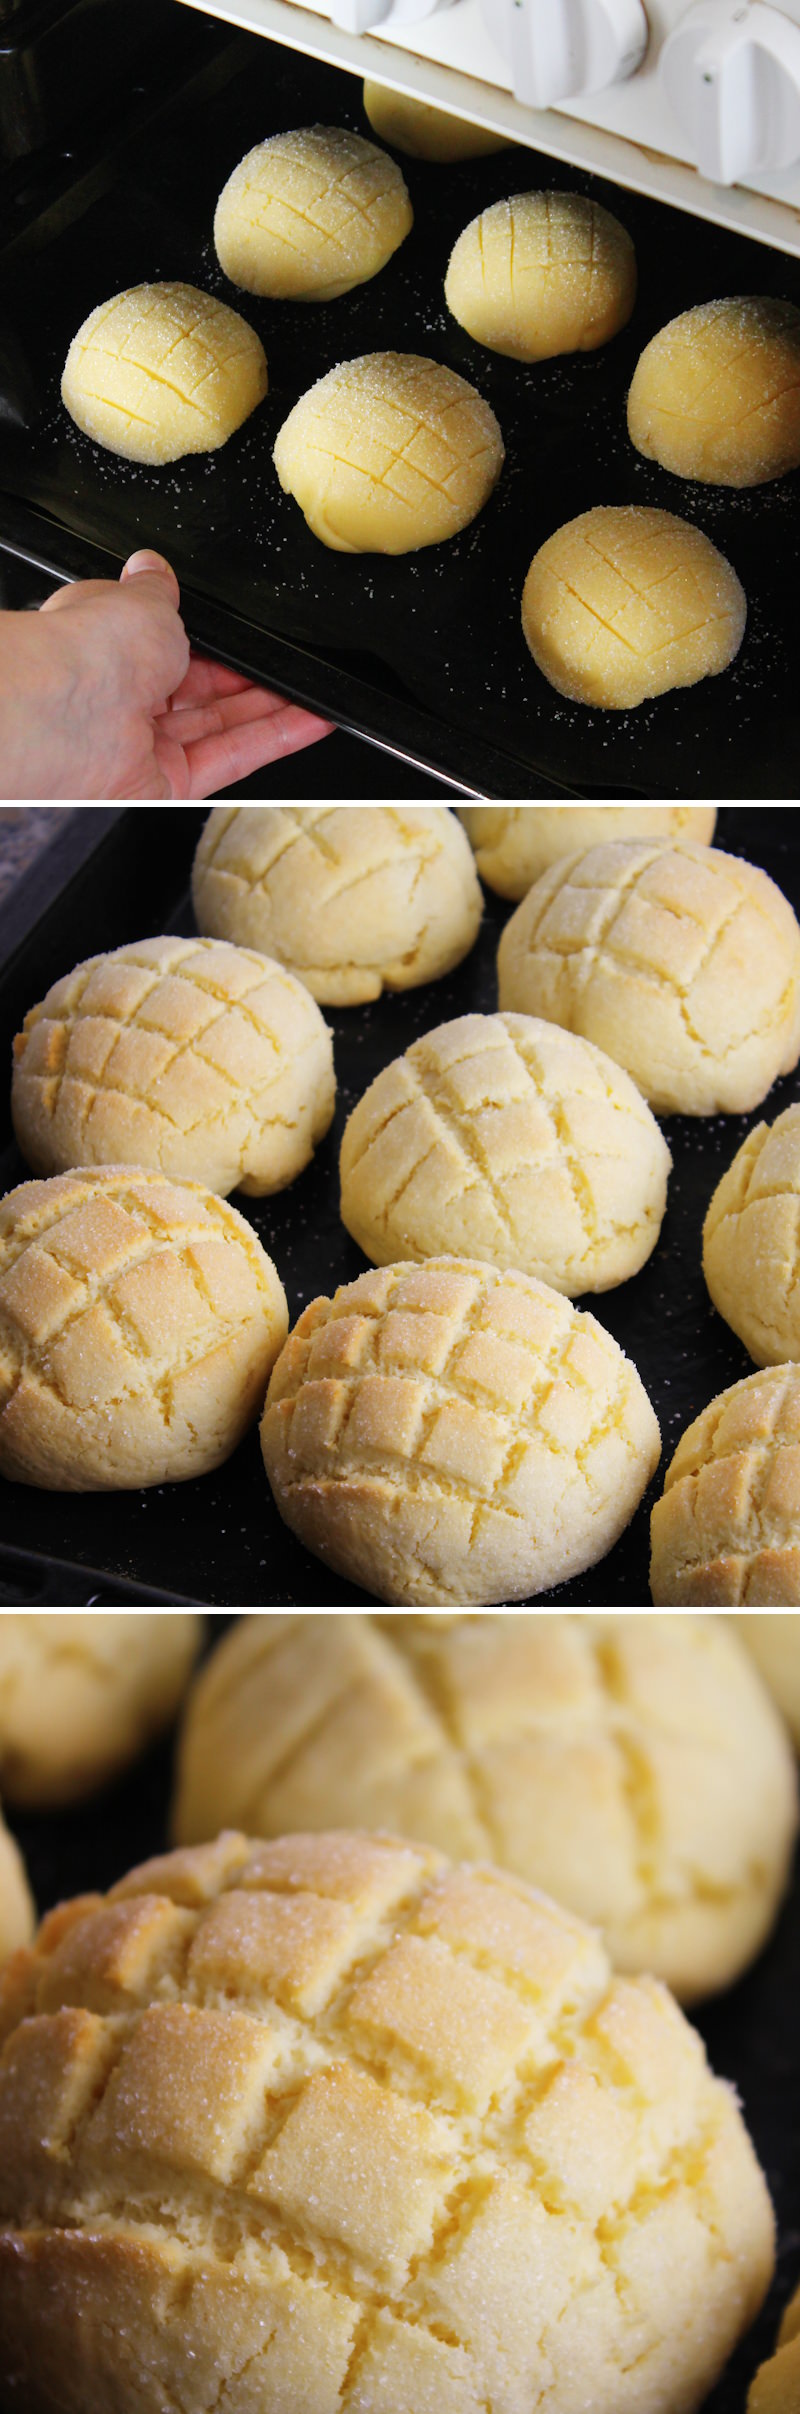
Step 17
After the resting period, place the melonpan in the oven and bake for 13–15 minutes until the biscuit dough is slightly burned.
Step 18
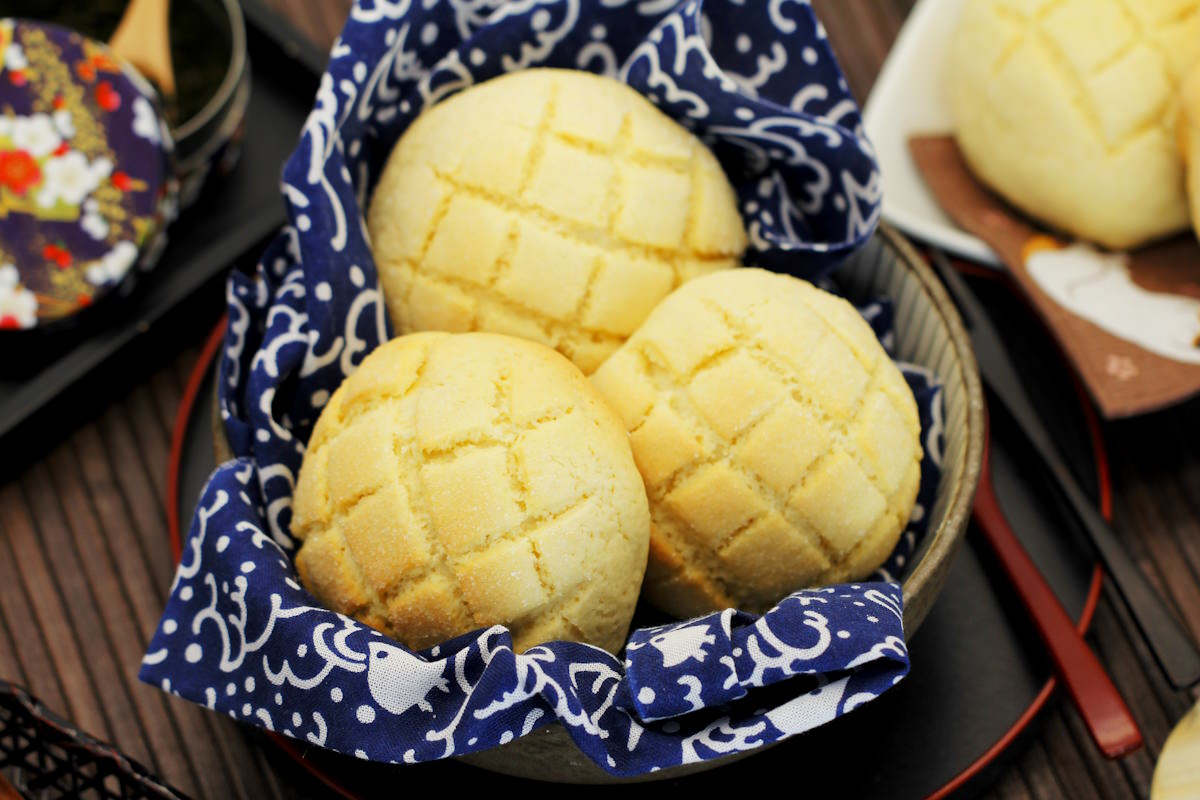
After baking, leave the melon pan to cool on a wire rack, but feel free to serve them fresh (slightly warm) . That’s when they taste best! Ready – Itadakimasu!
Tip: Once the melon pan have cooled completely, place them in an airtight container or bag and store in the fridge for up to 3 days or freeze for up to a month. Then let them defrost and bake briefly in the oven at 180°C until crispy on the outside.
Of course, there are plenty of other dishes that go really well with this recipe for the whole family! Here you’ll find my favourite recipe ideas from Japan:
Butter Mochi (Hawaiian Mochi Cake)
Butter Mochi ist eines dieser Rezepte, die man nur schwer in eine Schublade stecken kann. Es sieht aus wie ein…

Make your own Ninjin no Kinpira: Japanese carrot side dish in the Kinpira style
Ninjin no Kinpira is a simple Japanese side dish made from finely sliced carrots that are briefly stir-fried and then…

Korokke: Make your own Japanese croquettes | delicious street food from Japan
Korokke are among the best-known everyday fried dishes in Japanese cuisine. They combine simple ingredients with a straightforward technique and…

Nikujaga: Japanese potato and beef stew | Recipe for everyday cooking
I ate Nikujaga for the first time at my host family’s house in Fukui. It wasn’t a special occasion, just…

Make your own Omurice: Japanese omelette with ketchup rice & vegetables | delicious Omuraisu
Omuraisu is one of those dishes that brings an instant smile to almost every Japanese person’s face. A light, fluffy…

Make the best Okonomiyaki yourself: Basic recipe for Japanese cabbage pancakes, Osaka-style
For me, Okonomiyaki is one of those dishes that instantly puts me in a good mood. A hearty pancake, lots…