Sprache:
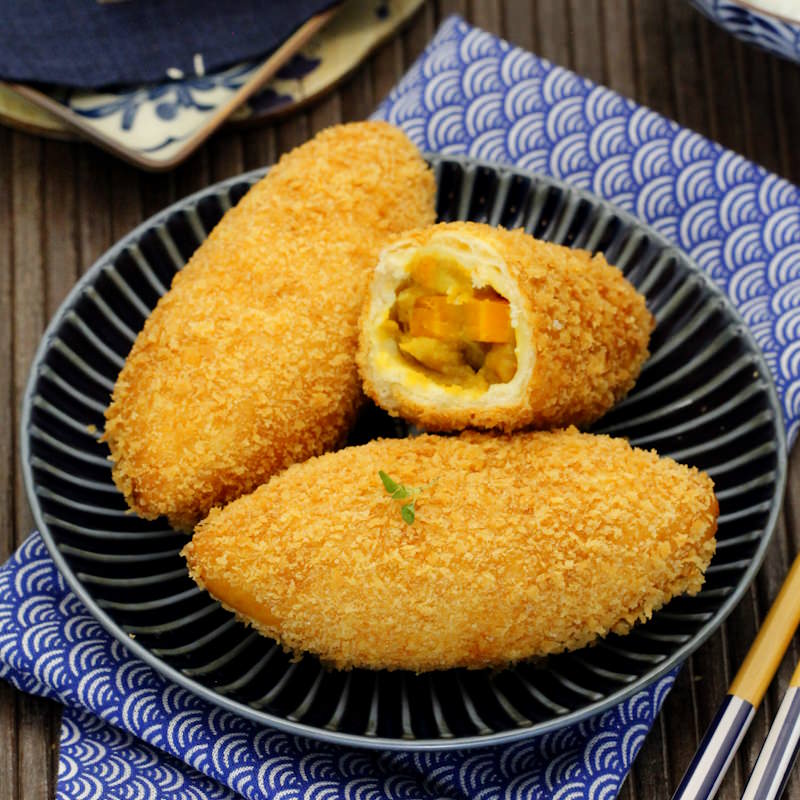
Curry Pan – A spicy curry filling, wrapped in a heavenly fluffy dough and finished with a golden-brown, crispy panko coating. This is Kare Pan, the star of every Japanese bakery! If Japanese curry has already won your heart, just wait until you’ve tried this delicious snack. The combination of a crispy crust and a savoury filling will captivate you from the very first bite. Let yourself be tempted and dive into the irresistible world of Curry Pan!
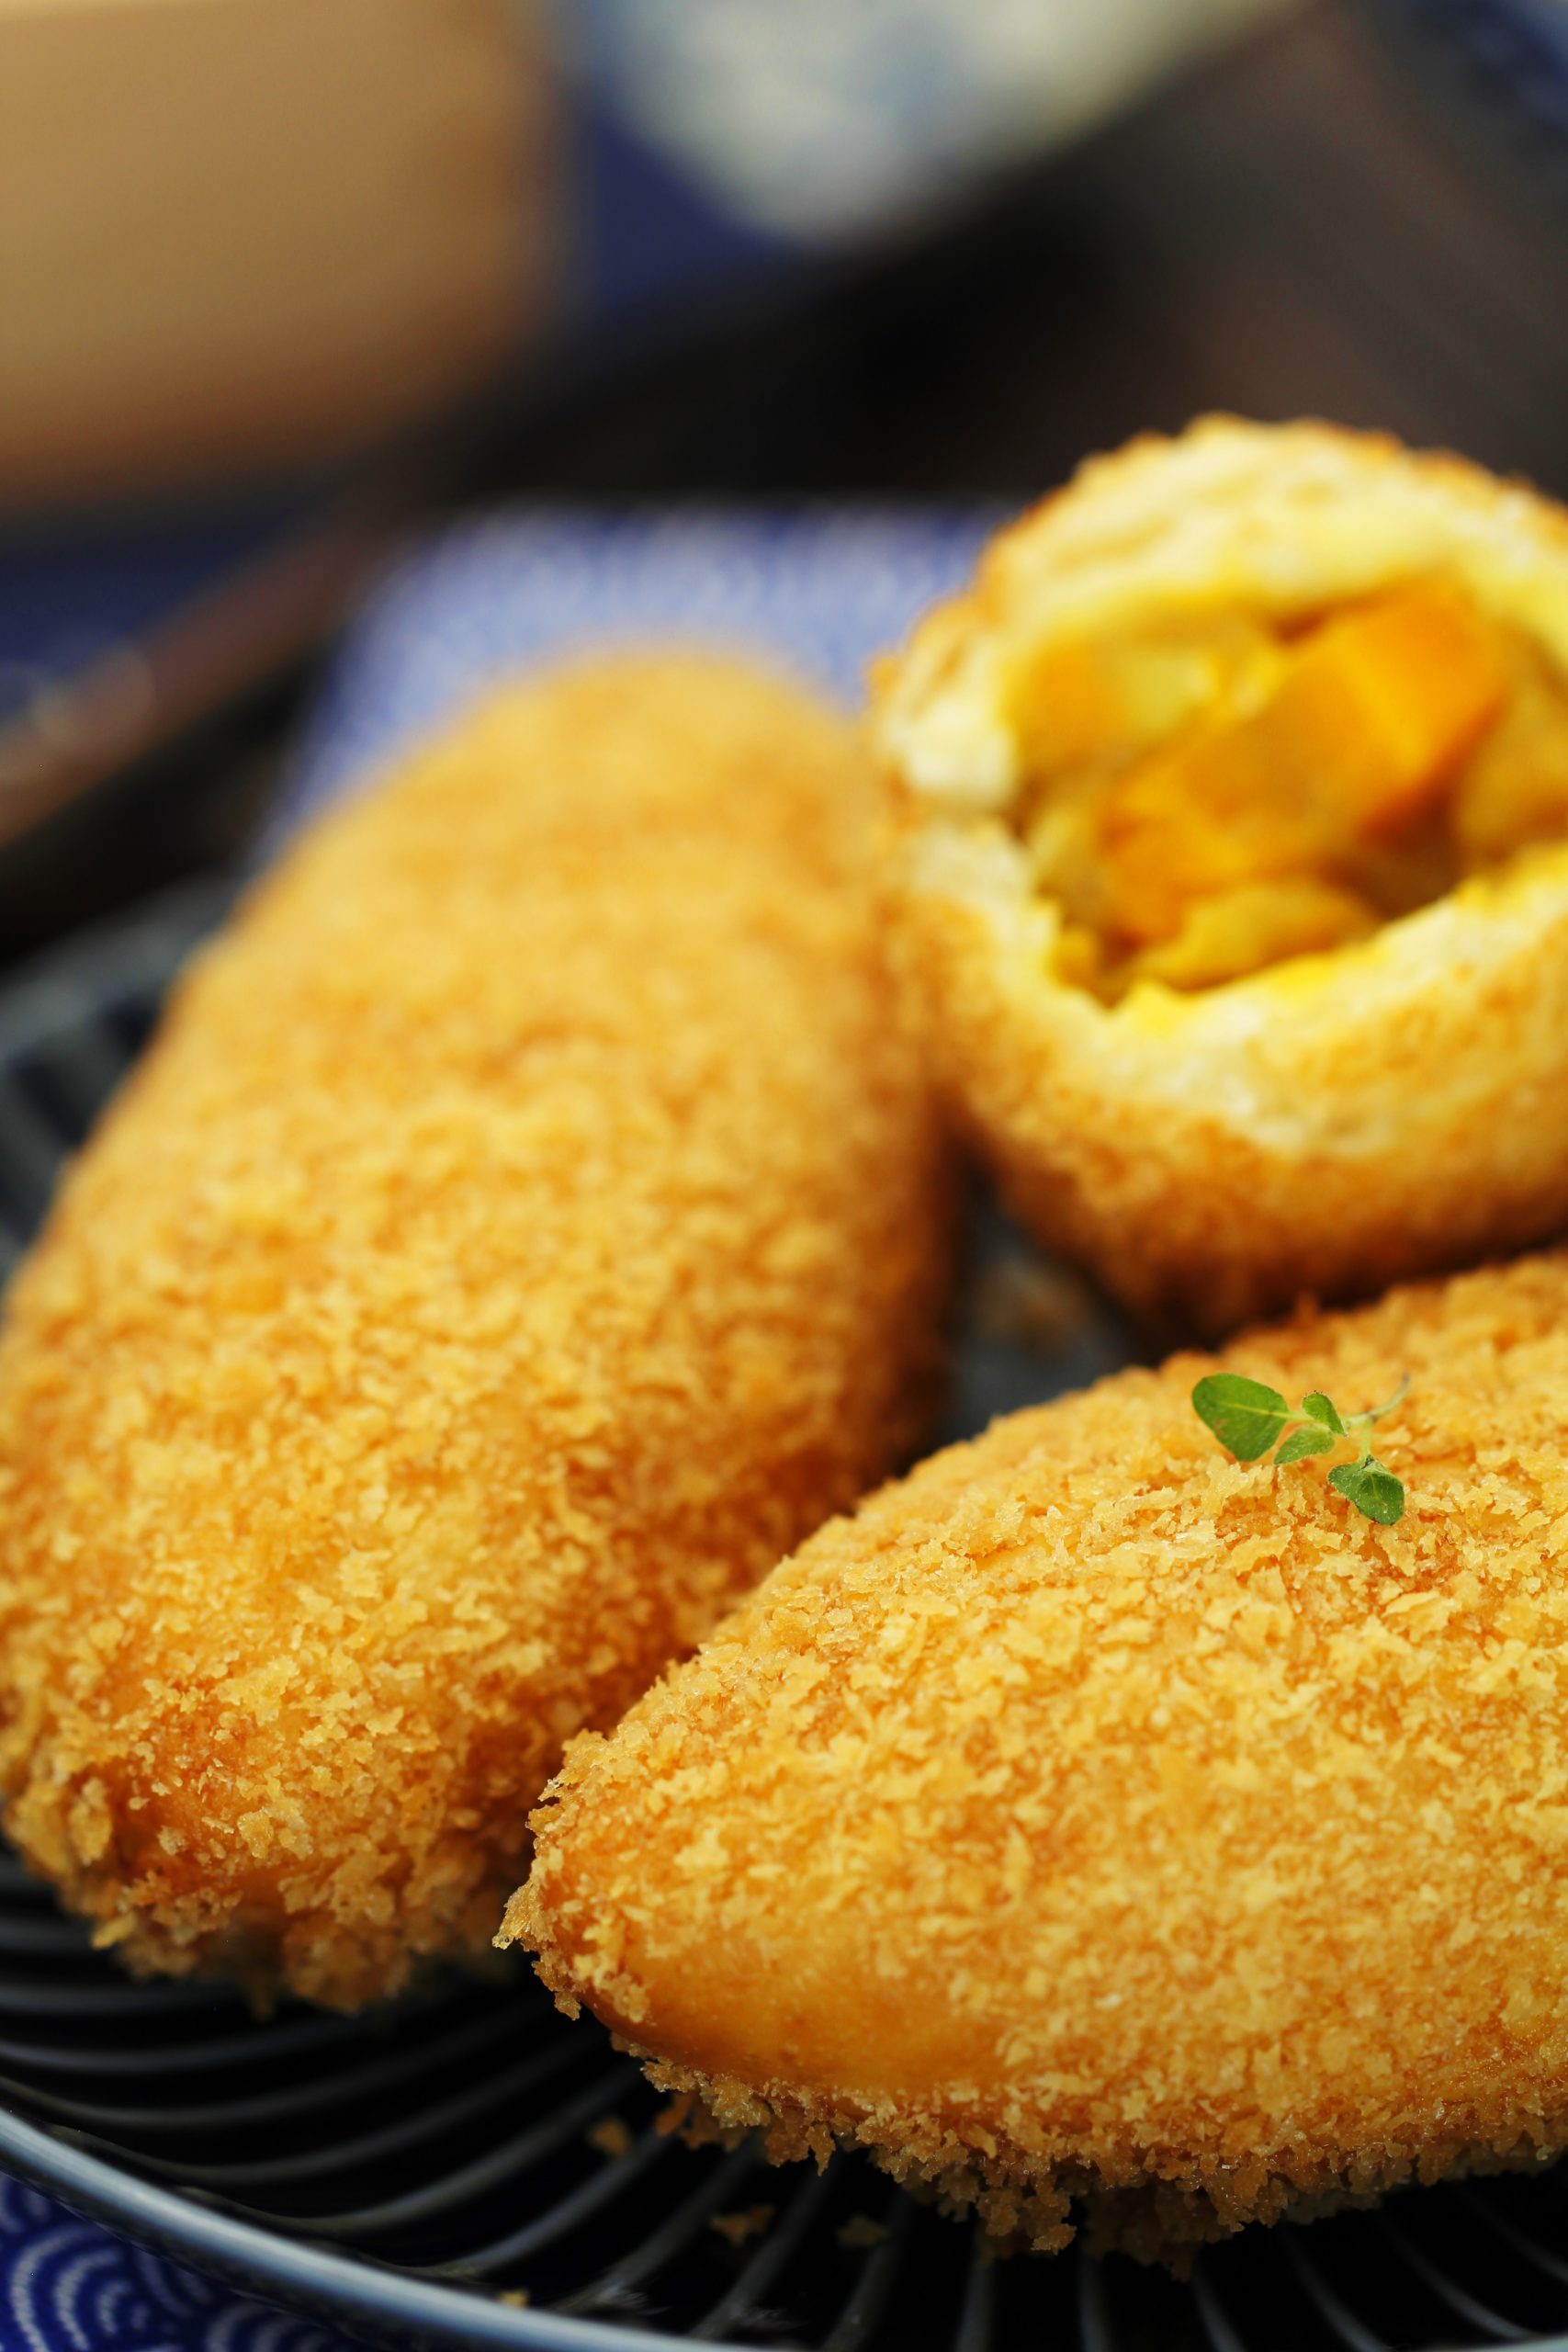
Have you ever bitten into a warm, crispy yet savoury delicacy that opens up to reveal a mildly spiced Japanese curry inside? If not, then it’s high time you got to know Kare Pan, or Japanese curry bread!
Japanese curry pan: The star of the bakery!
Kare pan is one of the most beloved savoury pastries in Japanese bakeries. Before experiencing its true flavour, people often imagine it as simply deep-fried bread with a curry filling. But it is so much more than that.
The combination of fluffy yeast dough, a crispy coating and a savoury curry filling is simply irresistible.
The idea behind Kare Pan is simple, but the art lies in the execution. A perfect curry bun should be crispy when you bite into it, whilst the dough is chewy, but not too thick. And although it is deep-fried, it shouldn’t be greasy. The curry filling must be the centrepiece of the bun and should fill it completely. It’s quite a challenge, but the result is well worth it!
The advantage of making Kare Pan yourself is that you have complete control over the curry filling. Simply use your favourite curry recipe, or experiment with different ingredients. The most important thing is that the curry is thick and paste-like so that it can be easily wrapped in the dough.
What do we need for curry pan?
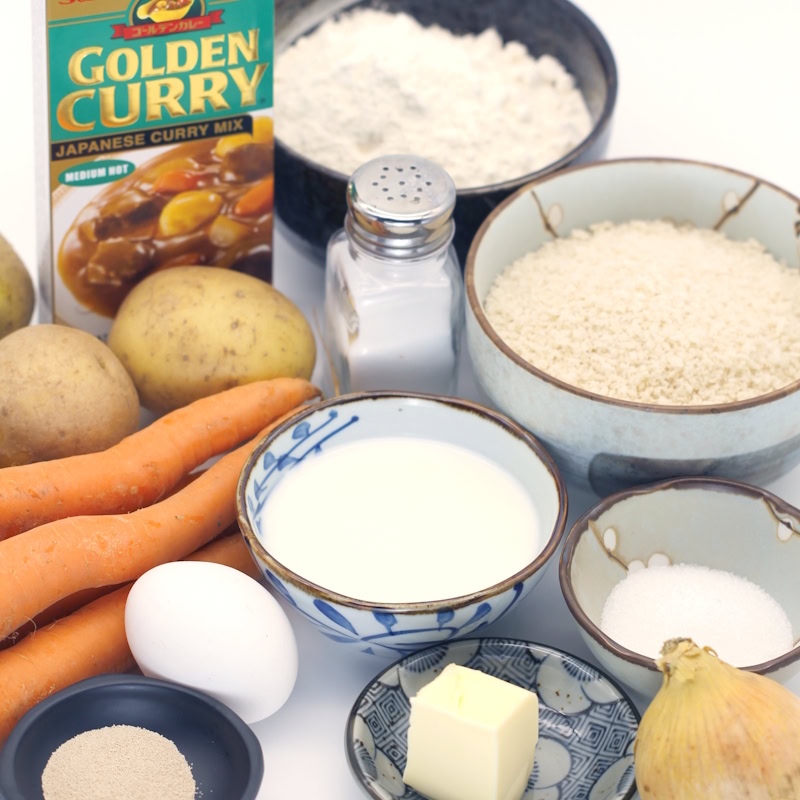
Fortunately, the ingredients for this Japanese snack are quite standard and easy to find. The exact recipe and quantities are given below:
- Flour
- Sugar
- Salt
- Yeast
- Milk
- Butter
- Egg
- Curry (im Shop ansehen)
- Panko (im Shop ansehen)
To make the yeast dough, heat the milk and butter, then mix with the flour, sugar, salt and dried yeast; the dough should then be left to rest for an hour. Meanwhile, for those who prefer fresh curry, you can sauté the vegetables, cook them and mix them with curry cubes to form a thick mixture.
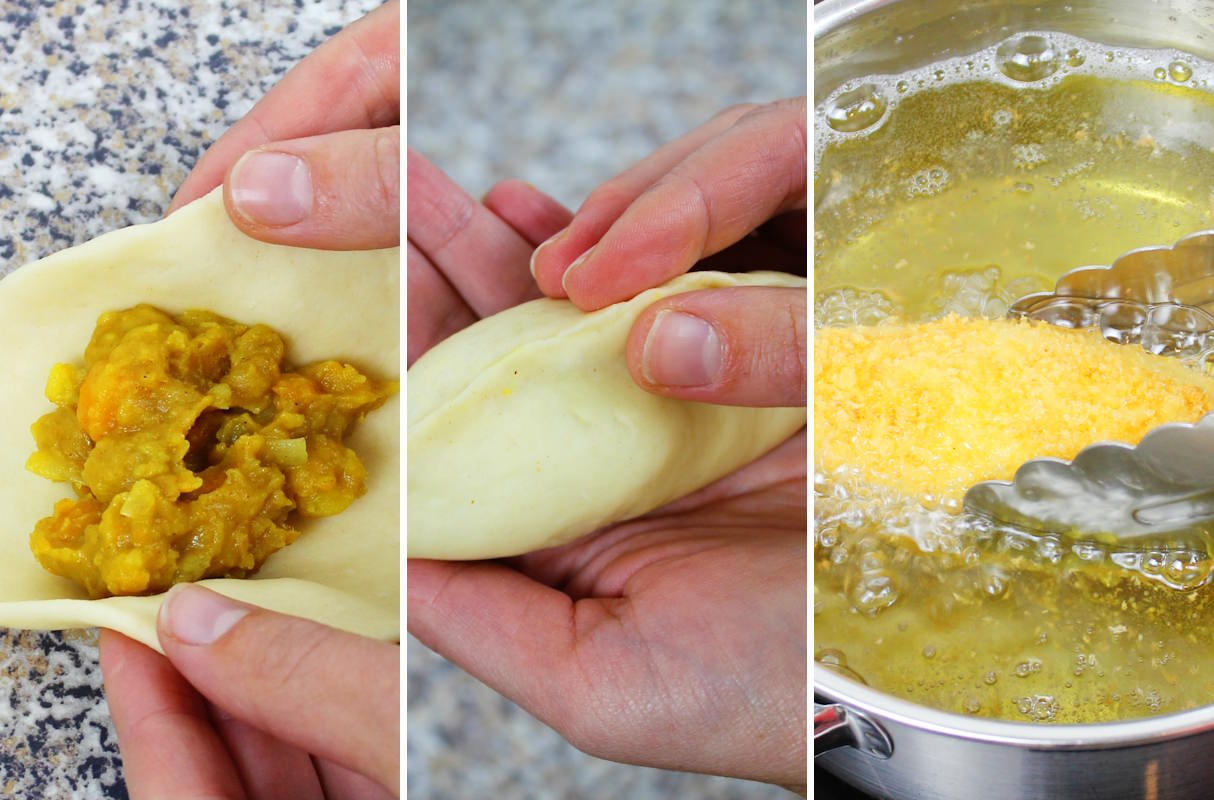
Once the dough is ready, shape it into eight balls and roll them out into circles. These circles are then filled with 1–2 tablespoons of the curry, taking care to keep the edges dry and seal them carefully. The filled pastries are then first dipped in beaten egg and then rolled in panko, before leaving them to rest for 30 minutes. They are then deep-fried in hot oil until golden brown.
It is recommended to serve the freshly fried curry pan slightly warm to enjoy their best flavour. If there are any left over, they can be stored in an airtight container in the fridge for up to three days once cooled.
If you want to eat them later, they should be briefly reheated in the oven at 180°C to restore their crispy exterior.

Before we start, I have three important tips for you:
- Don’t roll out the dough too thinly, as described in the recipe below!
- Don’t overload the dough sheets with too much curry paste!
- As soon as you’ve placed a bun in the oil, you should turn it straight away!
Kare Pan may seem simple at first glance, but it requires patience and precision. However, the effort is well worth it. Once you’ve perfected this recipe, you’ll never want to buy shop-bought curry bread again. So, what are you waiting for? Embark on the delicious journey of making Kare Pan and win the hearts of your loved ones in no time!
If you have any questions or suggestions, please feel free to use the comments section below the recipe 😊. Have fun and good luck making traditional Japanese curry pan!
Curry Pan
Serves 8 | 120 minutes | 368 kcal
🖨️ Print PDF 📌 Save pinA savoury curry filling, wrapped in a heavenly fluffy dough and finished with a golden-brown, crispy panko coating. This is Kare Pan, the star of every Japanese bakery! If Japanese curry has already won your heart, just wait until you’ve tried this delicious snack. The combination of a crispy coating and a savoury filling will captivate you from the very first bite. Let yourself be tempted and dive into the irresistible world of curry pan!
Ingredients (makes 8)
For the yeast dough:
200 g flour (here: plain flour)
2 tbsp sugar
1 tsp salt
3 g yeast (here: dried yeast)
125 ml milk
10 g butter
For the vegetarian curry:
400 g potatoes
400 g carrots
1 large onion
2 tbsp oil (e.g. sunflower oil)
500 ml water
1 packet </ strong>curry (im Shop ansehen)*
OR leftover curry from the day before (to the recipe)
For deep-frying:
1 egg
100 g panko (im Shop ansehen)*
plenty of oil (for deep-frying)
Preparation (2 hours)
Step 1
Get the ingredients for the homemade curry buns or kare pan ready.
Tip: If you want to use leftover curry, place it in the fridge overnight if necessary and then purée it into a paste before use.
Step 2
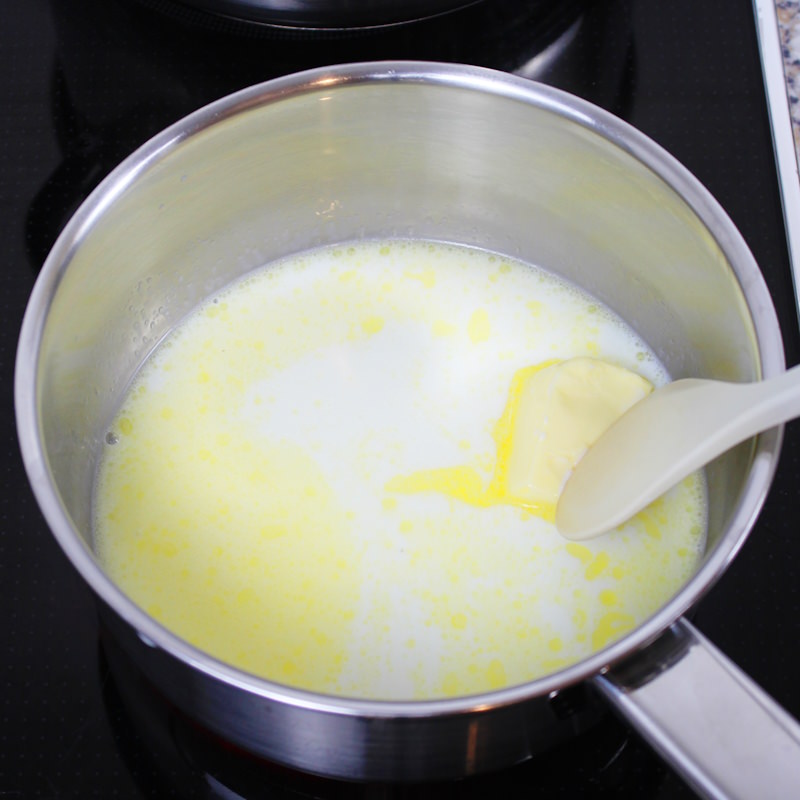
First, let’s prepare the dough: Pour the milk into a small saucepan and add the butter . Heat both slowly and remove from the heat as soon as the butter has melted. Leave to cool briefly.
Passaggio 3
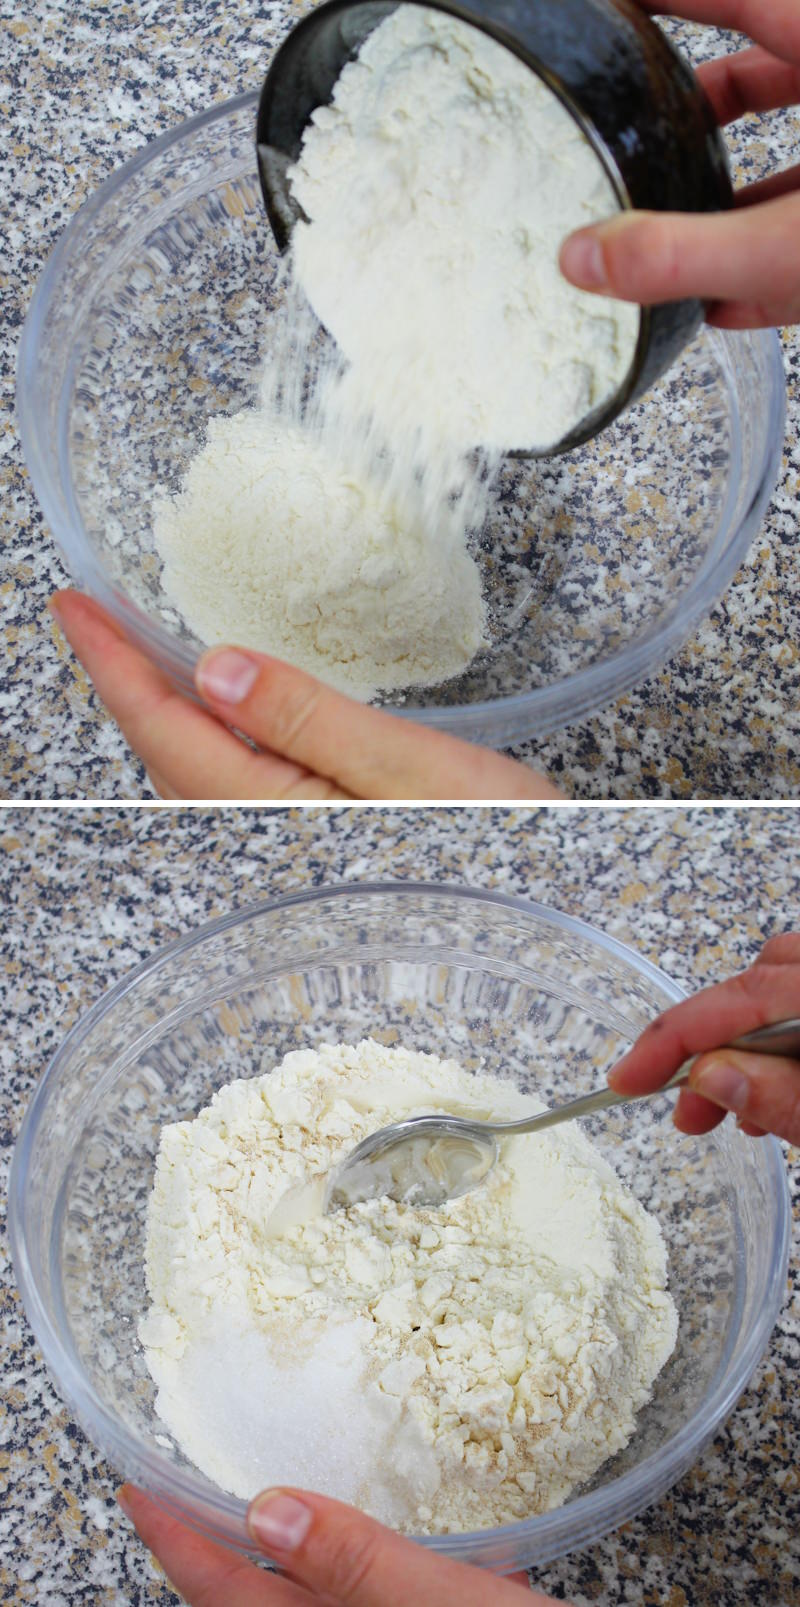
Meanwhile, in a large bowl, add the flour, sugar, salt and dried yeast for the yeast dough and mix together with a spoon.
Step 4
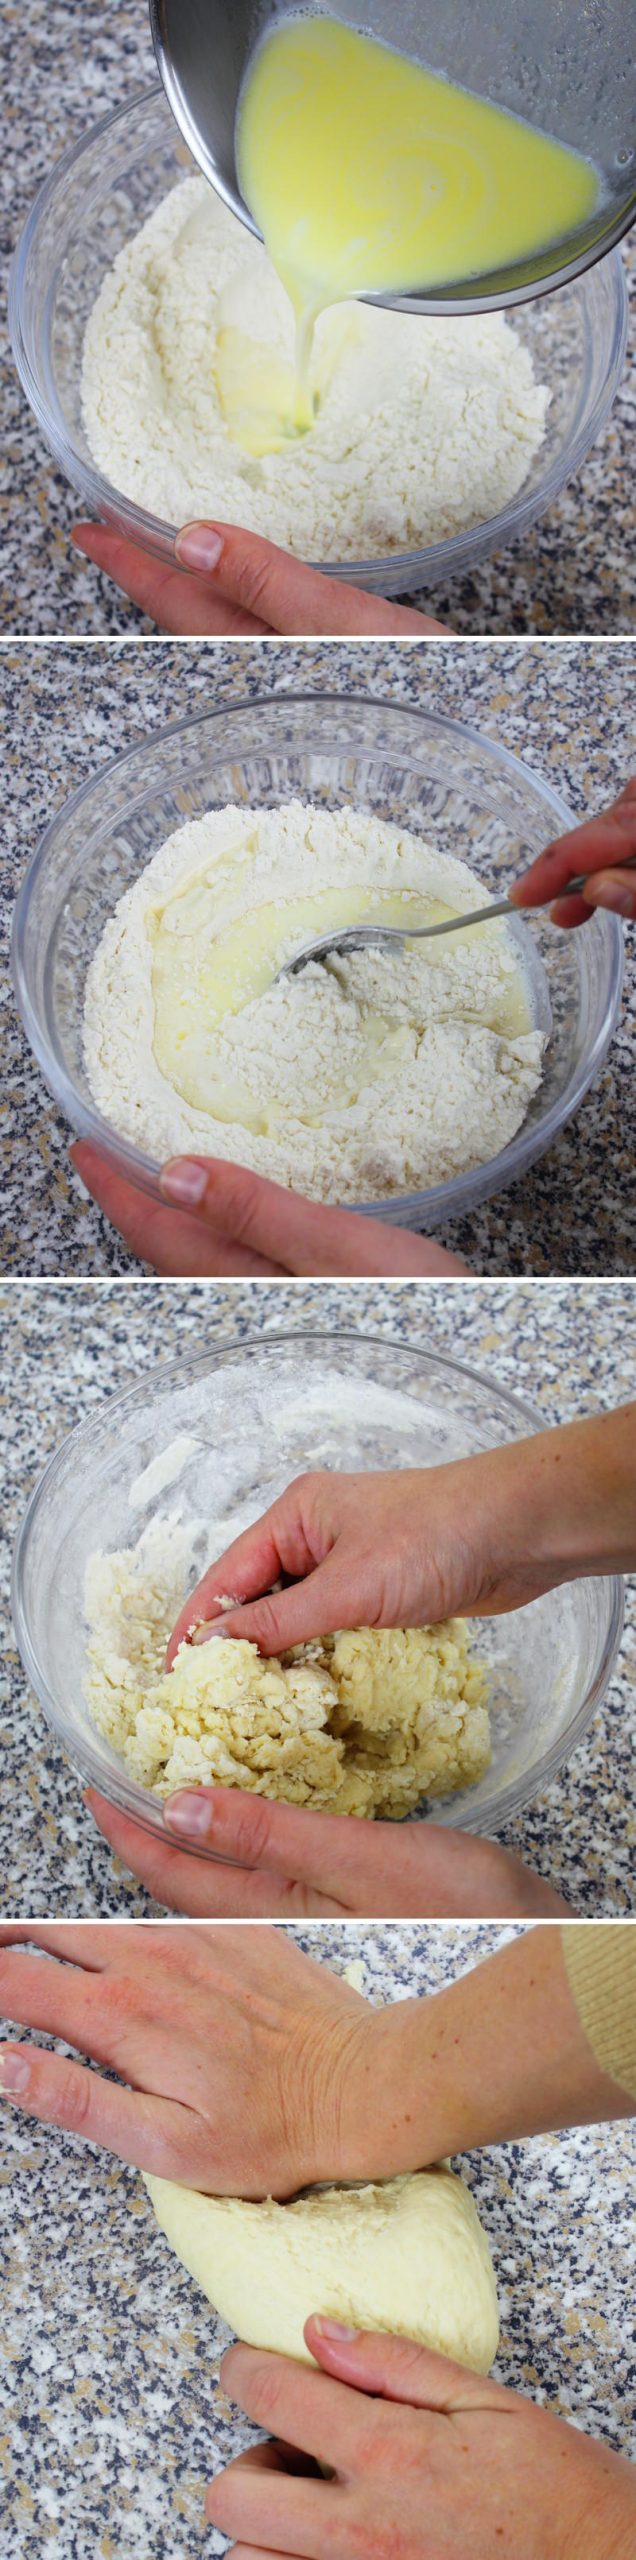
Next, add the milk and butter mixture to the bowl with the dry ingredients. First mix everything together with a spoon , then with your hands in the bowl and finally on a clean work surface </ strong>carefully and vigorously so that a smooth yeast dough forms (knead vigorously with the palms of your hands for about 5 minutes). If the dough sticks to your palms, gradually knead in some flour.
Passaggio 5
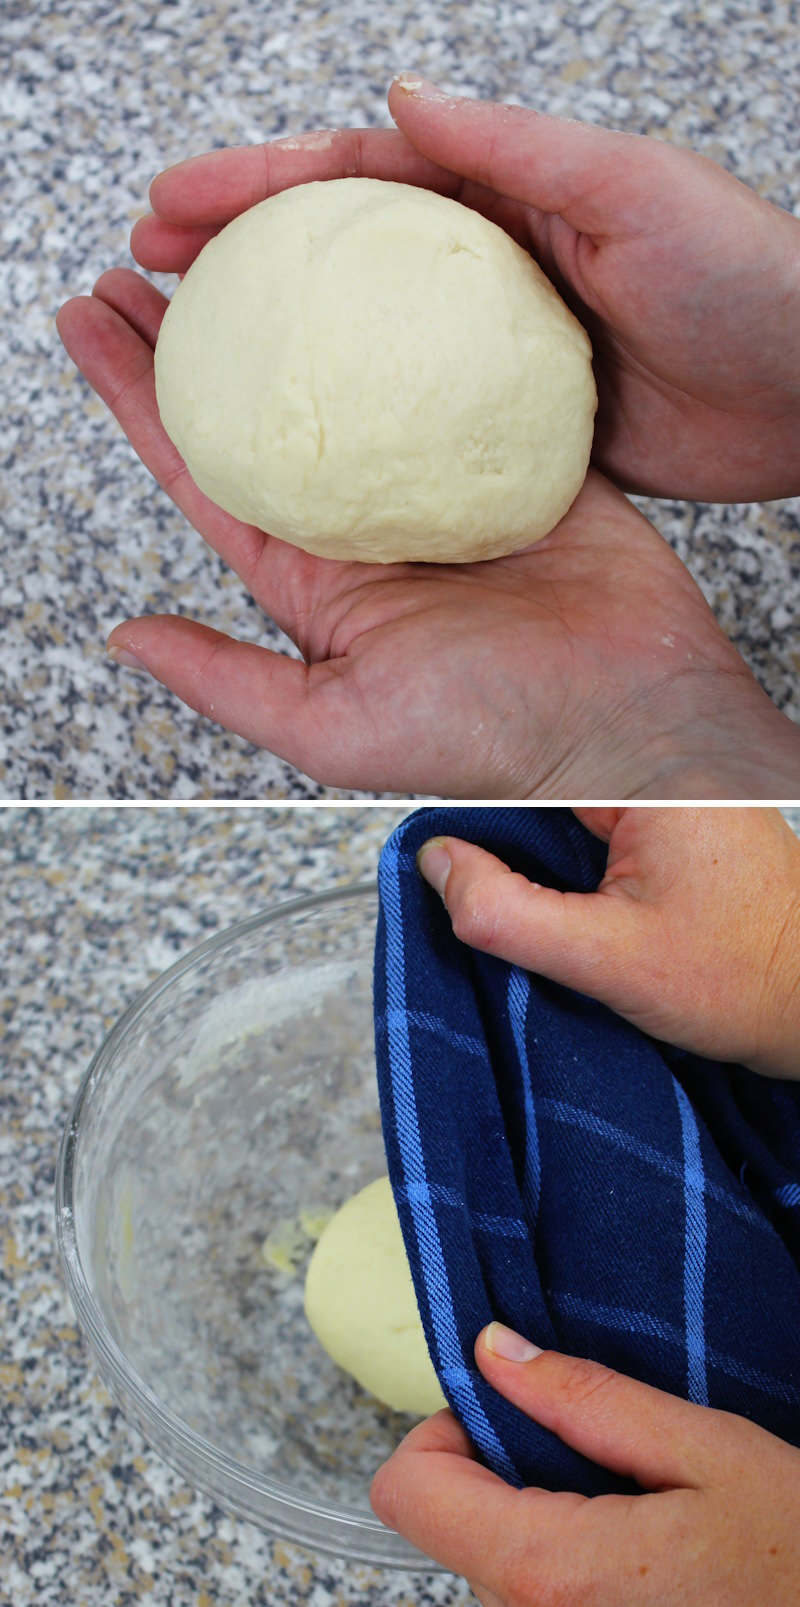
Shape the dough into a ball and leave it to rise in the bowl for about 1 hour, or until it has doubled in size, covered with a slightly damp tea towel in a warm place.
Step 6
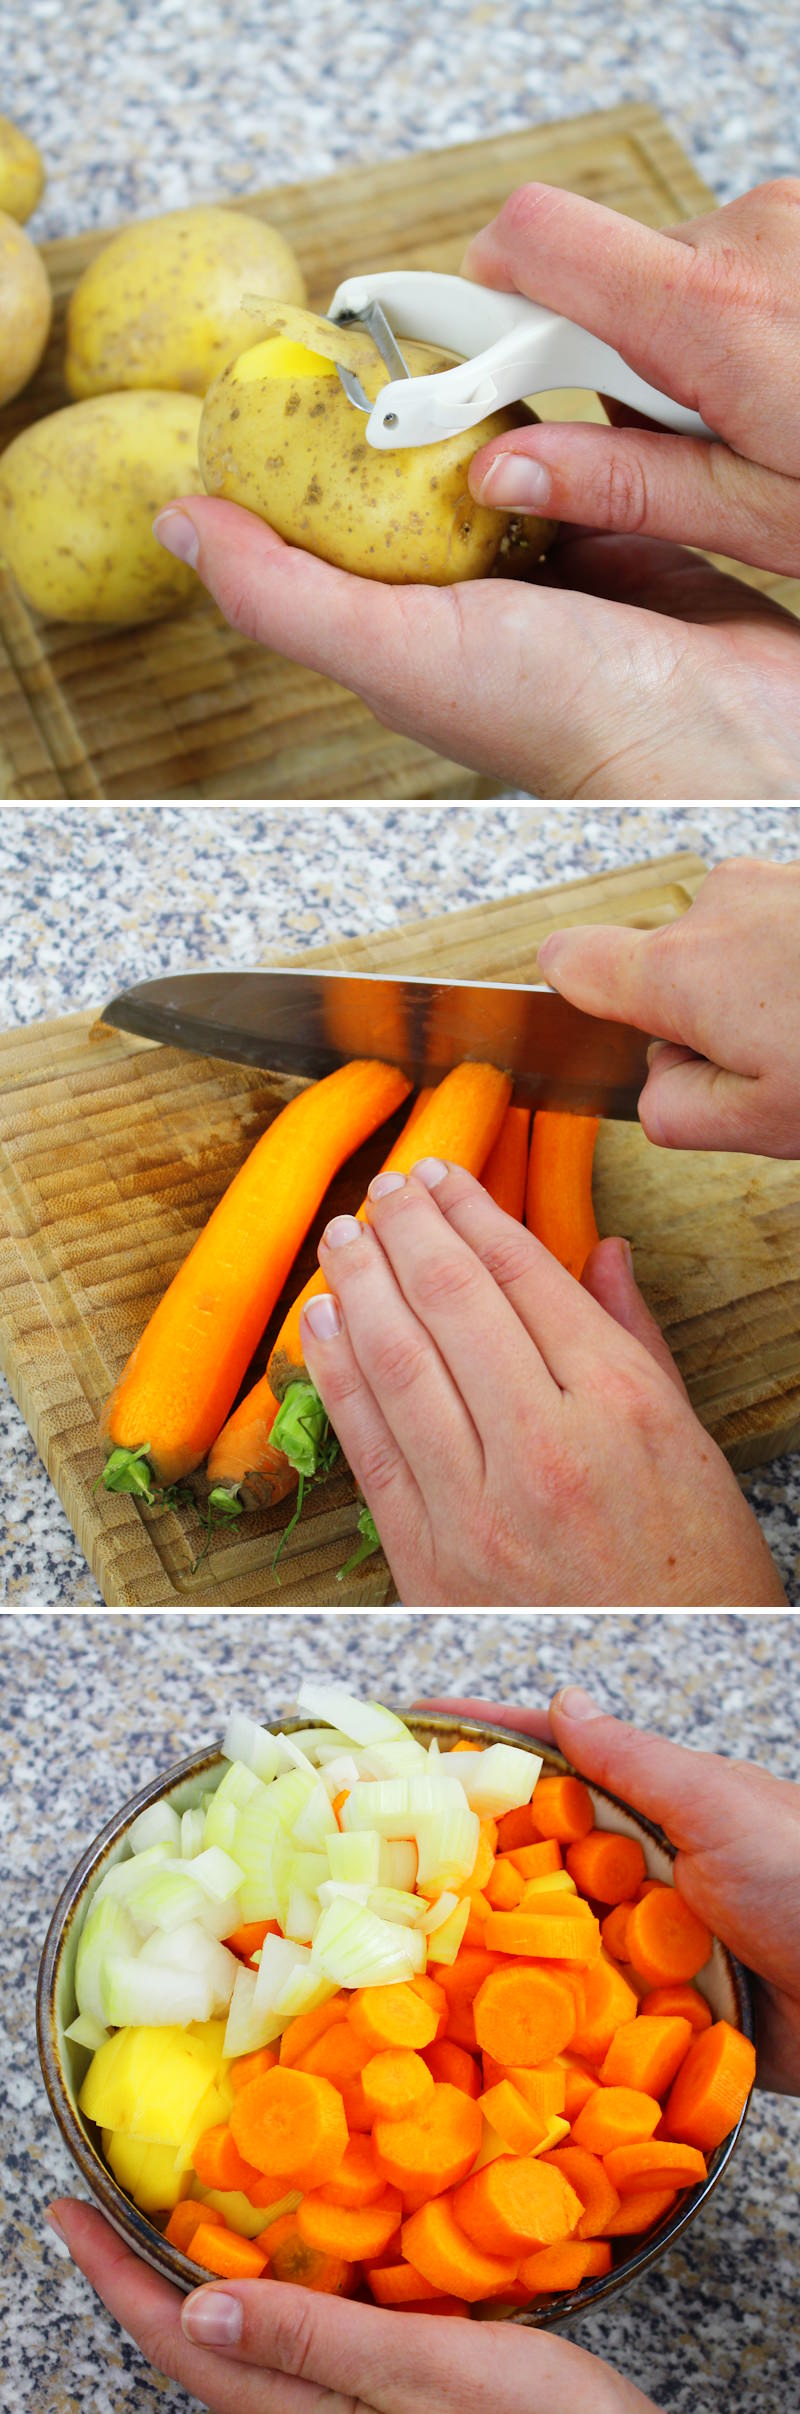
Meanwhile, we’ll prepare the vegetable curry, in case you’d like to make a fresh curry: To do this, peel the potatoes, carrots and onions and cut them into small pieces.
Step 7
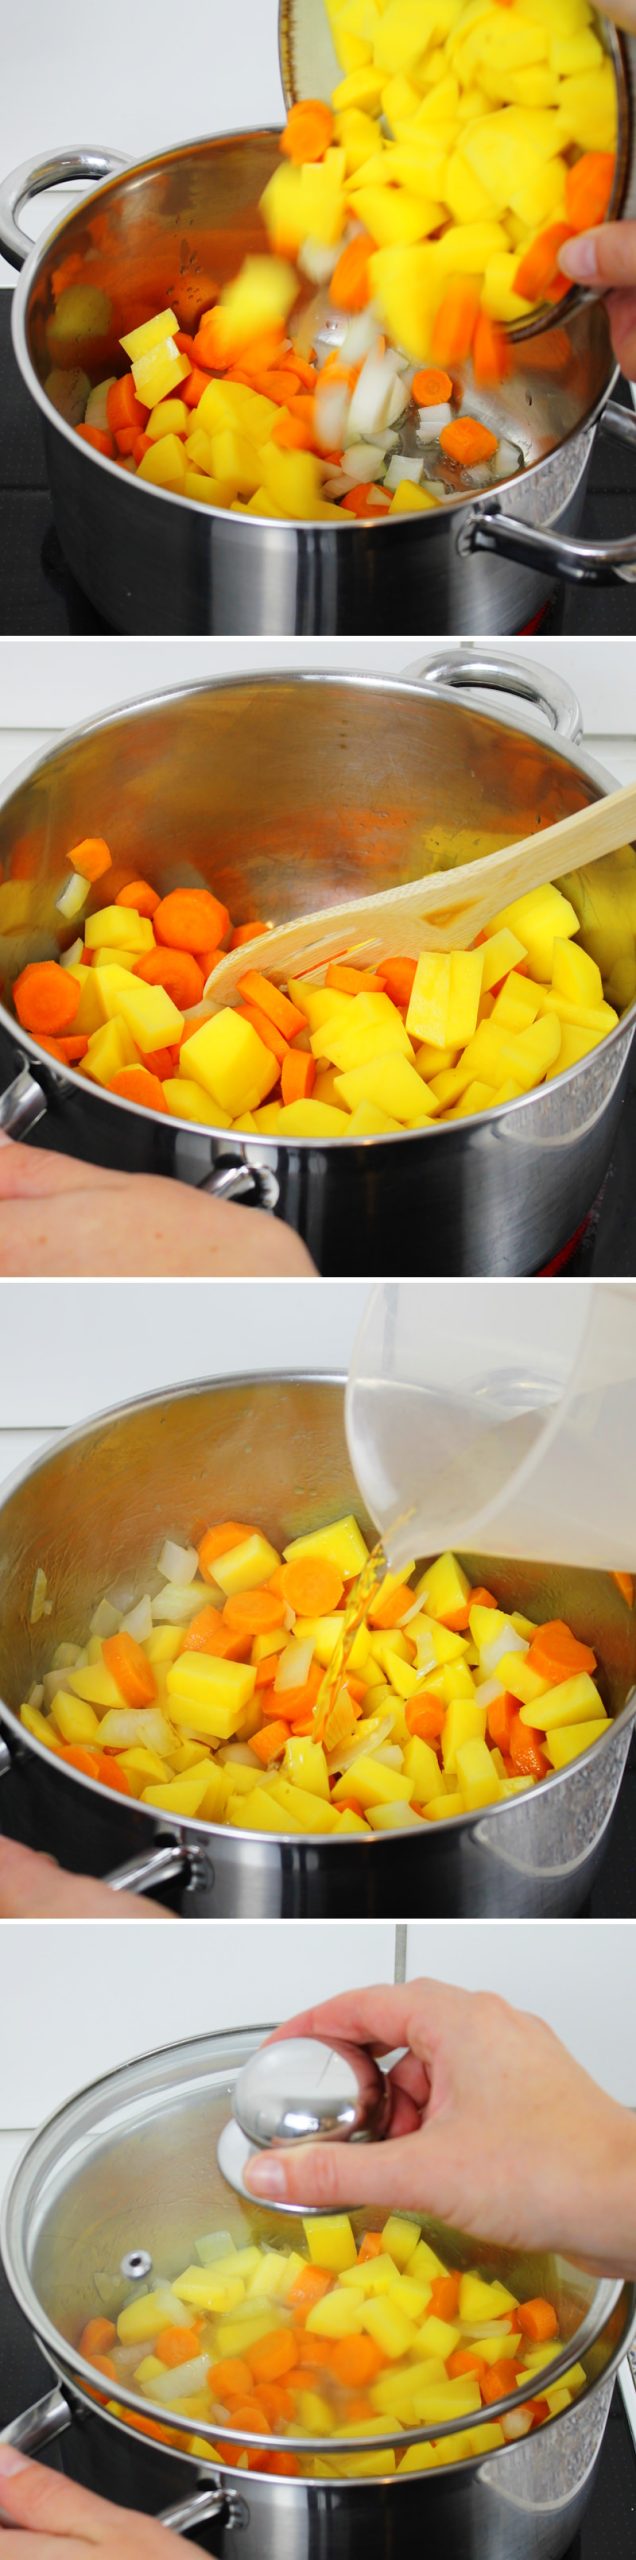
Heat the oil in a large saucepan and add the vegetables. Fry everything vigorously on all sides for about 5 minutes. Then pour water over the mixture and stir well. Put the lid on and reduce the heat so that the water in the pan simmers gently. Cook for about 15 minutes until the potatoes are soft.

Step 8
Once the vegetables are cooked, turn off the heat and add the unwrapped and crumbled curry . Stir in the curry cubes until they have dissolved. Remove from the heat and leave to cool for 5 minutes.
Tip: We only need about 100 g of the prepared curry for the filling. You are welcome to use the rest to make Curry Rice or freeze it.
Step 9
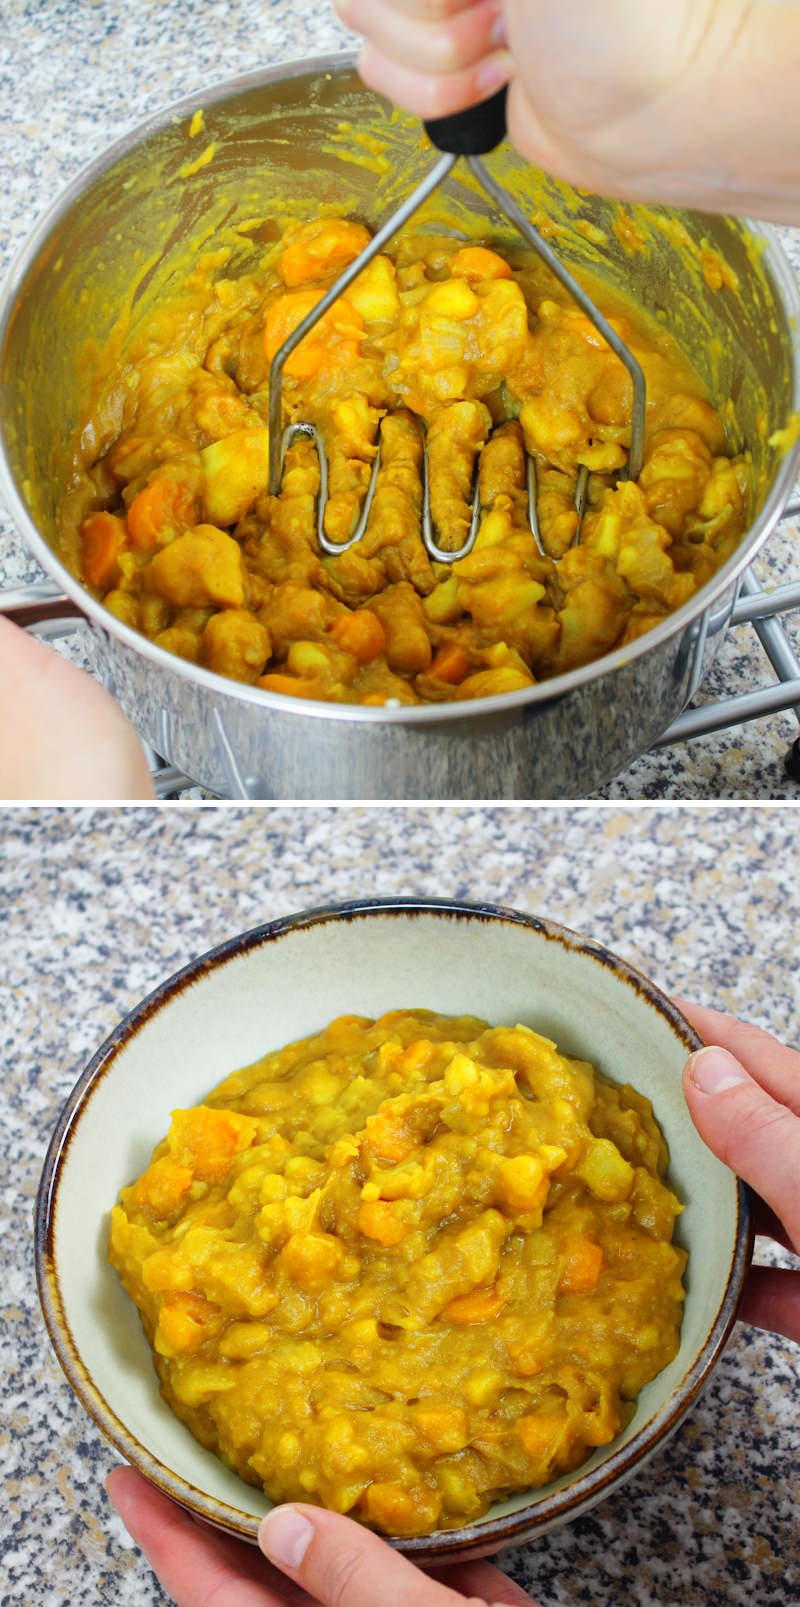
Then either purée the curry or mash it slightly with a potato masher to create a more even mixture that can be used to fill the rolls easily.
Step 10
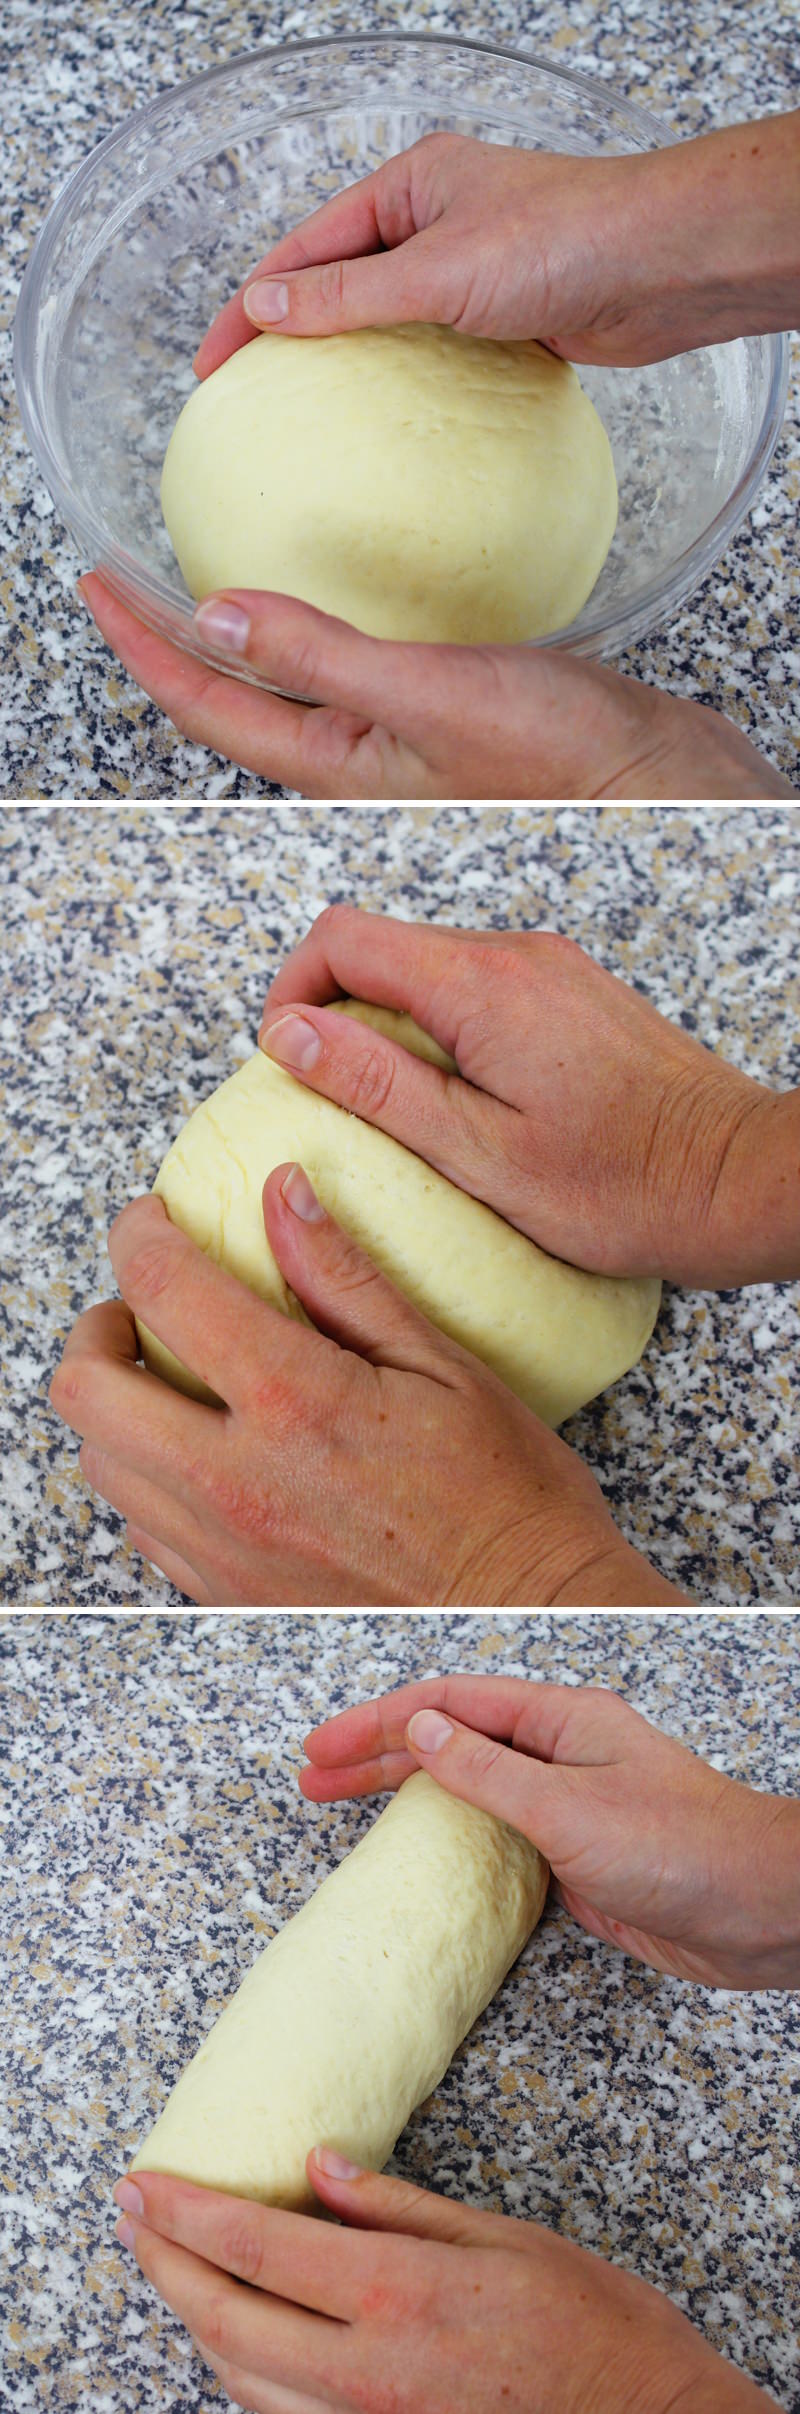
Back to the yeast dough: Once the yeast dough has doubled in size, lift it out of the bowl, knead it briefly and shape it into a long roll.
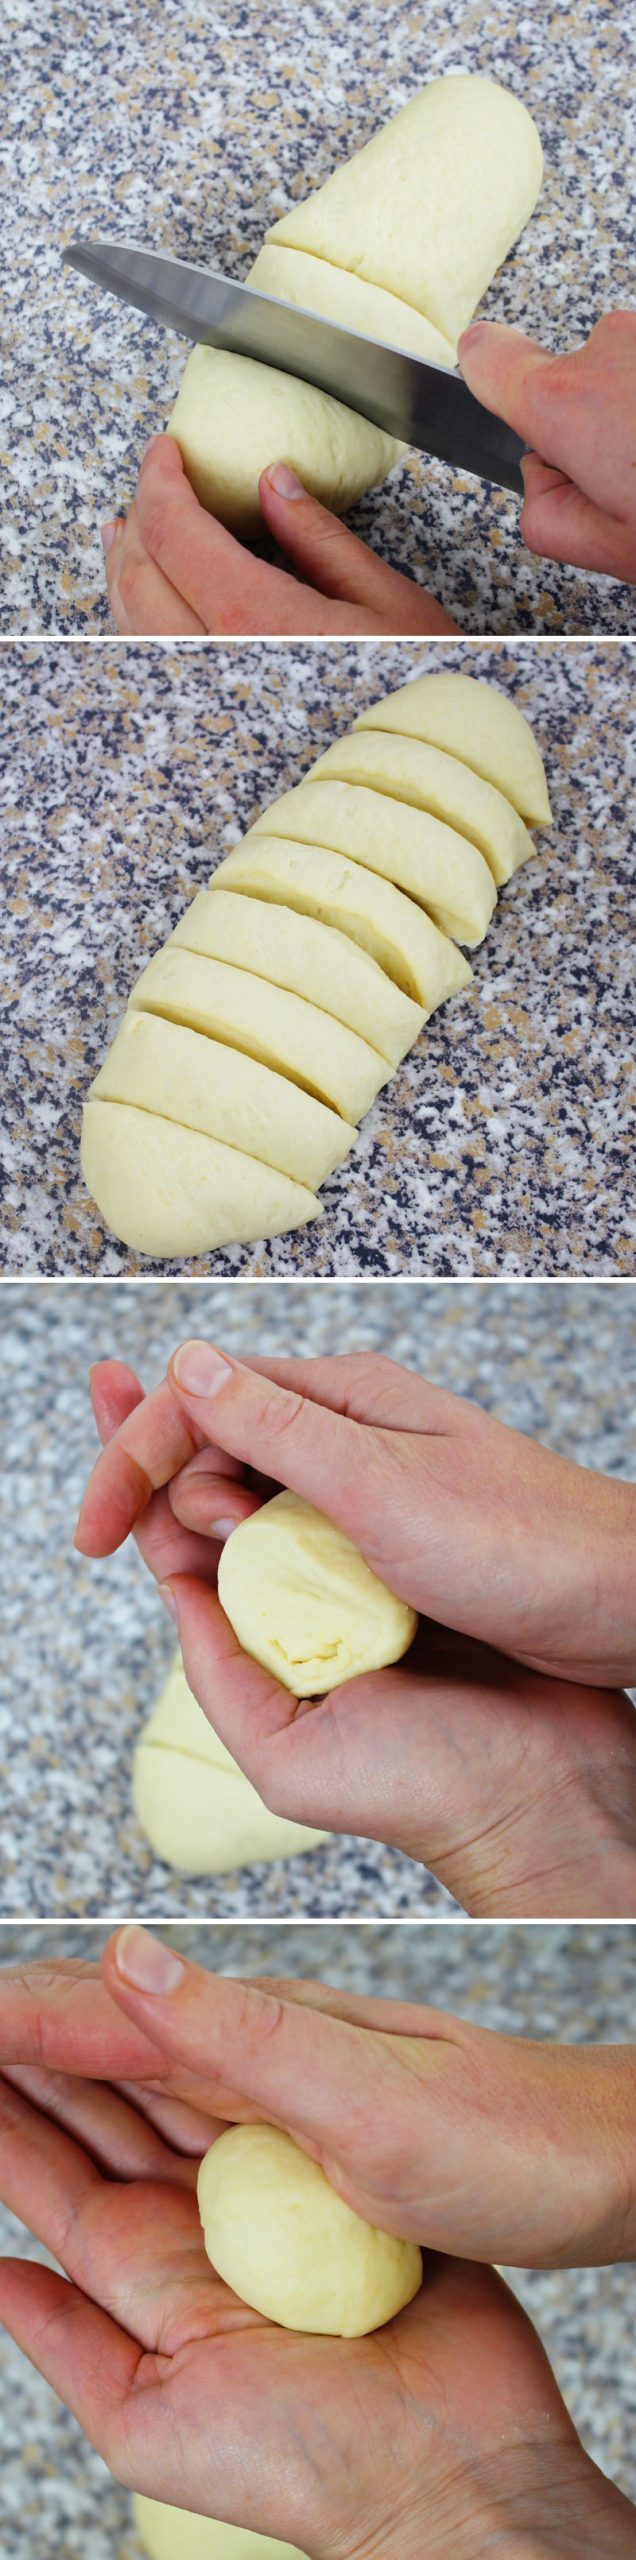
Step 11
Now cut the dough into 8 equal-sized pieces and shape them into even balls. The best way to do this is to roll them into a ball between your palms and then flatten them on the work surface. Shape all the pieces in this way and set them aside.
Passaggio 12
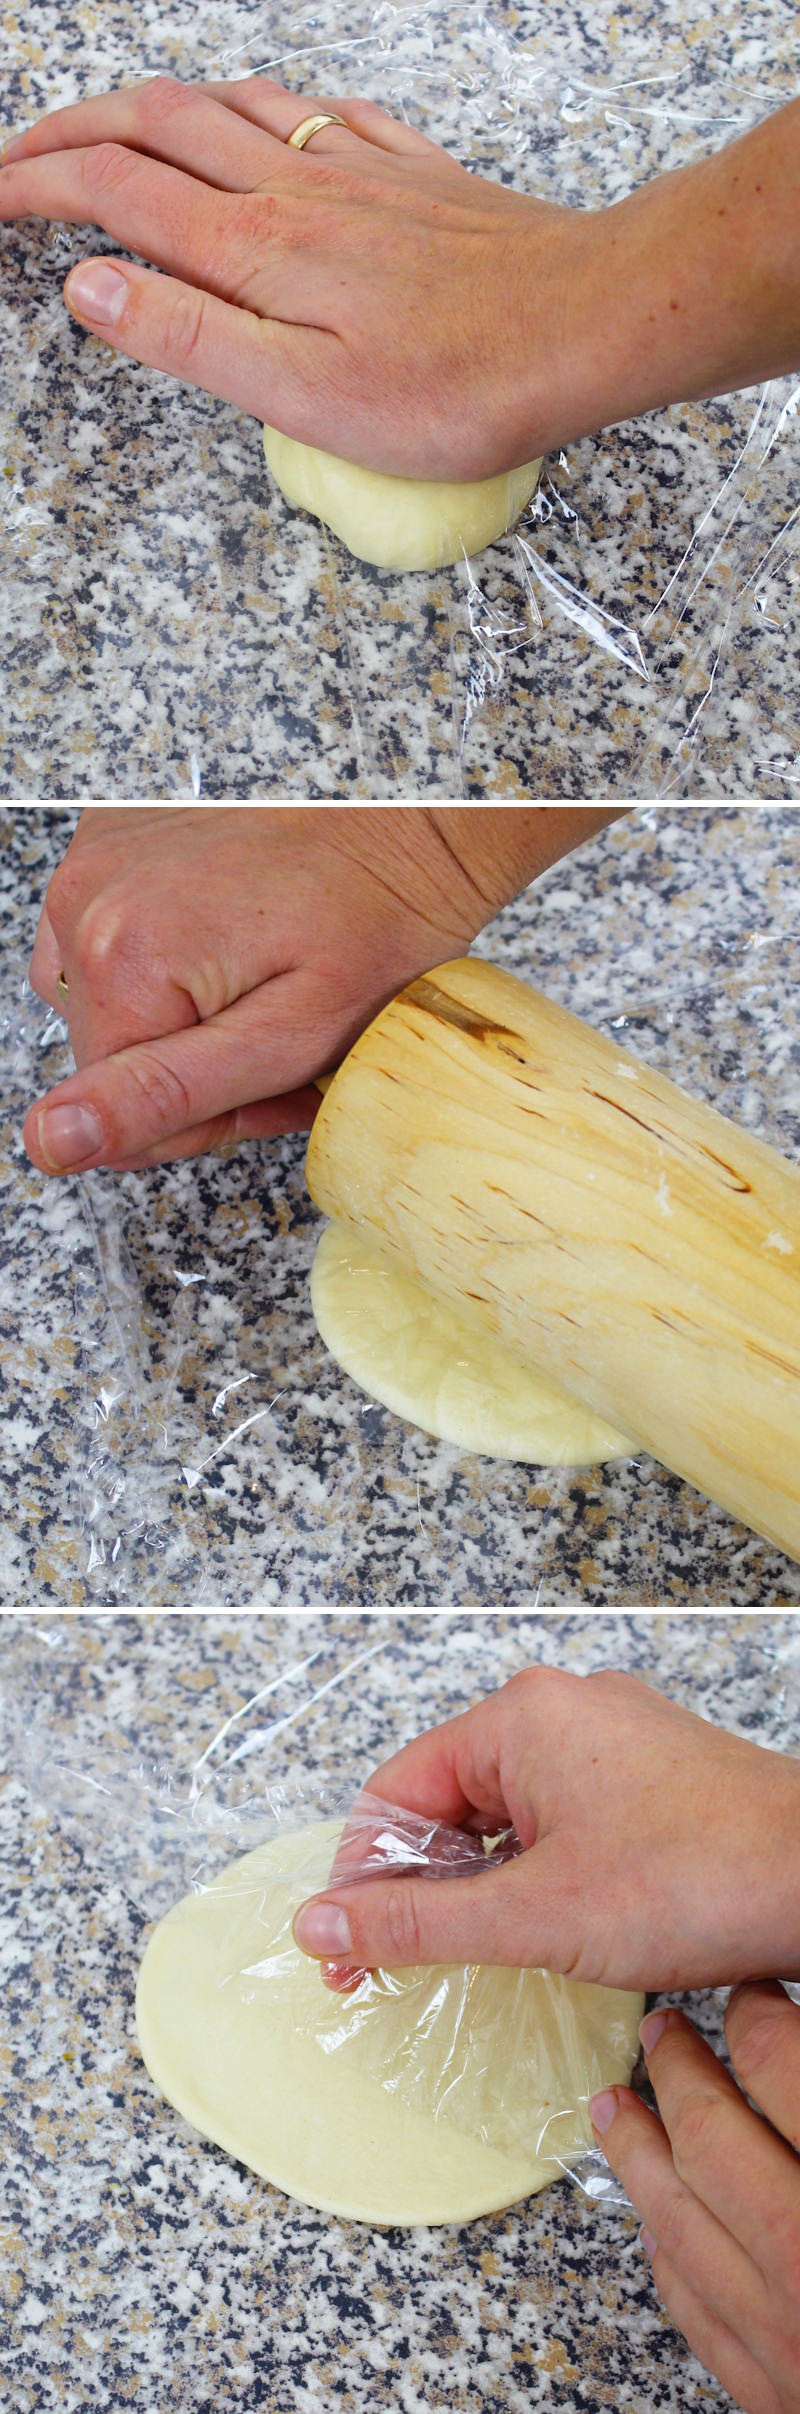
Place a ball on a clean work surface, cover with a little cling film , then gently flatten it with the palm of your hand and roll it out with a rolling pin into a circle (diameter approx. 10 centimetres) . Remove the cling film and set aside.
Passaggio 13
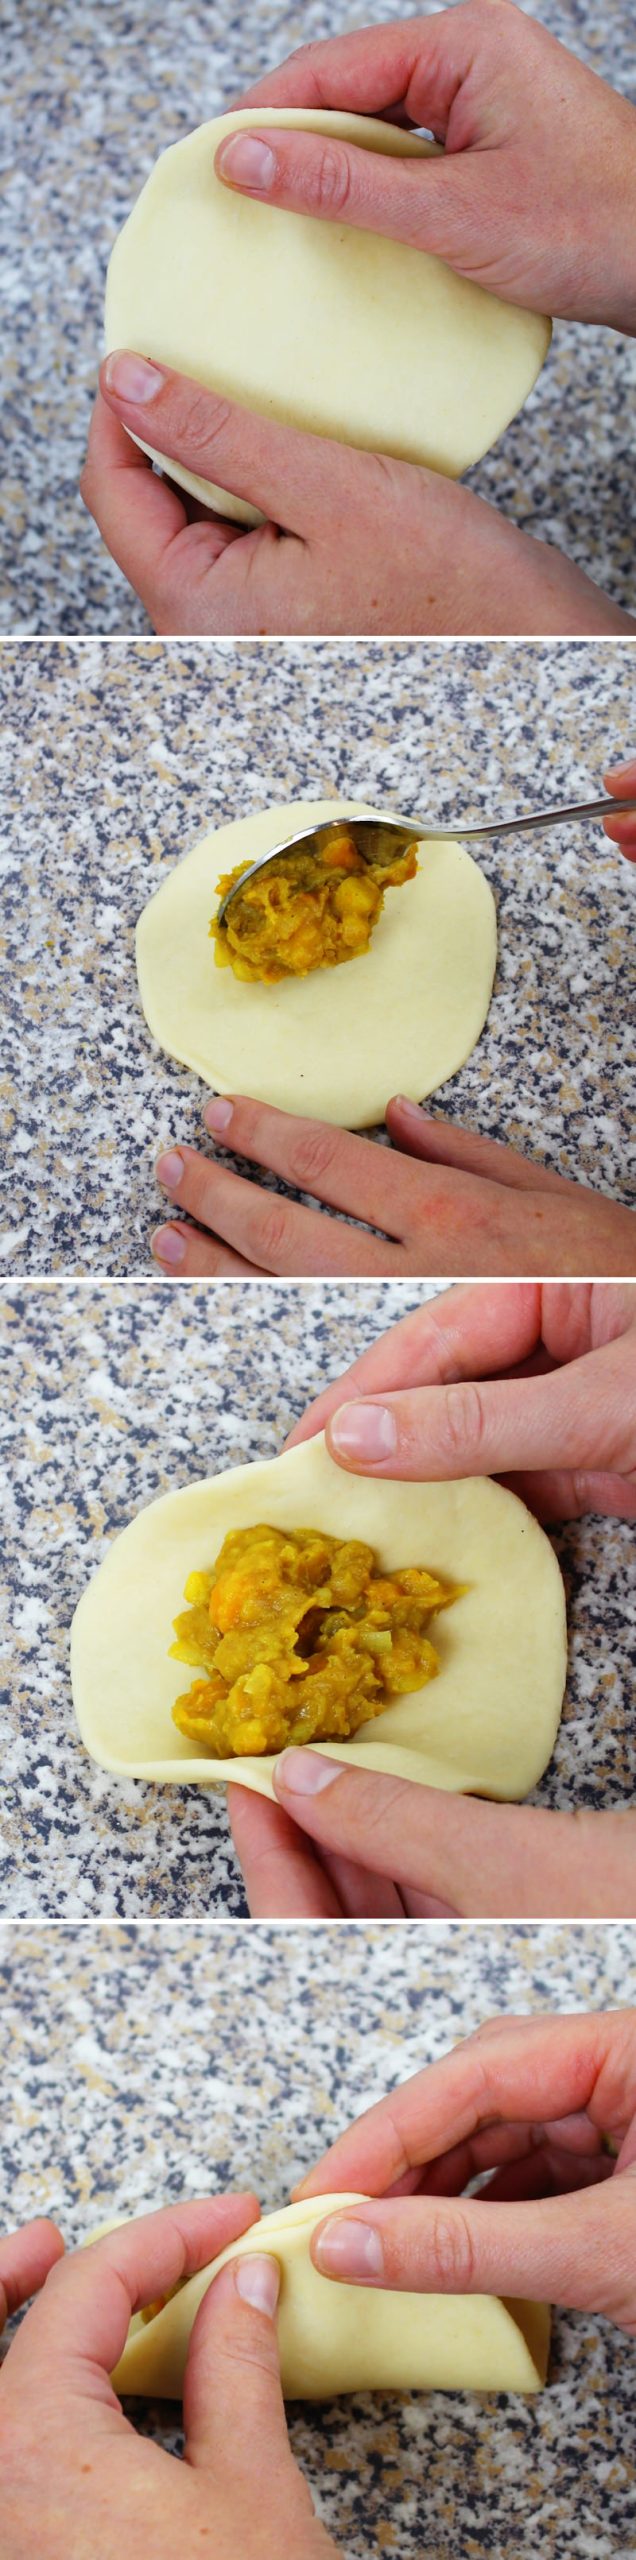
Stretch the dough sheet out a little more with your hands and place 1–2 tablespoons of the curry in the centre. Please make sure not to overfill the bun. Also, ensure that you keep the edge of the dough dry!
Using your fingers, take two opposite sides of the dough edge and press both sides firmly together lengthways with your fingertips.
Passaggio 14
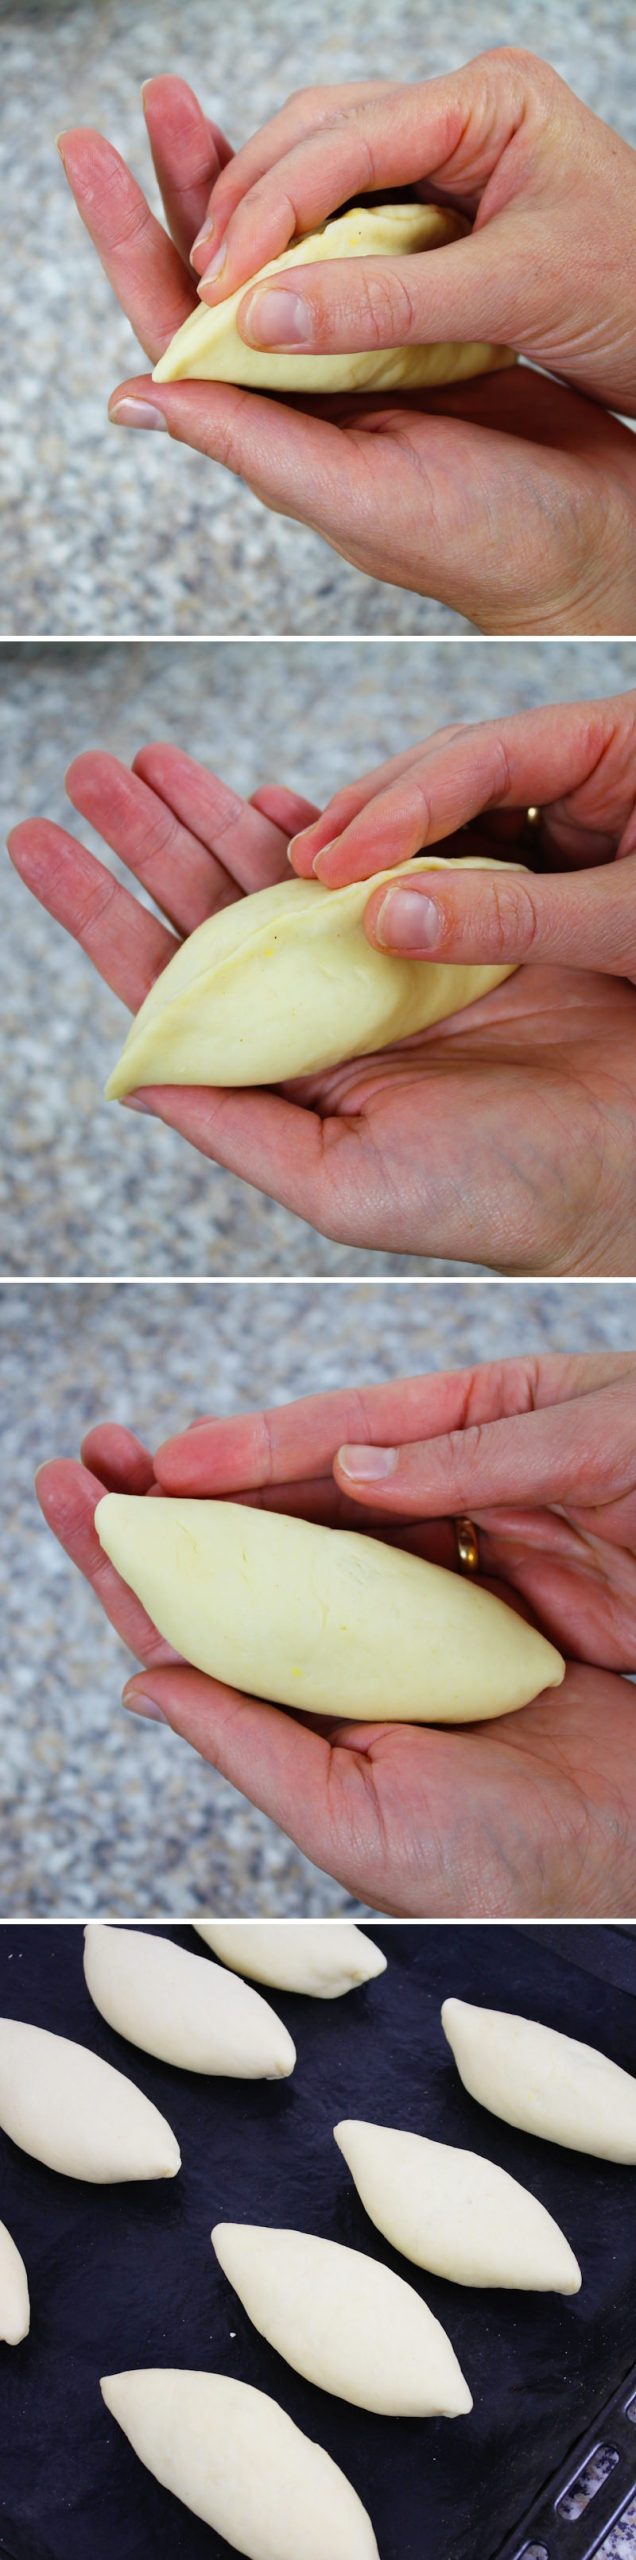
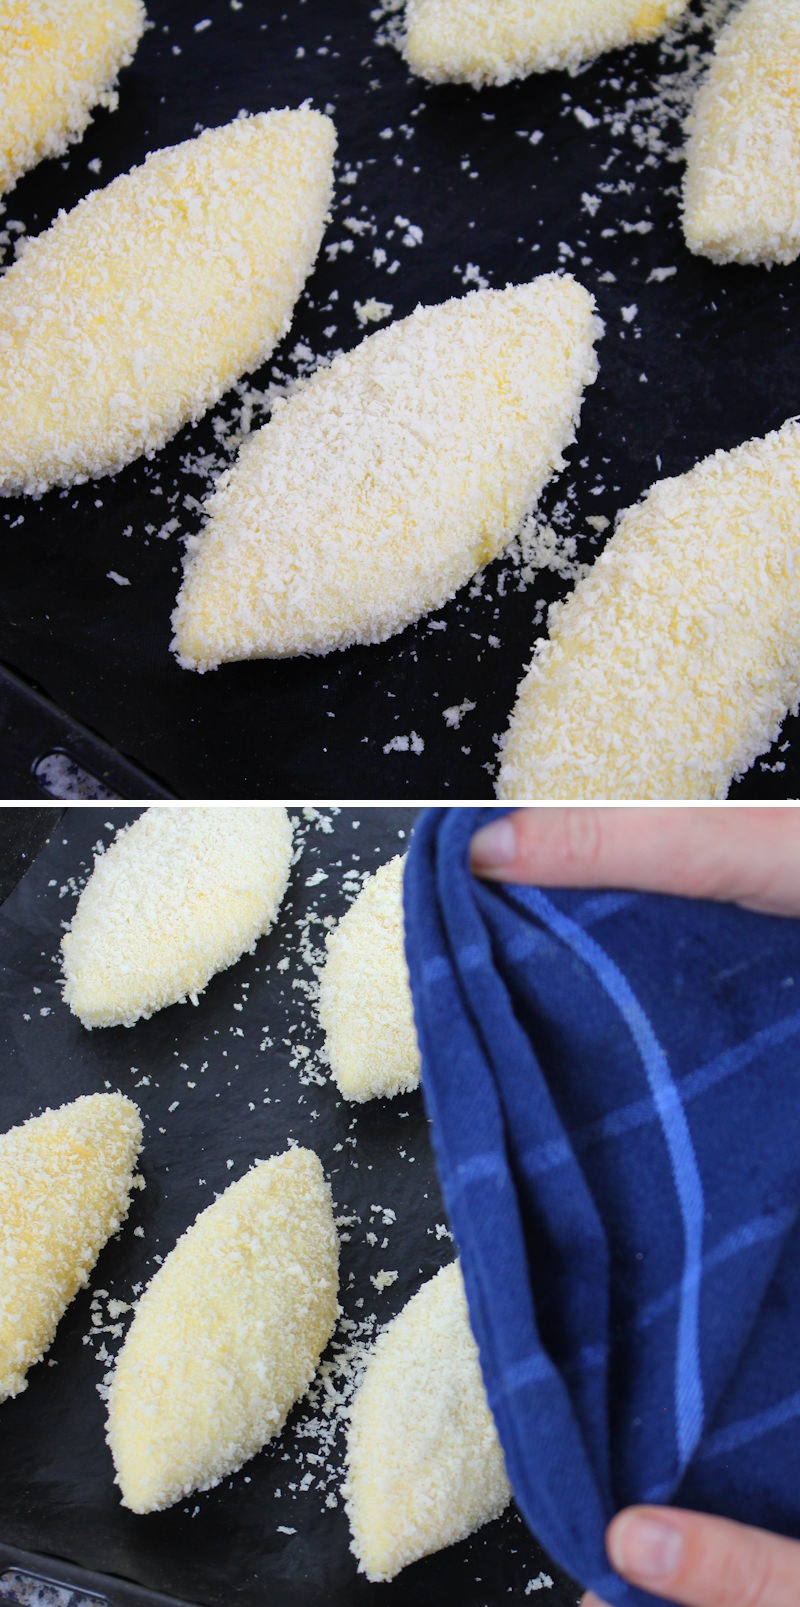
Seal the ends well and aim for an elongated oval shape. Prepare all 8 rolls in this way and place them on baking paper with the “seam” facing downwards.

Passaggio 15
In a bowl, whisk the egg and have the panko ready. Then dip each curry bun first into the egg, coating it all over, and then coat it all over with panko.
Step 16
Place the rolls back on the baking paper and leave them to prove for another 30 minutes, covered (for example with a tea towel).
Step 17
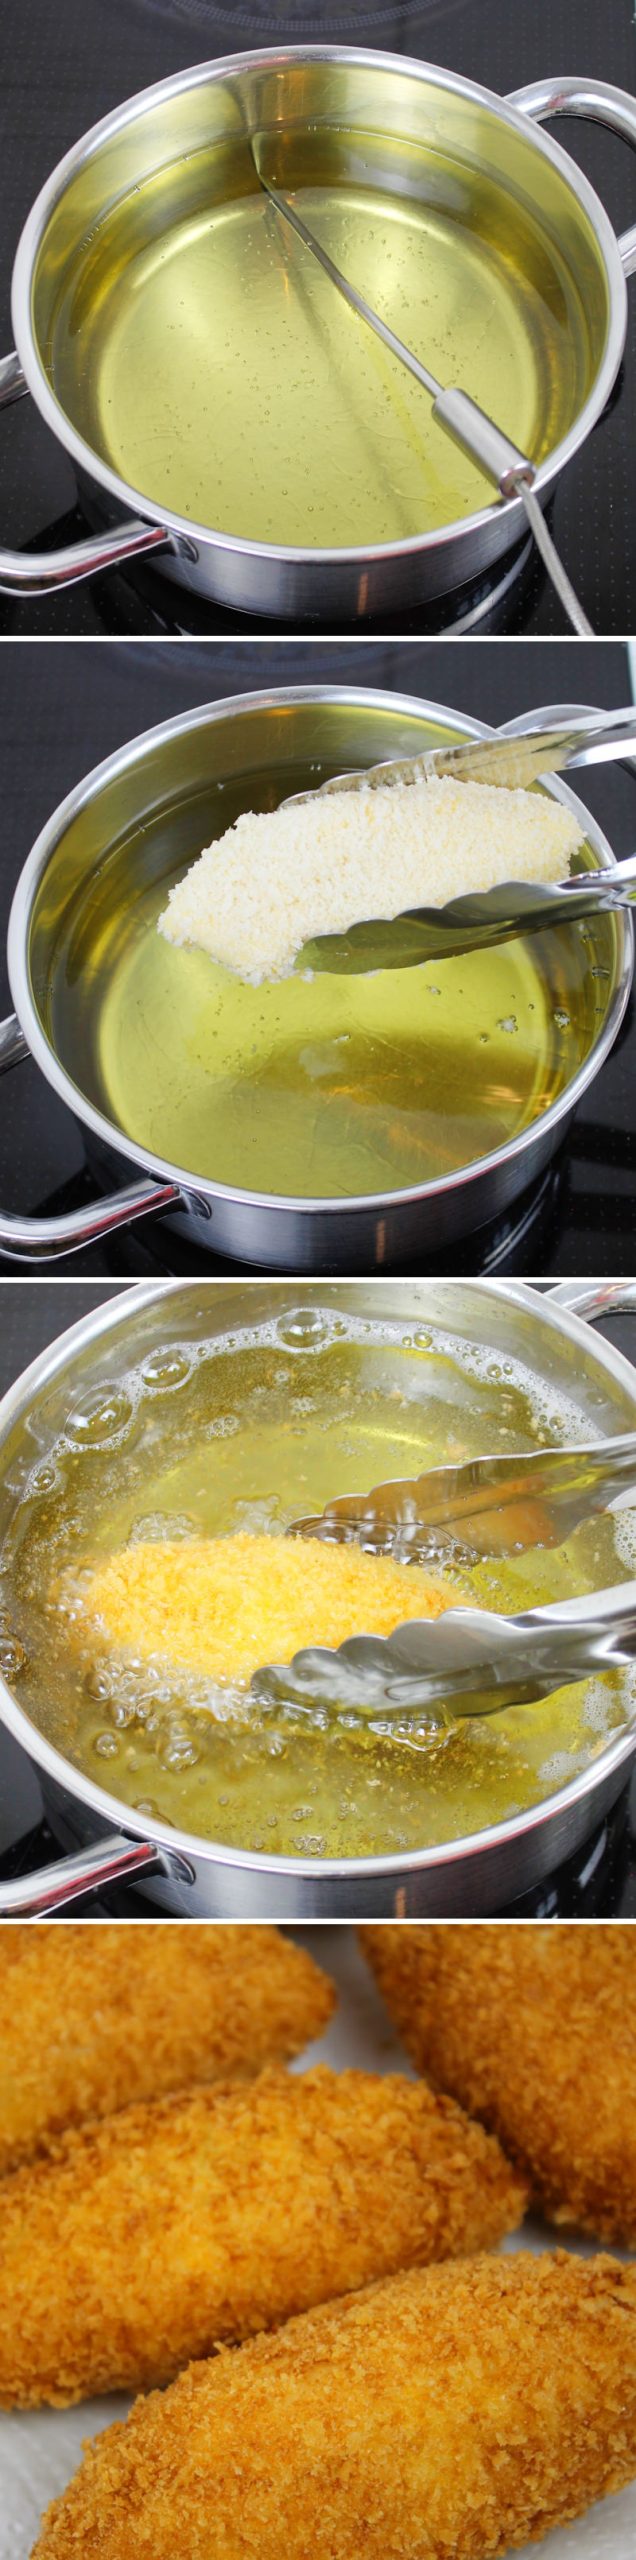
Heat the oil for deep-frying (about 400 ml here) in a suitable deep pan with high sides, into which the curry pan fits well (or, if available, use a deep-fryer), </ em>to approximately 165–175°C. It is best to check the oil with a kitchen thermometer.
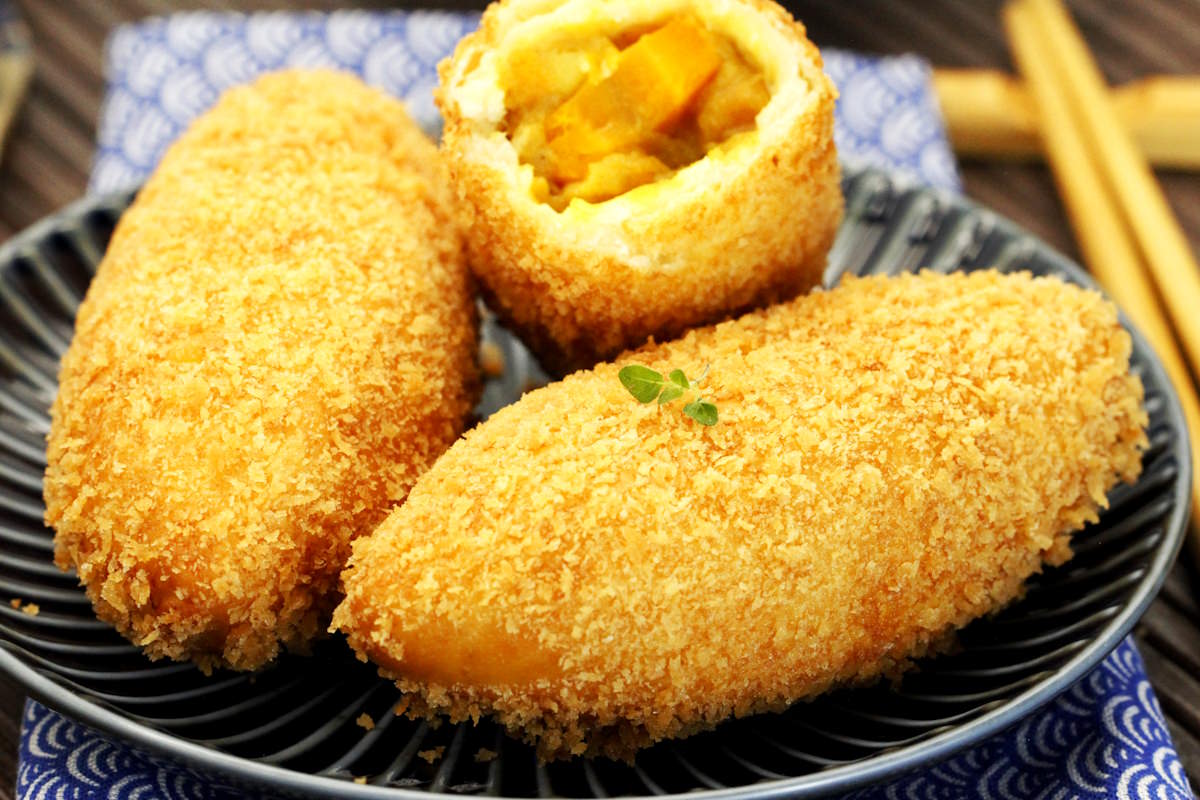
Carefully place one of the rolls into the hot oil and, using tongs, turn it in a circular motion throughout the frying process so that all sides brown evenly. Each roll takes between 2–3 minutes to fry – wait until the panko is golden brown. Place the finished curry pans on some kitchen paper to drain.
Step 18
After frying, leave the curry pans to cool on a wire rack, but feel free to serve them fresh (slightly warm) . That’s when they taste best! Done – Itadakimasu!
Tip: Once the curry pans have cooled completely, place them in an airtight container or bag and store in the fridge for up to 3 days or freeze for up to a month. Then defrost and bake briefly in the oven at 180ºC until crispy on the outside.
Of course, there are plenty of other dishes that go really well with this recipe for the whole family! Here you’ll find my favourite recipe ideas from Japan:
Butter Mochi (Hawaiian Mochi Cake)
Butter Mochi ist eines dieser Rezepte, die man nur schwer in eine Schublade stecken kann. Es sieht aus wie ein…
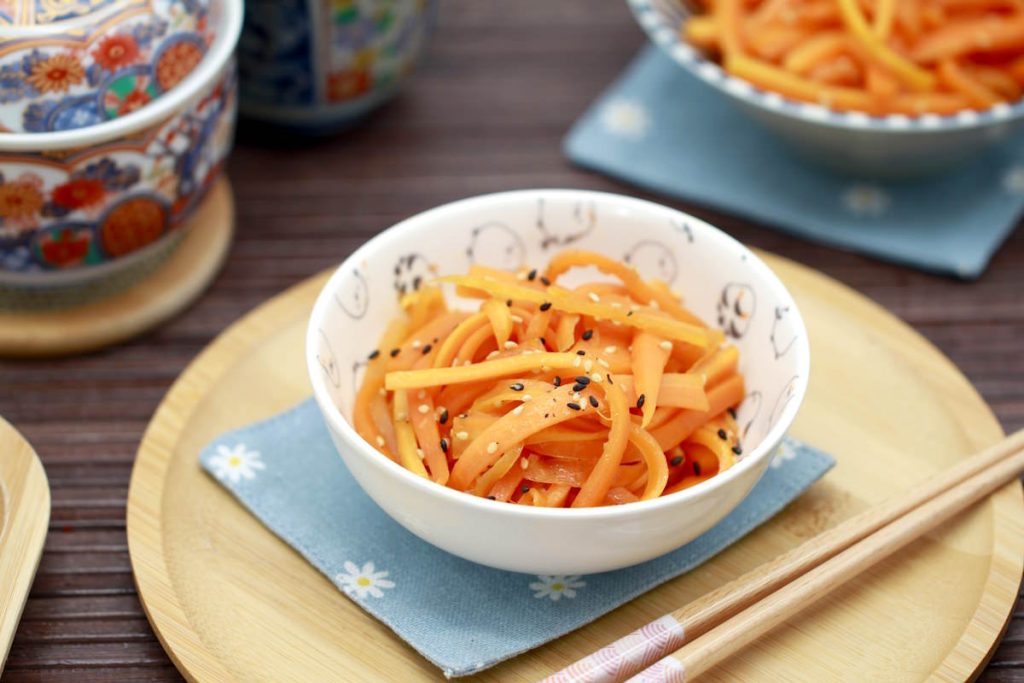
Make your own Ninjin no Kinpira: Japanese carrot side dish in the Kinpira style
Ninjin no Kinpira is a simple Japanese side dish made from finely sliced carrots that are briefly stir-fried and then…
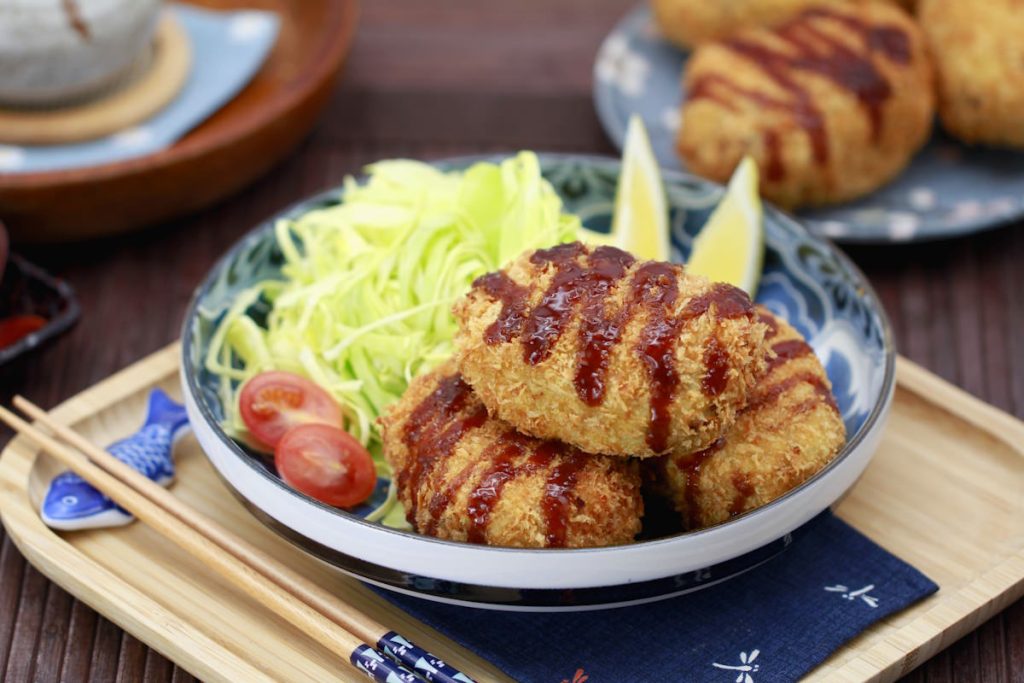
Korokke: Make your own Japanese croquettes | delicious street food from Japan
Korokke are among the best-known everyday fried dishes in Japanese cuisine. They combine simple ingredients with a straightforward technique and…
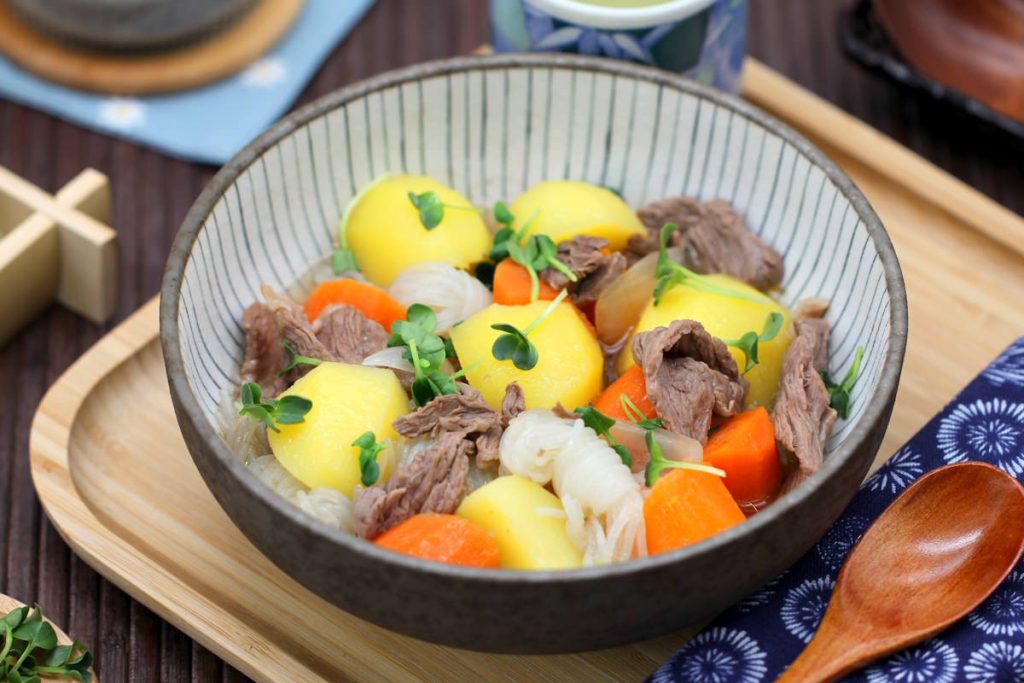
Nikujaga: Japanese potato and beef stew | Recipe for everyday cooking
I ate Nikujaga for the first time at my host family’s house in Fukui. It wasn’t a special occasion, just…

Make your own Omurice: Japanese omelette with ketchup rice & vegetables | delicious Omuraisu
Omuraisu is one of those dishes that brings an instant smile to almost every Japanese person’s face. A light, fluffy…
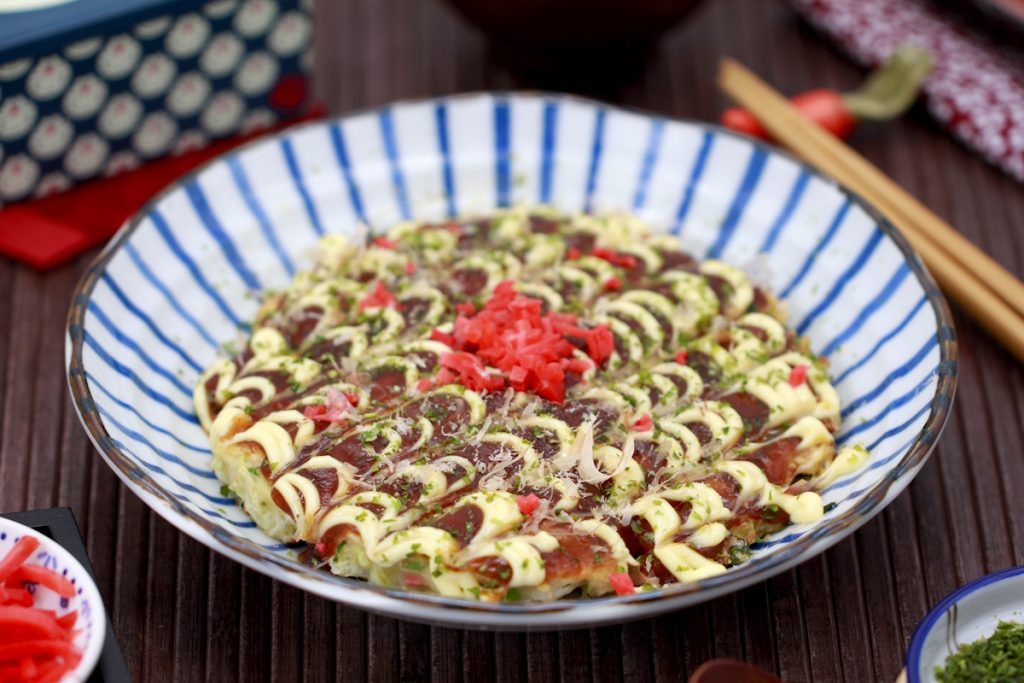
Make the best Okonomiyaki yourself: Basic recipe for Japanese cabbage pancakes, Osaka-style
For me, Okonomiyaki is one of those dishes that instantly puts me in a good mood. A hearty pancake, lots…