Sprache:
Fancy a culinary adventure that transforms your kitchen into the bustling streets of Tokyo? Imagine biting into a crispy bun filled with juicy, savoury fried noodles – that’s Yakisoba Pan, a street food classic that everyone in Japan knows.
It combines the savoury flavour of grilled Yakisoba with the convenience of a sandwich – perfect for on the go or as a highlight on your menu. In just a few simple passages, I’ll show you how to recreate this flavour sensation authentically at home. Are you ready to discover the flavours of Japan in a single bite? Then grab this ticket and read on to find out how to make your own Yakisoba pan with ease!

Have you ever wondered what it would be like if your two favourite dishes – noodles and bread – came together in one delicious snack? The answer from Japan is Yakisoba Pan, a street food classic that can now be enjoyed in the comfort of your own home.
This unique dish has rightly achieved cult status in “Midnight Diner: Tokyo Stories” on Netflix. It combines two cornerstones of Japanese snack culture: carb-rich Yakisoba noodles (im Shop ansehen) and soft, warm bread. But what exactly makes Yakisoba pan so special, and how did this unusual combination come about?
The recipe has its roots in a suggestion made by a resourceful customer at Nozawa-ya in Tokyo to combine both dishes – Koppepan and Yakisoba – into one. The result was a hearty, filling snack that quickly became a favourite with the masses.
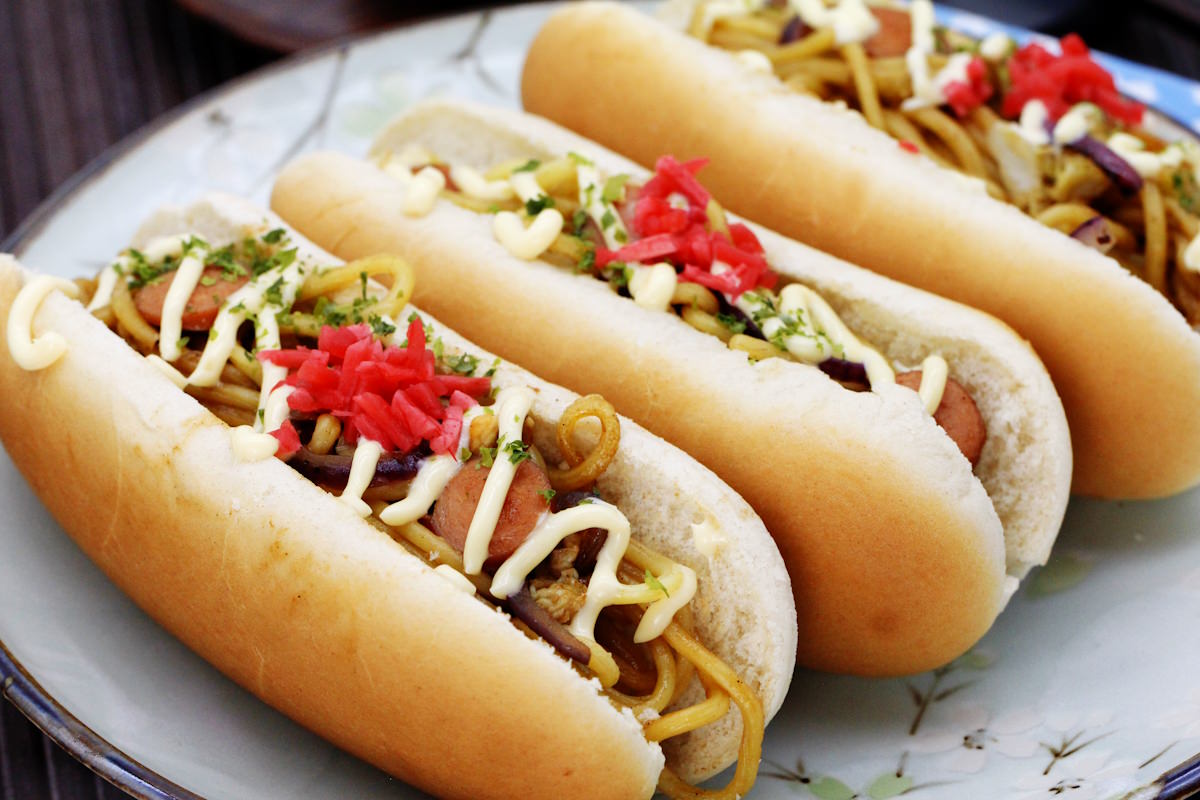
Yakisoba Pan bridges the gap between Eastern and Western cuisine. Hidden inside a soft, buttery bun are savoury, juicy noodles that delight with their Umami-rich flavours. Topped with pickled ginger , mayo (im Shop ansehen) and Aonori (im Shop ansehen), every bite is a feast for the senses. This unexpected combination quickly became a hit and remains a popular snack throughout Japan to this day.
TOP RECOMMENDATION

Yakisoba Kochbox | für japanische Bratnudeln, vegan
6-tlg. Set für 6 Portionen japanische Bratnudeln + Anleitung, perfekt für Einsteiger, vegan. Mit dem Yakisoba Kochset gelingen dir japanische Bratnudeln wie vom Streetfood-Markt ganz…
In stock
From the street to the kitchen
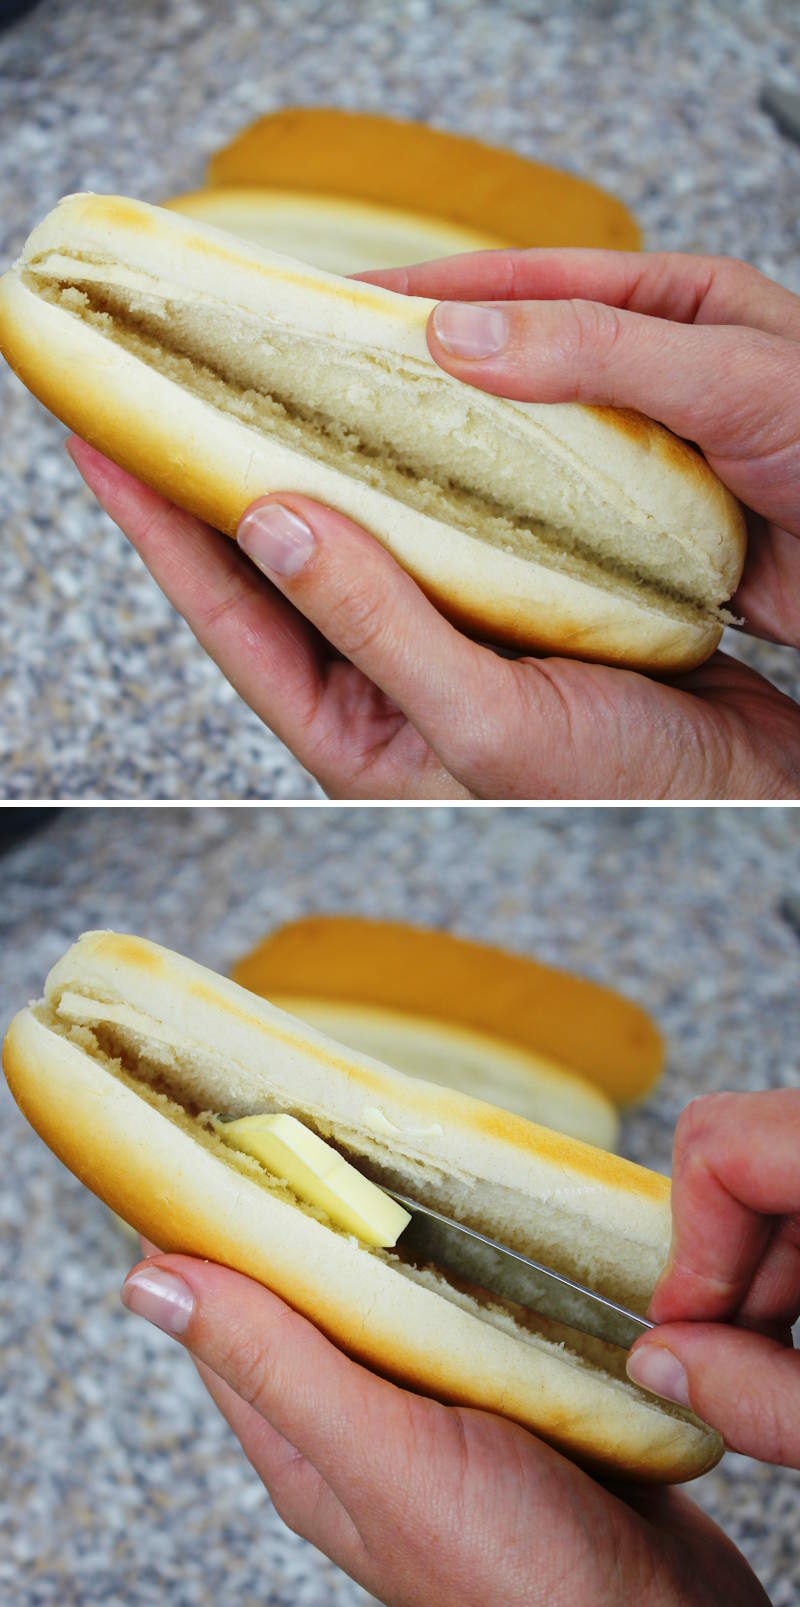
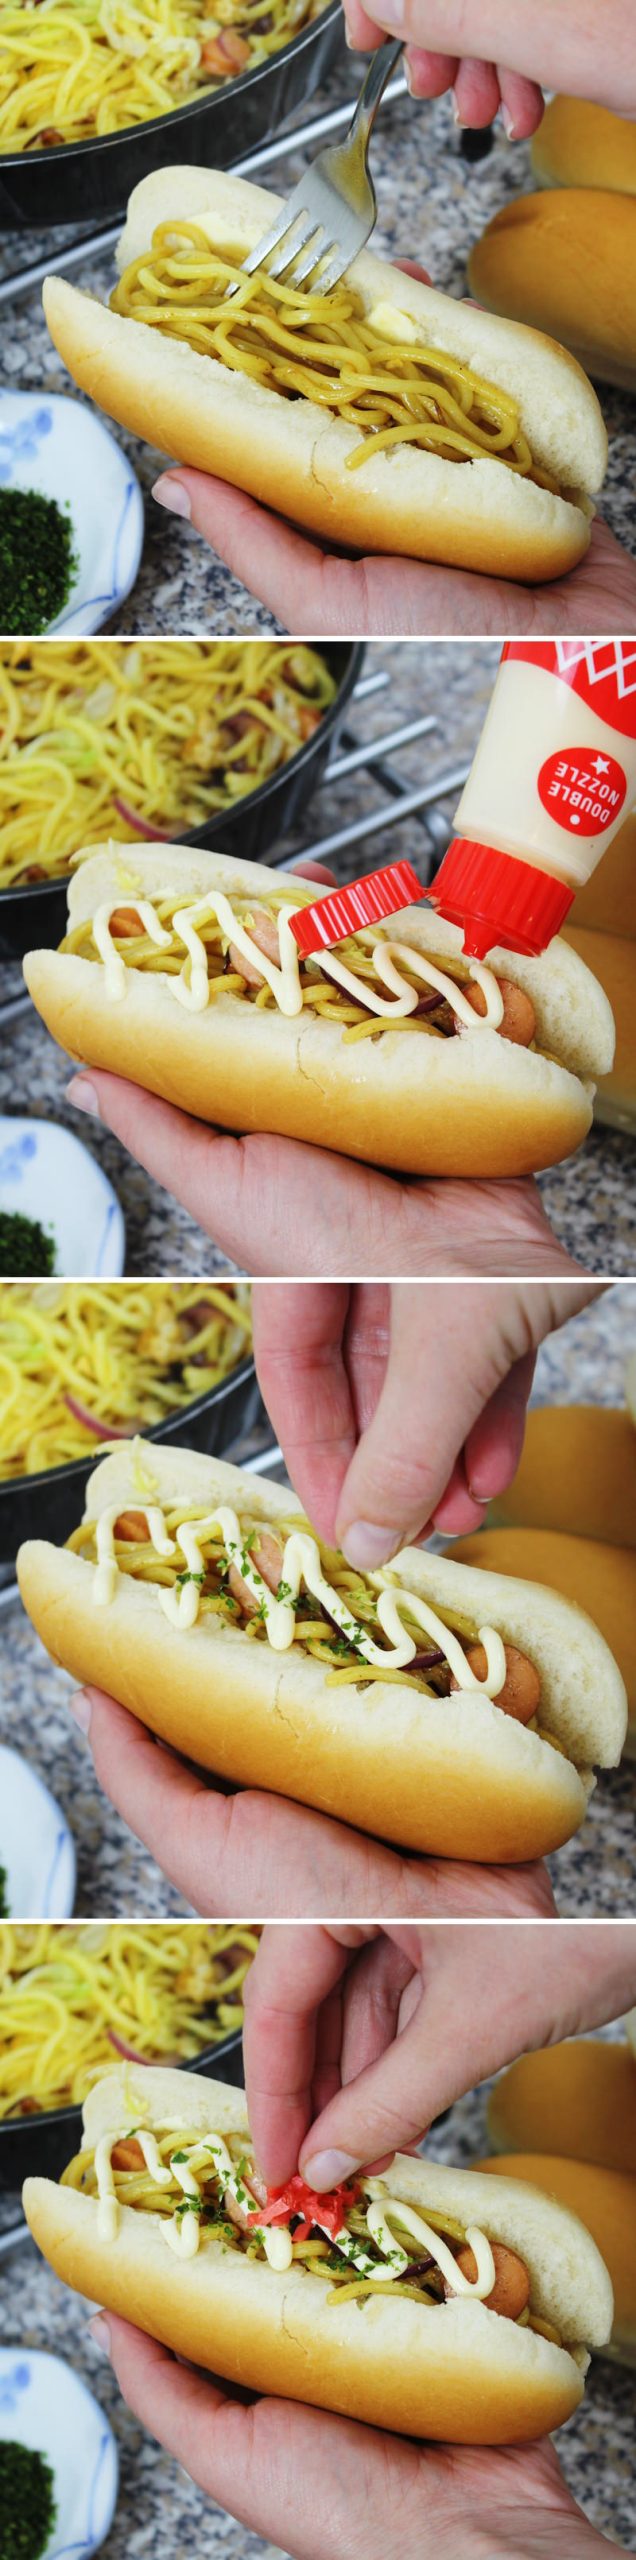
The art of the Yakisoba bun lies in the simplicity of its preparation. A long slit is cut into the bun, then a layer of butter or Japanese mayonnaise is added to absorb the moisture from the noodles. The warm, savoury noodles with Yakisoba sauce (im Shop ansehen) are carefully layered into the roll and garnished with extras such as red pickled ginger and Aonori seaweed or fresh parsley, adding not only flavour but also visual appeal.
The variety of sauces makes every Yakisoba Pan a unique experience. You can choose between thin or thick sauces, as well as different spice blends. Although traditionally only noodles are used to prevent the bun from becoming soggy, you can also opt for a filling of crunchy vegetables and a little meat or Tofu.
Make your own Yakisoba Pan
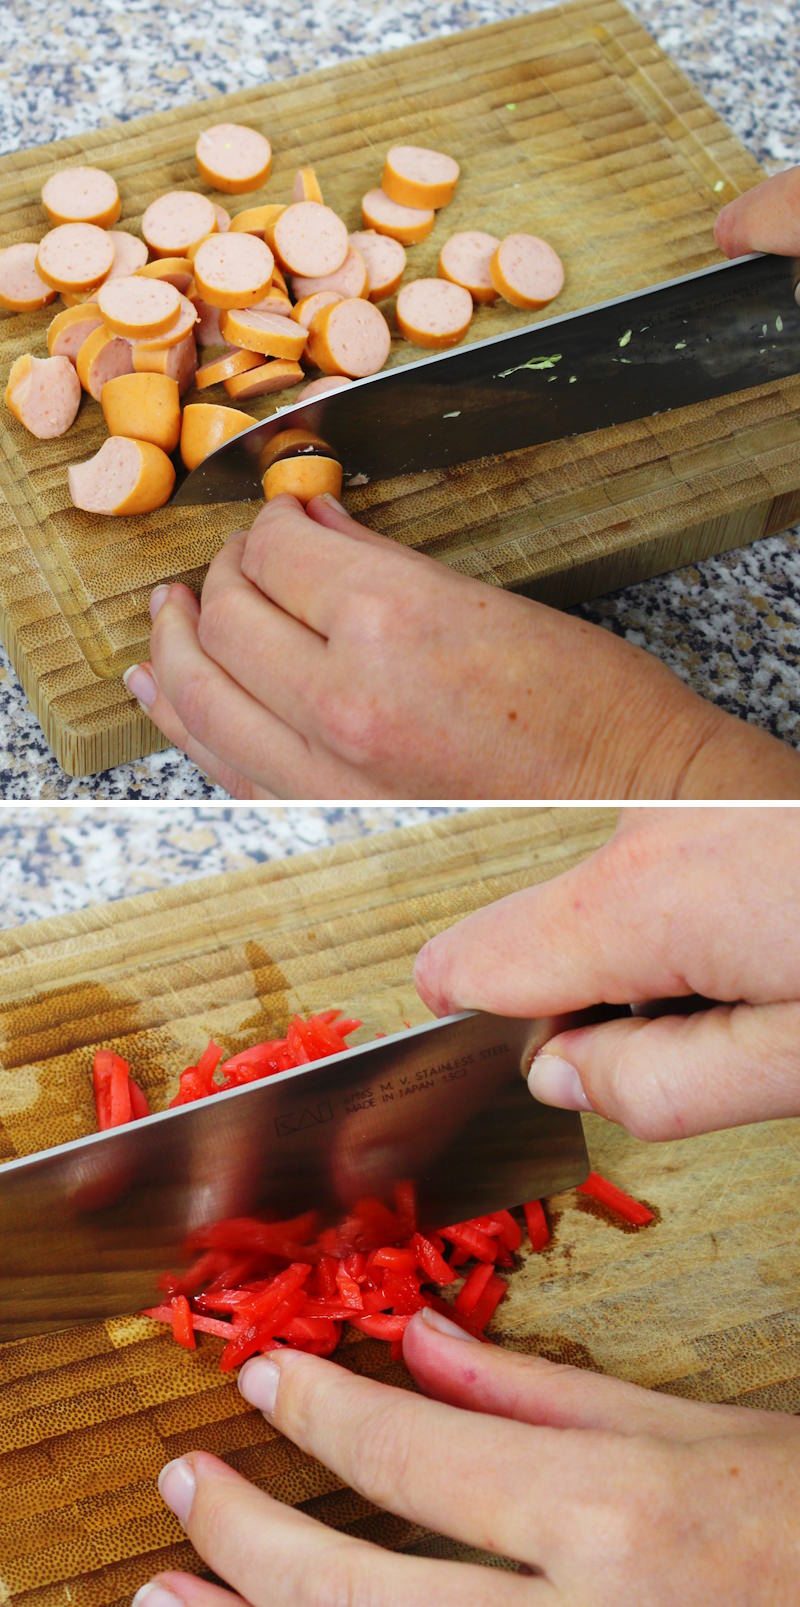
Start with the vegetables: cut the cabbage and onions into strips, then slice the sausages thinly and finely chop the beni shoga. Slice the hot dog buns open and brush them with butter. Pour boiling water over the Yakisoba noodles, leave them to stand, fluff them up and then drain them.
Heat oil in a frying pan, fry the noodles until crispy, and set them aside. Fry the sausage slices, add them to the noodles, and then fry the egg to add to the noodles as well. Sauté the onions and cabbage in the same pan, then add the pasta, sausage and egg mixture and steam everything under a lid.
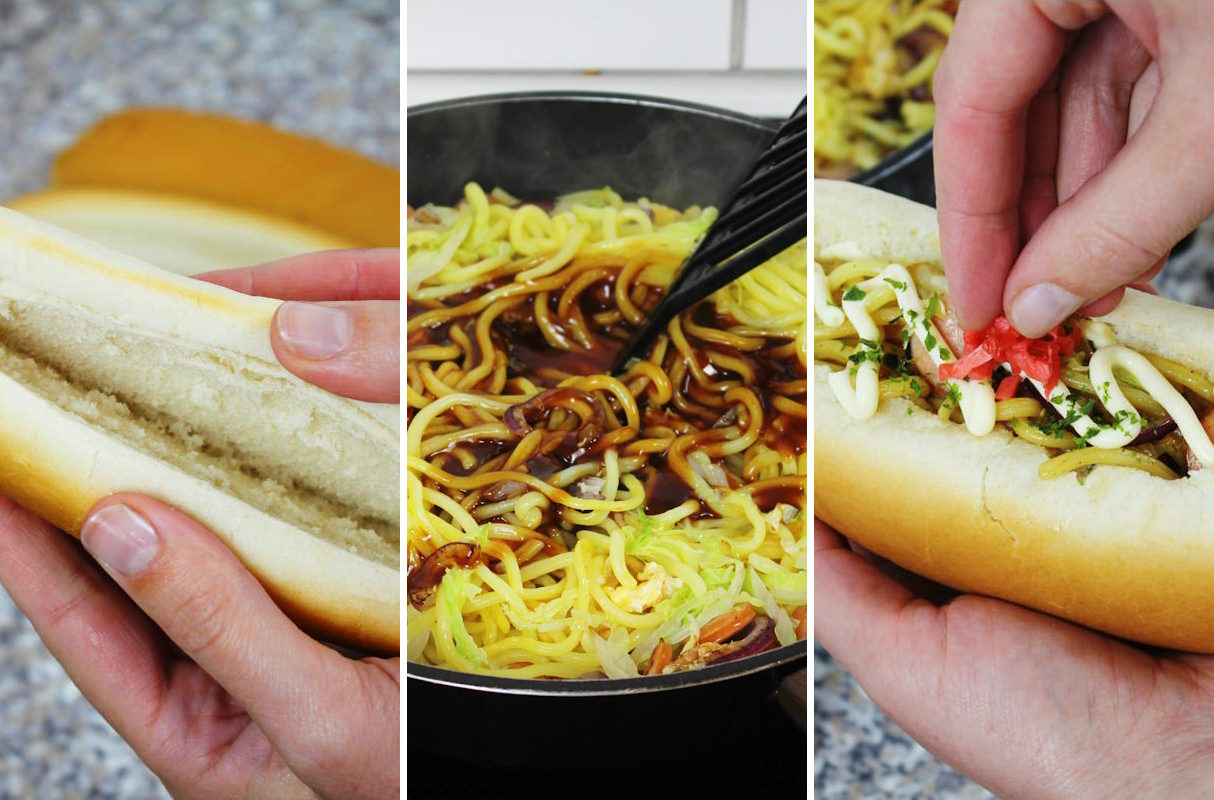
After a few minutes, mix everything together well and spread the Yakisoba sauce over the top. Fill the rolls with the noodle mixture, garnish with mayonnaise, sprinkle with Aonori and top with a dash of beni shoga. Now you can enjoy your homemade Yakisoba pan – Itadakimasu!
Yakisoba Pan isn’t just a snack; it’s a culinary journey that shows how a simple idea can turn into a much-loved dish. With this recipe, you can bring a slice of Japanese food culture into your kitchen and treat yourself and your loved ones to an unforgettable taste experience.
If you have any questions or suggestions, please feel free to use the comments section below the recipe 😊. Have fun and good luck making traditional Japanese Yakisoba pan!
Yakisoba Pan
Serves 4 | 20 minutes | 353 kcal
🖨️ Print PDF 📌 Save this pinFancy a culinary adventure that’ll transform your kitchen into the bustling streets of Tokyo? Meet Yakisoba Pan, a street food classic that everyone in Japan knows. It combines the hearty flavour of grilled yakisoba with the convenience of a sandwich – perfect for on the go or as a highlight on your menu. In just a few simple passages, I’ll show you how to recreate this flavour sensation authentically at home. Are you ready to discover the flavours of Japan in a single bite?
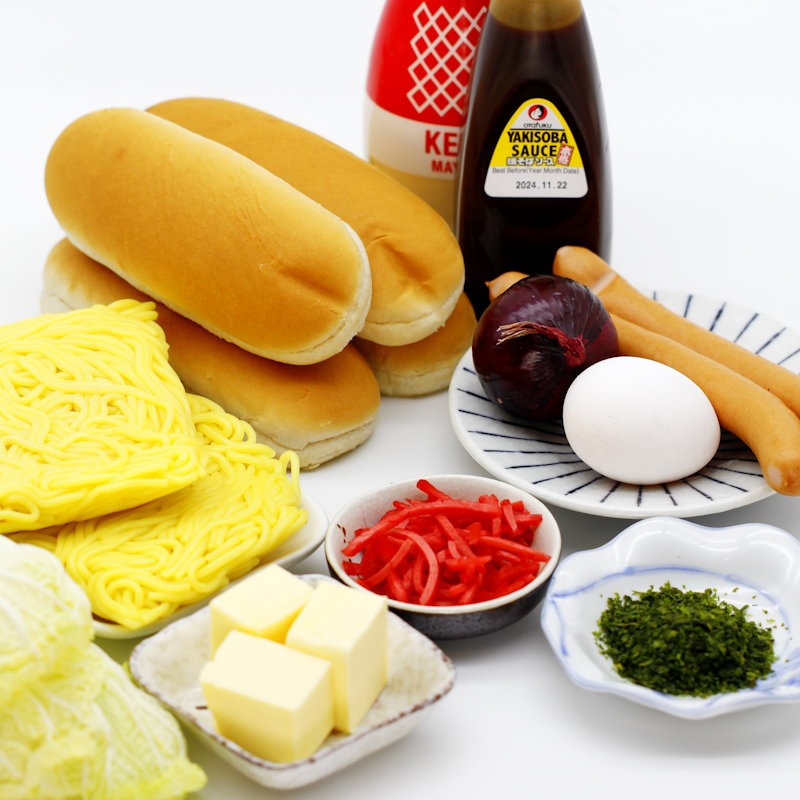
Ingredients (serves 4)
4 hot dog buns
2 portions of Yakisoba noodles (im Shop ansehen)*
2 sausages
1 egg
1 small red onion
4 leaves of cabbage (e.g. Chinese cabbage)
5 tbsp Yakisoba sauce (im Shop ansehen)*
2 tbsp oil (e.g. rapeseed oil)
For the topping:
a little butter
a little mayonnaise (im Shop ansehen) *
a little Aonori (seaweed flakes) (im Shop ansehen)*
a little beni shoga (pickled red ginger) (im Shop ansehen)*
Useful tools:
Japanese Santoku knives (im Shop ansehen)
Teppanyaki tabletop grill (auf Amazon* kaufen)
Preparation (20 minutes)
Step 1
Prepare the ingredients for the homemade Yakisoba Pan.
At the same time, bring 1 liter of water to a boil in a kettle.
passaggio 2. Step
Next, we’ll prepare the vegetables: to do this, separate the cabbage leaves , stack them on top of each other and cut them into strips using a large knife. Peel the onions , cut them in half and slice them into fine half-moons.
Step 3
Then cut the sausages into thin 0.5 cm slices using the large knife. Also, finely chop the Beni Shoga.
Step 4
Also, cut the hot dog buns to about two-thirds of the way through, if necessary, and spread a little butter on either side of the slit.
Step 5
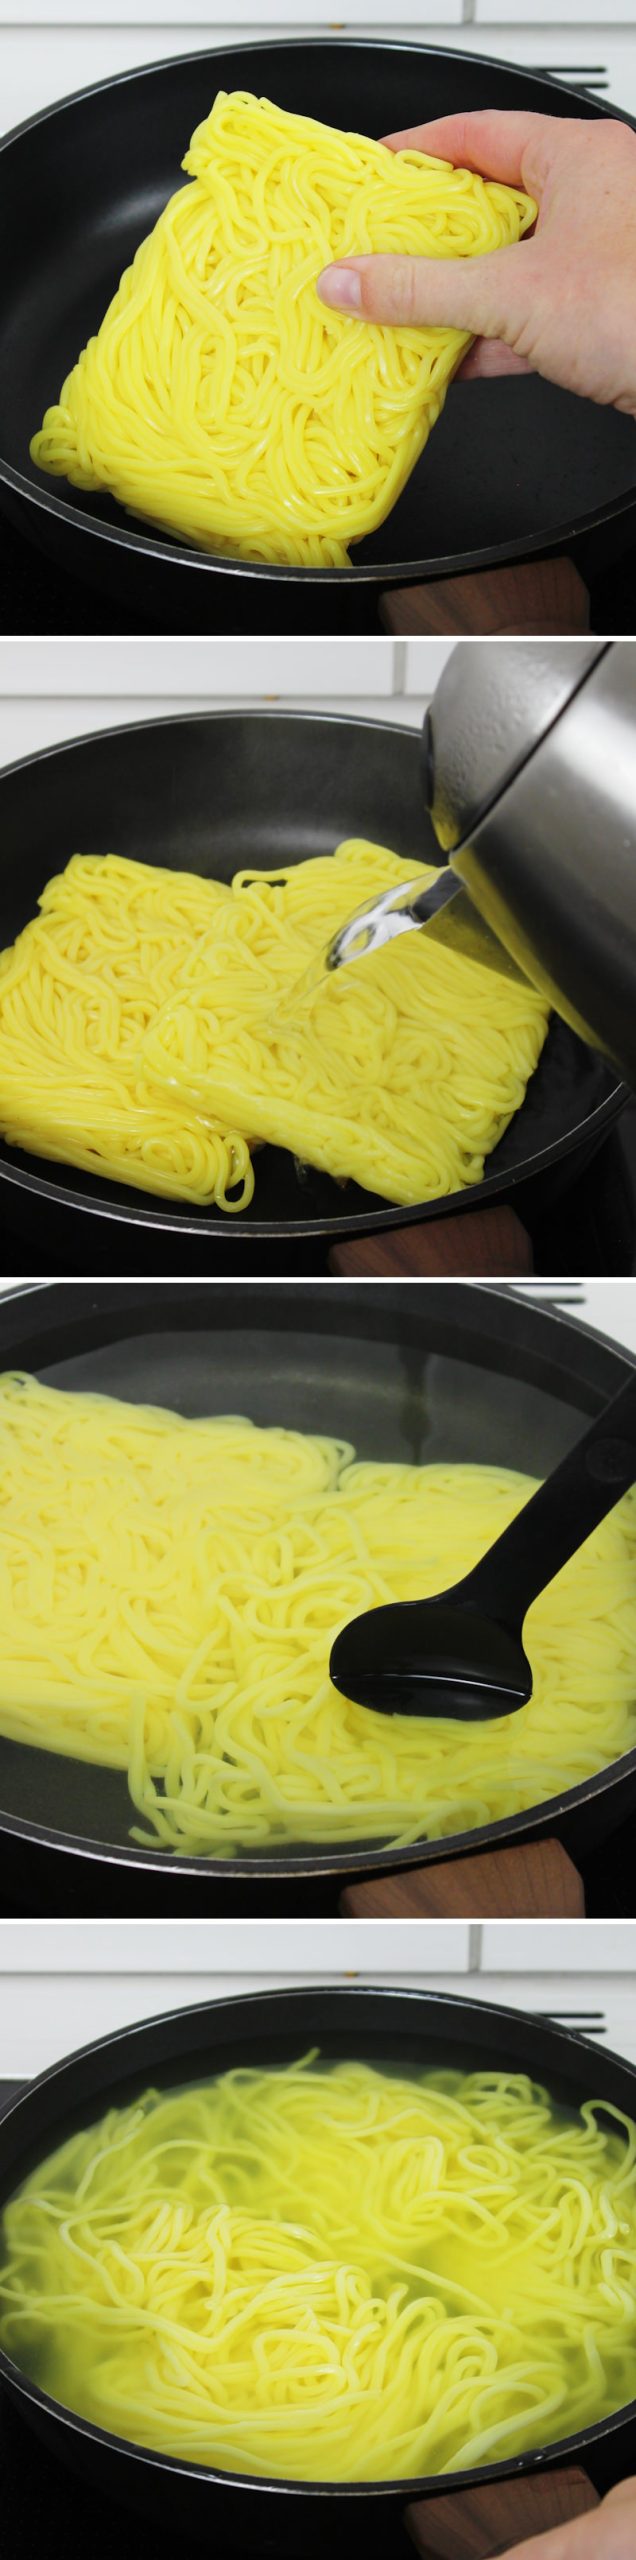
Now add the Yakisoba noodles to a pan and pour the boiling water from step 1 over them, then let them soak for 1 minute. Loosen the noodles slightly and drain through a sieve.
Step 6
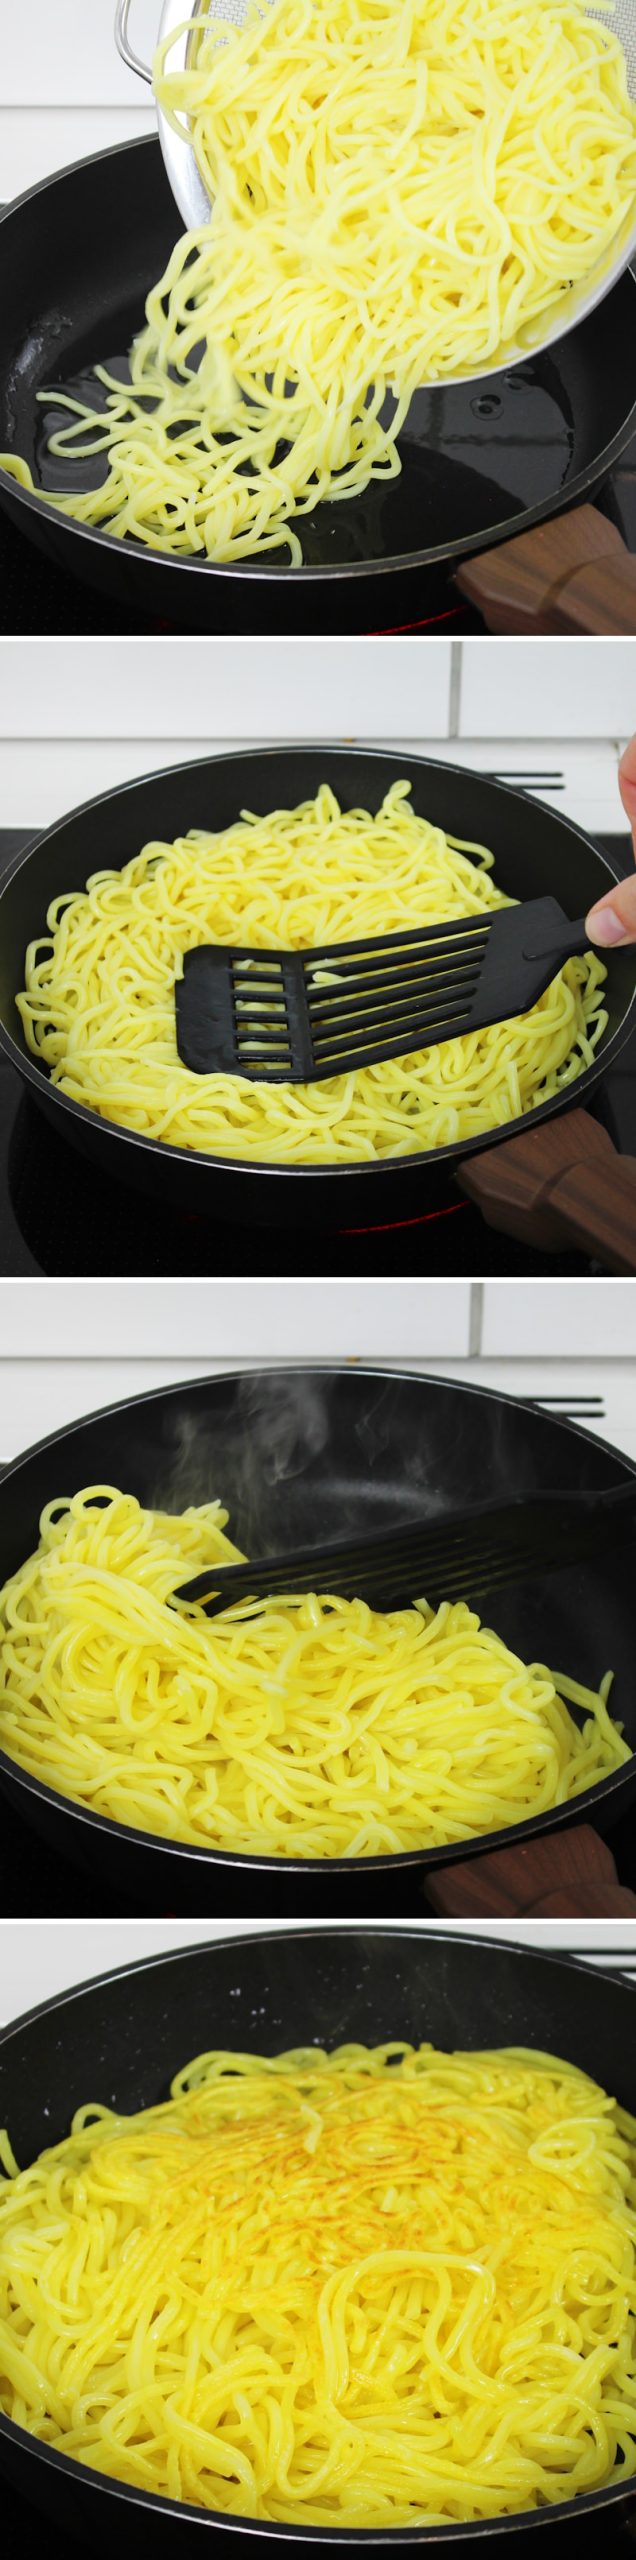
Let the noodles drain briefly. Meanwhile, dry the pan with a cloth and heat the oil </ strong>in it over a high heat. Add the noodles to the pan and press them firmly against the base of the pan with a spatula to brown them over a medium to high heat. After about 2 to 3 minutes, turn the noodles over. After a further 3 minutes, transfer the noodles to a bowl and set aside.

Step 7
Return the frying pan to a medium to high heat and add a little more oil to the pan. Add the sliced sausages and fry them. Once the sausages are cooked, add them to the noodles in the bowl. Then add the egg to the pan, whisk it, stir it through and fry it. Add it to the noodles in the bowl
Step 8
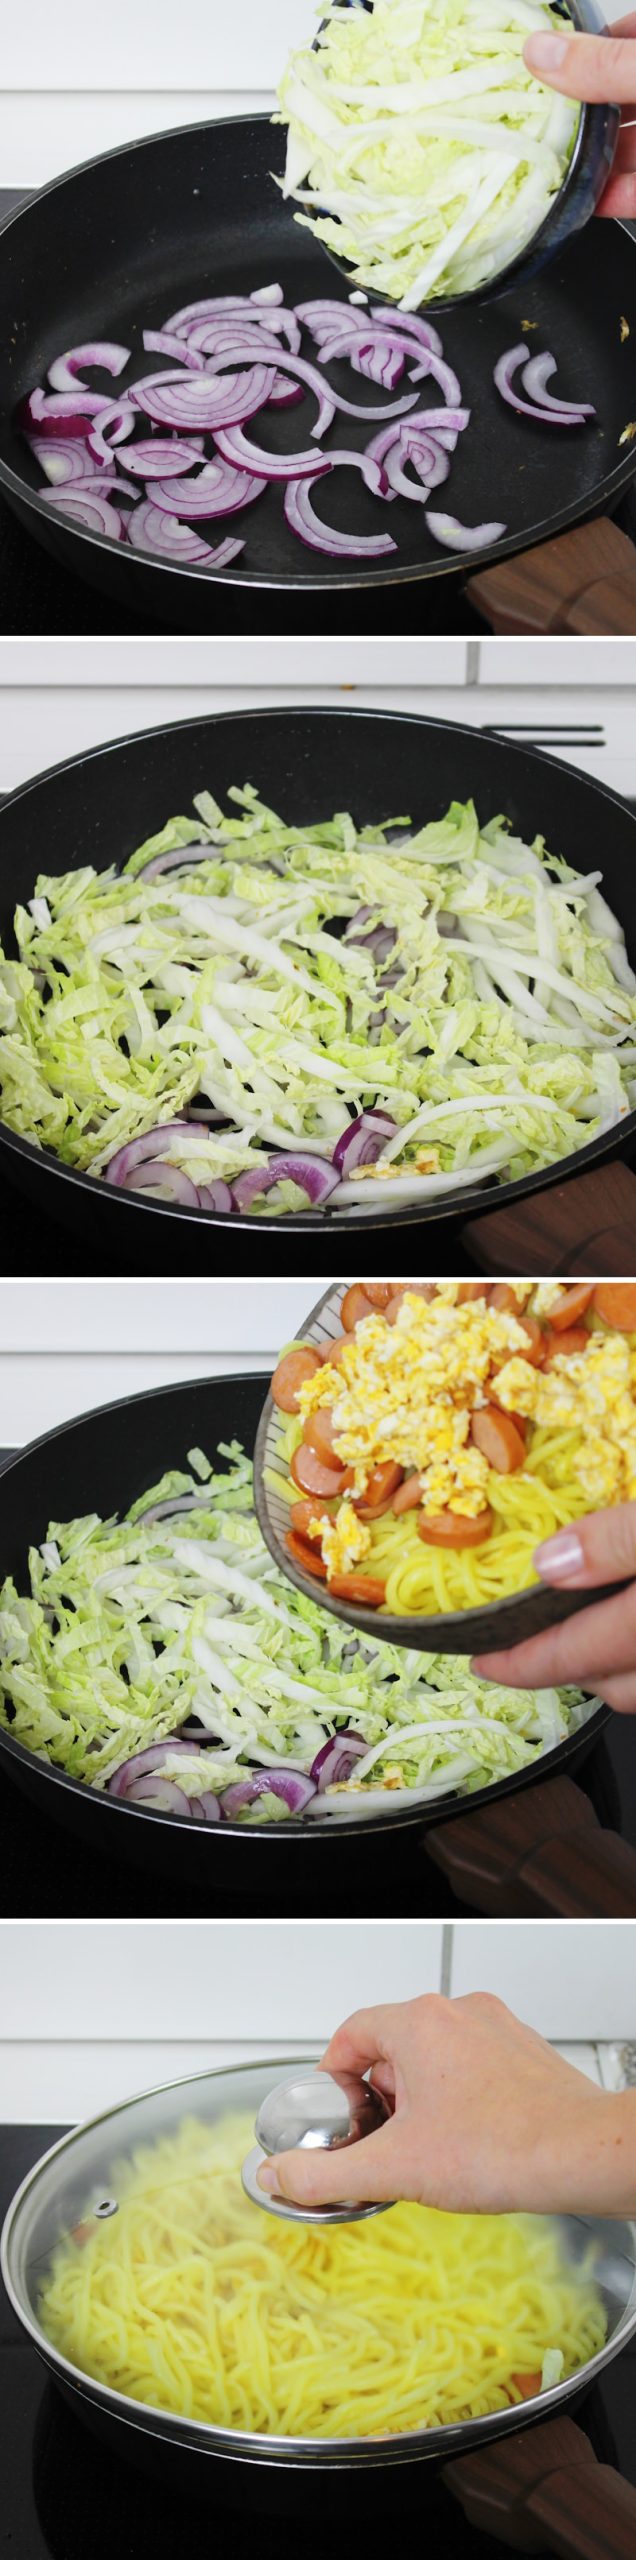
Add the sliced onion and the cabbage to the pan. Place the noodles with sausages and egg on top of the onion and cabbage, and steam-cook with a lid .
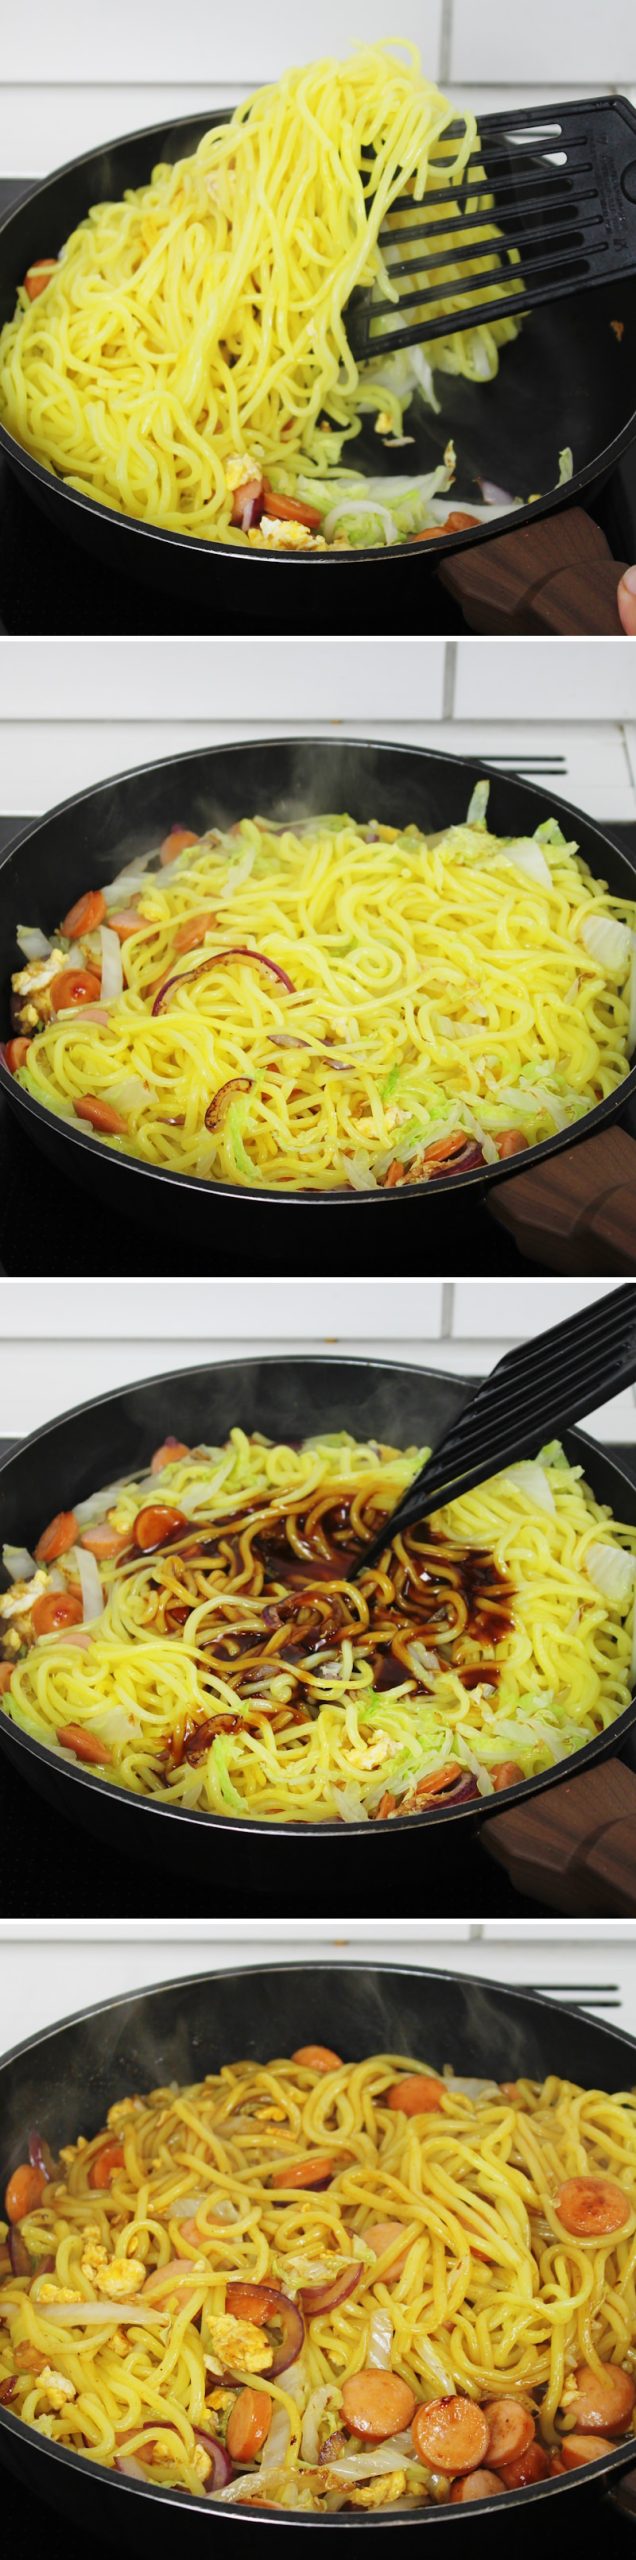
Step 9
After about 2 minutes, when the onion and cabbage are cooked, combine everything (ideally by tossing) and pour the Yakisoba sauce over everything. Cook everything together until the sauce is evenly distributed over all the ingredients. Remove from the heat.
Step 10
Now take one of the hot dog buns and fill the slit with some of the Yakisoba (how much fits in depends on the size of the bun – there may be some left over, but this can easily be reheated later and eaten as classic Yakisoba). To finish, use the topping of mayonnaise , sprinkle with Aonori and then place a little of the chopped beni shoga in the centre. Done – Itadakimasu!
Of course, there are plenty of other dishes that go really well with this recipe for the whole family! Here you’ll find my favourite recipe ideas from Japan:
Butter Mochi (Hawaiian Mochi Cake)
Butter Mochi ist eines dieser Rezepte, die man nur schwer in eine Schublade stecken kann….
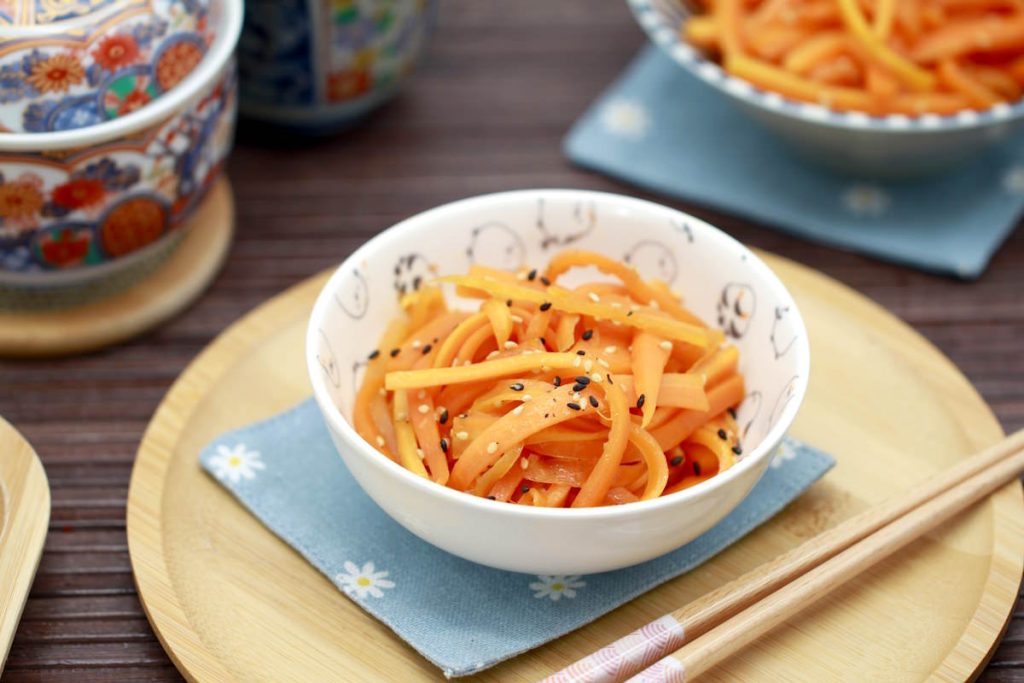
Make your own Ninjin no Kinpira: Japanese carrot side dish in the Kinpira style
Ninjin no Kinpira is a simple Japanese side dish made from finely sliced carrots that…
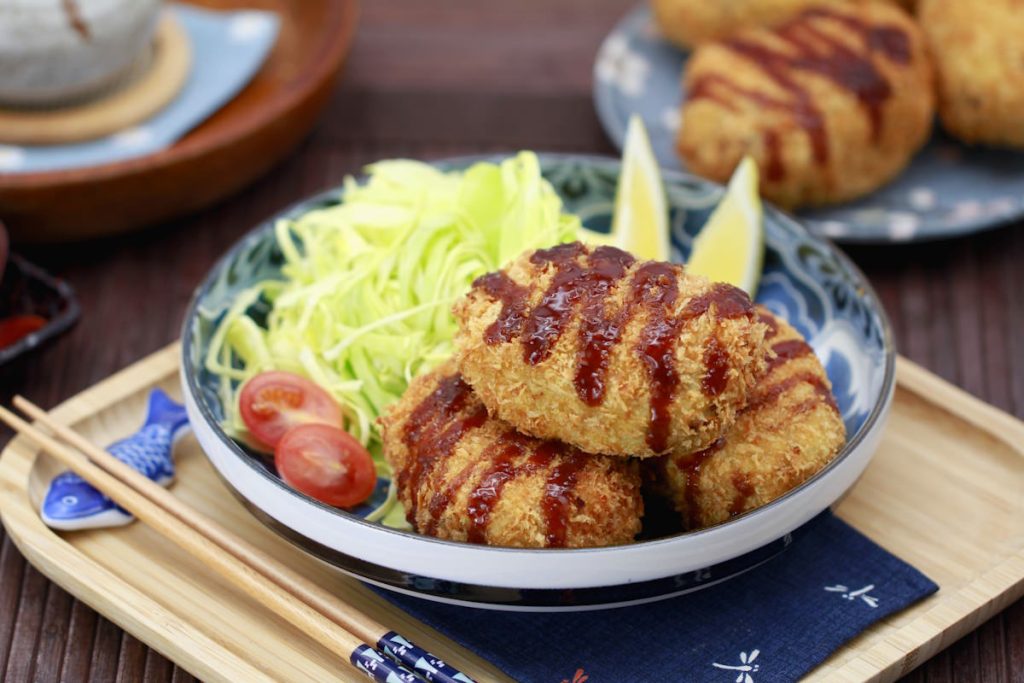
Korokke: Make your own Japanese croquettes | delicious street food from Japan
Korokke are among the best-known everyday fried dishes in Japanese cuisine. They combine simple ingredients…
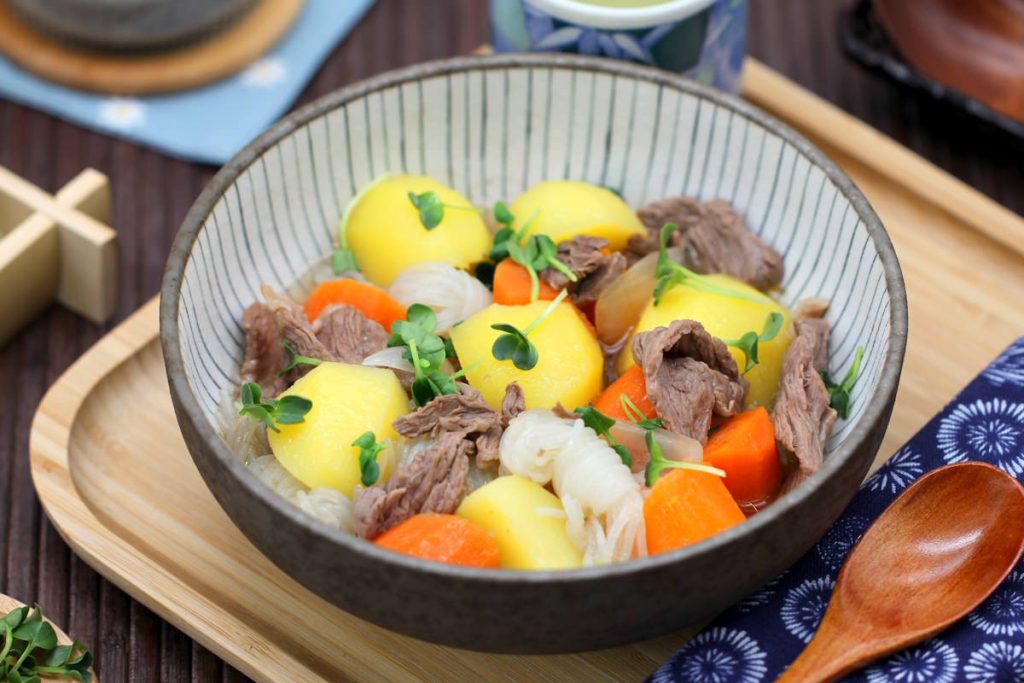
Nikujaga: Japanese potato and beef stew | Recipe for everyday cooking
I ate Nikujaga for the first time at my host family’s house in Fukui. It…

Make your own Omurice: Japanese omelette with ketchup rice & vegetables | delicious Omuraisu
Omuraisu is one of those dishes that brings an instant smile to almost every Japanese…
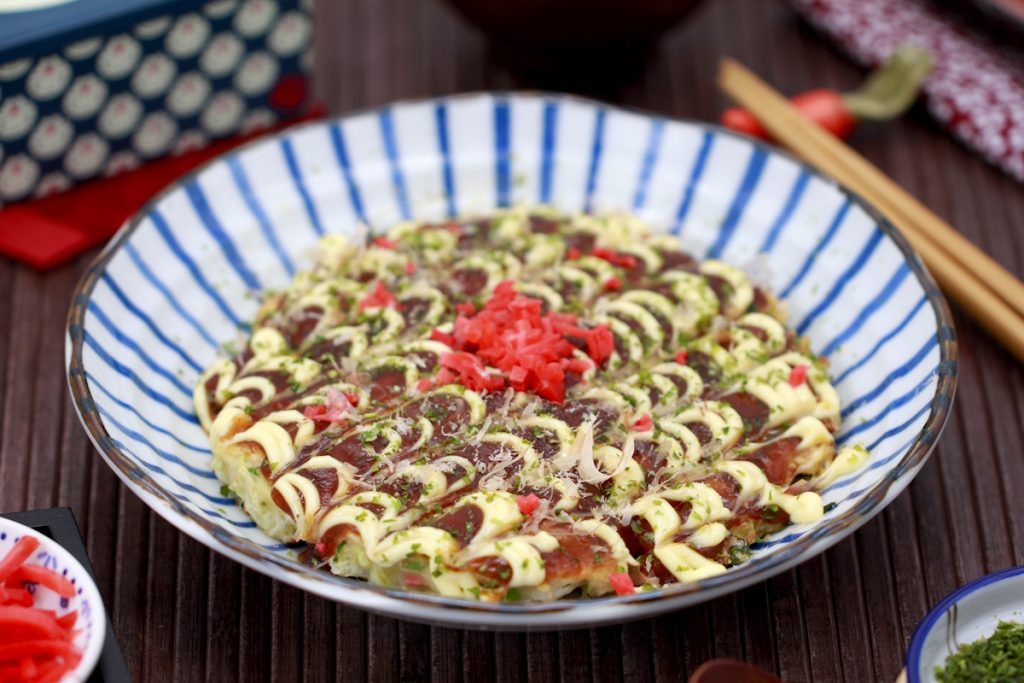
Make the best Okonomiyaki yourself: Basic recipe for Japanese cabbage pancakes, Osaka-style
For me, Okonomiyaki is one of those dishes that instantly puts me in a good…
Have you tried out the recipe? Let me know in the comments – I can’t wait to hear from you!